Jamm Pro Manual
Jamm Pro Quickstart Guide
On first load of the app, Jamm Pro is set to autoload the built in Quantum Trap Set.
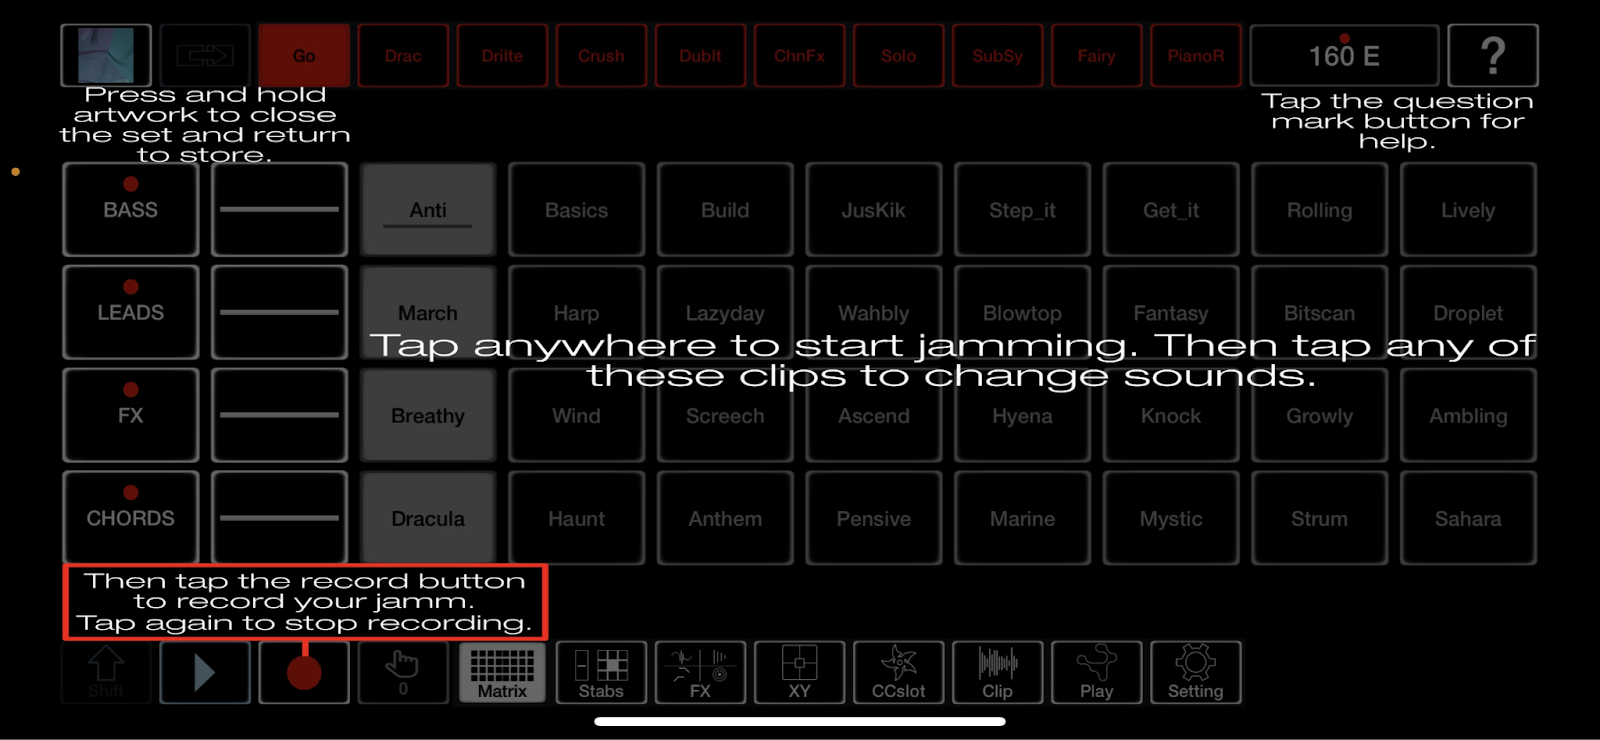
Tap anywhere to start jamming.
On phones, the app always boots into the Loop Matrix screen, the heart of the app.

In Advanced mode, the default on large screen devices is the Play screen, which has all the functions.
This can still be accessed in Basic Mode. (Toggle between the two in the settings)
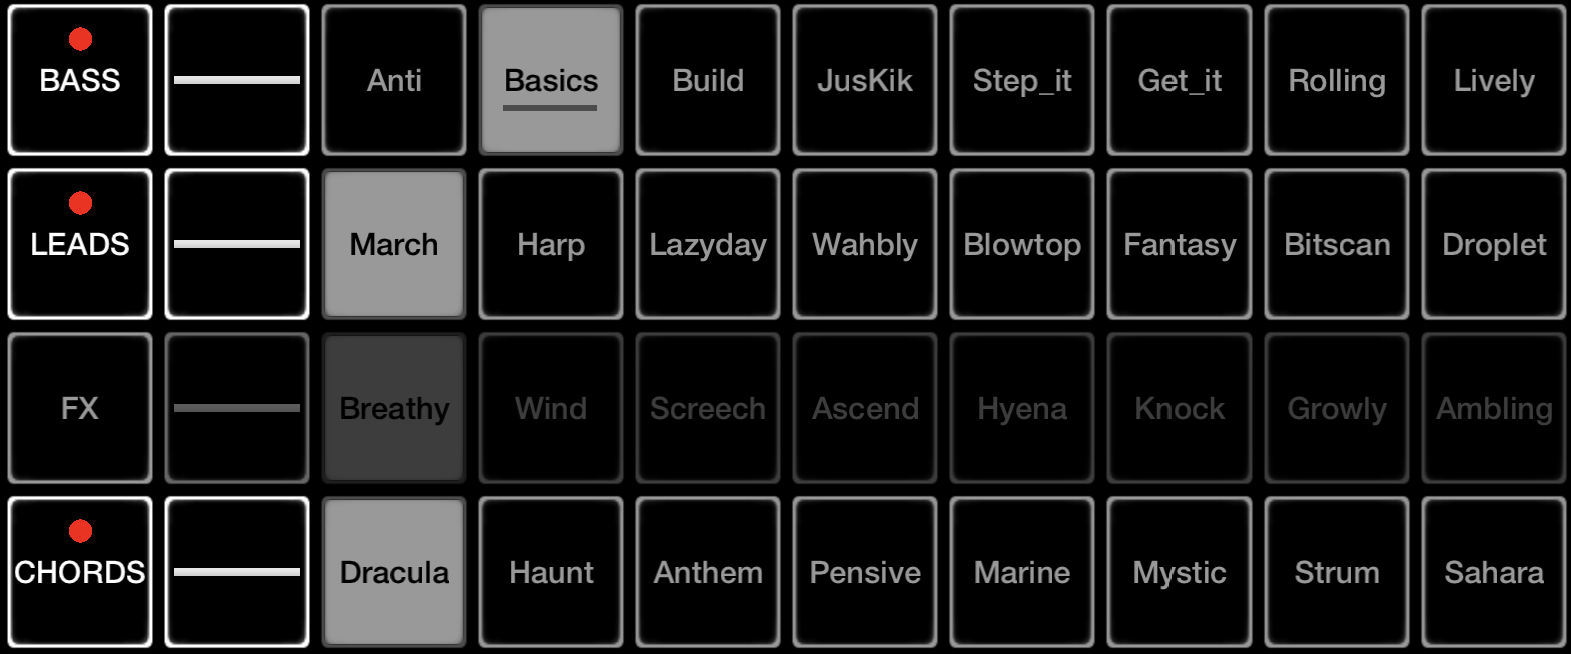
The clip matrix works as follows:
4 channels each of 8 clips. Swap instantly between clips by tapping them. Hold down a clip then move your finger gradually up/down left / right for ‘Drillter’ effect. Mute channels with channel name buttons on left.
Get instant Help, toggled from ? Icon top right.


Tap BPM top right to bring up BPM slider. Tap to hide.
Buttons at bottom select other screens like this XY 2 finger multi FX…touch and move the Square and Circle for freaky fx.

The XY routes each of the 4 channels into its functions. So do the Channel FX and CCslot screens. Think of each channel as continuing horizontally into these screens.

Explore the other screens like Stabs, CCslots, and Channel FX via their screen buttons at the bottom.
Tap a red patch slot at the top to recall saved combinations of clips and fx.
(Long tap one to save your own ) As all settings are saved this is well handy to capture ideas and killer combos.
Tap Record Button bottom left to Record your Jamm. Tap to stop Recording and export it.
Finally the Play screen has ALL functions available at same time, wicked on IPad but can work on Phone.
We delivered next generational beatnological manipulation😃
You know who you are.
Jamm on.
Matt Black and the Coldcut Crew, Ninja Tune
Intro
This is a journey into Sound....for Ninja Tune founders Coldcut it’s been a 30 year trip: equal parts dreaming, scheming, designing, remixing, djing, producing, gigging and Jamming. The aim of Jamm Pro: to create our ultimate electronic music instrument and share it. Welcome to the journey!
In-app Help
The Jamm Pro app contains in-app Help for all the main screens and functions, toggled on/off from the Question Mark icon in the top right. Controls can still be operated when Help is on. So, you might not need this manual :)
Check out our Discord group for the Jammers community also the Audiobus Jamm Pro Group
The Store
The app boots up into the Store which contains your selection of available /existing Sets i.e. collections of audio clips and patches. In Jamm, bits of audio may be called clips or samples, they are equivalent. The Store is where you decide which Set to load. It also allows the creation of new User Sets, purchase of Sets, deletion of Sets.
It also has the Store menu with online links to Manual and Socials.

Sets
Sets have artwork, artist, title, bpm and root key shown. Sets for purchase have a Trolley icon. Sets that have been purchased or are free, are available for download indicated by a Download arrow.

Delete Set
Touch and keep holding down on a Set to bring up an option to delete it. (That action is called a ‘long hold’ by Apple, we will just say ‘hold down’ in Jamm parlance)
Download Set
When you press the Download button to download a Set, the message ‘Downloading…’ is displayed and a download progress indicator is shown. Then a message ‘Installing’ is displayed. After installation, the Set should be visible in the Store. Select Sort by: Recent and it should be the first one at the top.
For already downloaded Sets the Download arrow and the Trolley icons are naturally not shown.
Tap a Set to show the Set Detail screen where you play, view, purchase, download, and edit the info of a Set
Set Detail
When you tap a Set in the Store, the app shows its Set Detail. Sets for Purchase or to be Downloaded indicate that.
Already downloaded Sets have a Play arrow button in the middle of the artwork - tap to load that Set.

Edit Set info
To edit a Sets info, tap on a field: Artist, Title, BPM, Key, Notes, Channel names, Tags, Artwork
Store Sets are able to be edited, but be aware that some descriptions exceed the built in character limit, editing those will truncate them. If you want to create custom versions of these sets for personal usage, it is recommended that you save a copy and leave the original intact. If you overwrite the original, you’ll have to redownload it from the Store Server.
Artist , Title , Notes
Creator info fields, notes are limited to 128 characters.
Type:
SoundSet (Use to make your own songs) or TuneSet (copyright protected, based on existing works by guest artists, the details and artwork are fixed, please read the Terms and Conditions for usage of Tune Sets.
BPM, Key
BPM and Key
Key is the root note C, C#…. Flats are not used.

Channels
The names of the 4 main Channels in a Set. Maximum length is 6 characters.
Tags
Lets you define tags for a Set you create. Tap the Tags button to select up to 4 from the list. NB no genre list can ever be perfect :)
Artwork
double tap to choose an Artwork for the Set from your Photos library on the device. Max recommended size is 2000x2000 pixels (GPU limitations cause variance, newer devices can do higher res).
Preview
Link to a video demonstrating the Set. (not editable for User sets, will default to Jamm generic demo).
Play Set
For available (ie downloaded and created Sets) tap the circular Play icon in the centre to load the Set and get ready to Jamm! On Play Set, a progress indicator shows the loading status, giving you a look at the artwork, and then the Main Jamm Interface appears.
Delete Set
Hold on a Sets artwork to delete it; rarely a Set might get corrupted or incompletely downloaded - deleting it and then re-downloading usually fixes this.
Create new Set
In order to start a New Set, you must have purchased the ”Jamm Creator” pack
Tap the New Set sleeve ( with a + Icon) to start a new Set into which you can load/record your own clips. The Set Detail view opens where you can name the Set and its Title etc by tapping the relevant field, and make Notes for it.. Notes are limited to 128 characters. The 4 main channels for the Set can be named here by tapping them. If later it is required to rename the channels or alter other fields from within the Play environment , use File/Edit to return to the Set Detail page.
Here is is a doc with more info on making your own sets
NB It is highly recommended to keep a copy of Sets you create off your device, e.g. on your main computer or on cloud storage. You can export Sets using the Export function within the main app File menu. On iOS and android you can conveniently see the share menu appear when you export a set, allowing you to offload it to any cloud storage destination. On iOS; AirDrop is a quick way to transfer files to other Apple devices, you can even go into the Jamm Pro/Packs folder on the files app and copy extracted packs from there.
Set View/Filter options
The top of the Store shows various options for Sorting and Filtering the Stores contents to help you locate the Sets you want.
Also there is the ViewMode toggle which gives different views of the Store content.


Sort by: Recent/Artist/Title/BPM/Free
Sort By orders the Sets in the Store according to the Sort By option e.g. if BPM is selected, the Sets will be shown in ascending BPM order.

Sets: All/User/Store
This filter displays Sets according to their Origination. User Sets are created by Users. Store Sets have been provided to users in the Store either free or as a purchase. These have been created by our team of content providers, producers and users.

NB Please see Terms of Use of Sets.
Tags
Sets are tagged to indicate their genres. Each Set can have 4 Tags drawn from a pool of 30, like Techno, Ambient, Dub, etc. To find Sets in genres you want, tap the Tag menu to select the relevant genres. On closing the Tag menu, the selected Tags are listed in the Tag field, and the Store will filter the available Sets to show only those which contain the selected Tags.

Store Menu
From the Store Menu (3 horizontal lines icon, top left of Store) you can access the Manual and Social Media feeds for Jamm. Currently we are using the Ninja Jamm SM sites as these already have a community of users.
On re-installing Jamm, or installing it on a new device, use Restore Purchases to get any Sets you have already purchased. (For iPadOS users who purchased Jamm Pro prior to V1.5, you may need to do this on a new device to restore full functionality).
Refresh
The top right circular arrow icon refreshes the Store view. If after installing or transferring sets they are not visible, Refresh!
Import Sets
When you want to restore an Exported Set, swap devices, or perhaps trade custom Jamm Pro Sets with your friends, we have a system in place to enable this, the core procedure works the same on both platforms.
Please note, that due to idiosyncrasies involved with Zip creation, we don’t recommend trying to extract and recompress Zip files made in Jamm Pro, it can break things. For a full multi-platform guide on Set backup and migration please check the guide at the end of the manual.
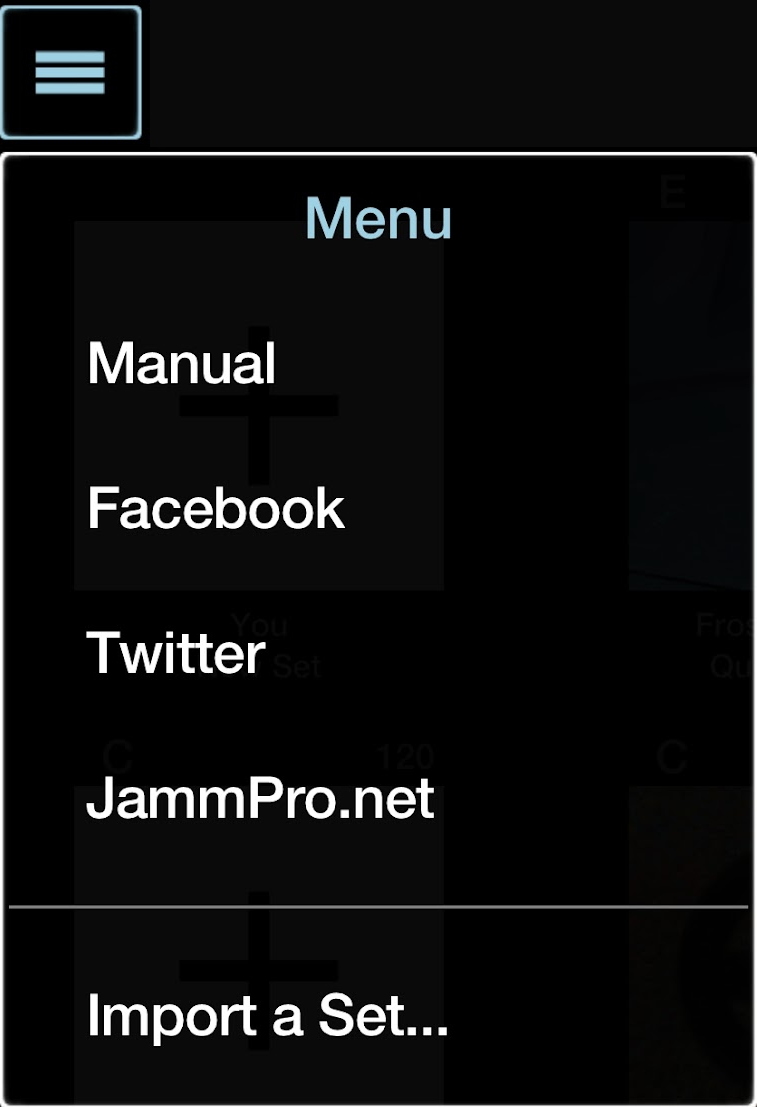
Tap the ☰ and bring up the store menu.
Import a Set.
On Android
The default file manager will open, usually in the last location accessed. Slide in from the left to access your storage directories.
Here you can find links to Google Drive, Dropbox, Onedrive etc if you have those services installed.
Find the location where your Set in Zip form (as it was exported from Jamm Pro) tap the zip to load. You’ll be returned to the store, and a message will appear at the bottom left, “unzipping pack…” you may have to wait a moment for it to download the file if you’ve chosen a cloud storage service, when it’s done, the store will refresh with your pack at the top of the list.
On iOS
The default file manager will open, usually in the last location accessed. Slide in from the left to access your storage directories.
Here you can find links to Google Drive, Dropbox, Onedrive etc if you have those services installed.
Find the location where your Set in Zip form (as it was exported from Jamm Pro) tap the zip to load. You’ll be returned to the store, and a message will appear at the bottom left, “unzipping pack…” you may have to wait a moment for it to download the file if you’ve chosen a cloud storage service, Google Drive can be particularly slow on iOS. When it’s done, the Store will refresh and your imported set will be at the top of the list.
If you want the most reliable import experience, download your zip to the local storage.first. See File Management Guide.
Please don’t copy Sets for other people
Store Sets are provided to users to use as a basis for freely creating their own Jamms and tunes. Please do not distribute these Sets to other people: they are provided to you as a purchaser of Jamm for your use and represent a Labour of love by the Jamm team of producers who have generously shared their DNA. See the full Terms and Conditions for more info on the usage agreement. Basically we want you to be free to Jamm but please respect the independent cooperative ethos.
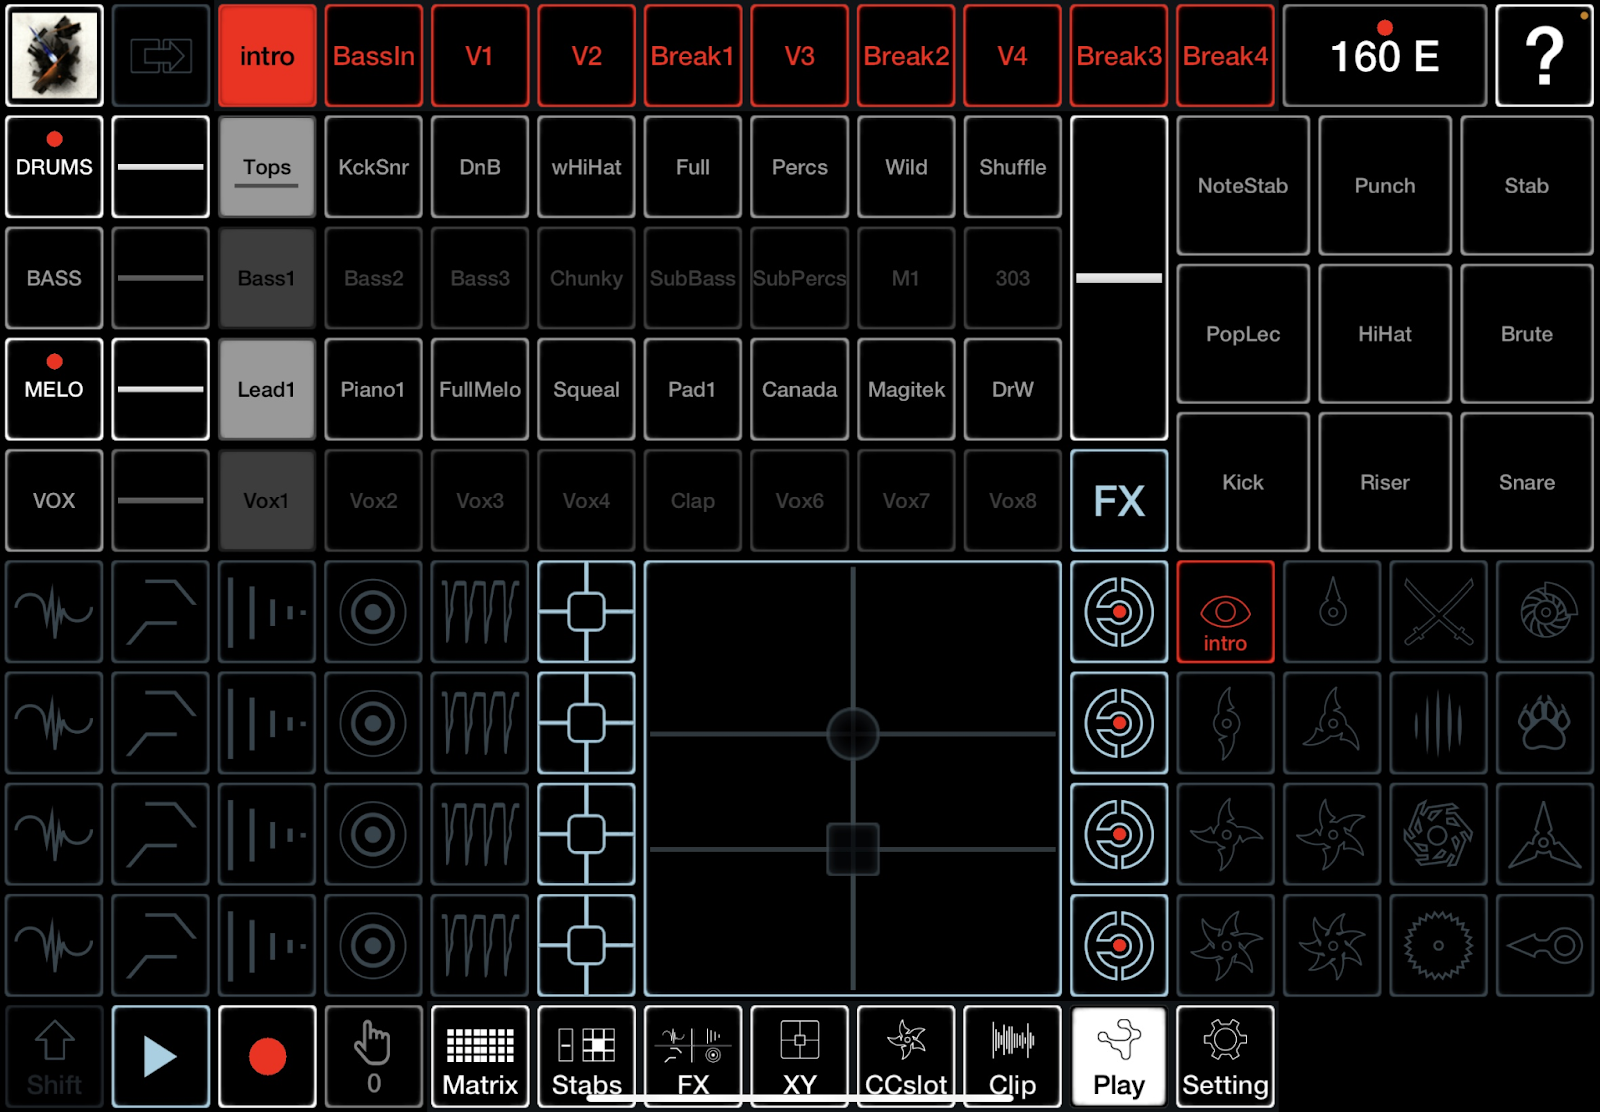
Main Jamm Interface
The Main Jamm Interface contains a set of Global Controls which are present on all screens, including the Screen Selectors at the bottom. The Screen Selectors select between the main Screens and Modules which offer different functions of which the Play Screen is the most important.
This manual is an addition to the comprehensive In-App Help available for any screen from the top right Help icon. Use this Help first which has a description of every control in the app. The manual is more in the nature of overviews of the different modules and functions.
Global Controls
Help
Toggle Help on/off from Help icon top right (A big Question Mark on the top right). Controls can still be operated when Help is on.
Shift
Hold Shift to access additional functions. ↑
Transport
Play/Pause
On pressing Play , Jamm Pro will start playback immediately. If Ableton Link is on, this will be linked to the current bar position of the Link clock so a delay of up to a bar can occur before playback starts.
Shift + Play
Deck Stop effect. (Speed of Deck Stop slowdown is set by Friction Slider in Master screen).
Record
Record has 2 modes: Recording Out and Sampling In. Swapping between the 2 modes and Settings for both are selected in the Mode screen. More info in the Record Mode Screen part of the manual.
Recording Out mode shows a circular Red button icon -for mixdown, stems and also resampling.
Sampling Mode shows a Red Microphone icon- for direct recording into the app sample slots from any audio input: mic, IAA*, soundcard.
* IAA (Inter-App-Audio) is exclusive to the iOS platform.
Sampling Mode requires the “Jamm Creator” Pack to be purchased.
Hold Shift + Mode to switch between the two without having to jump to the recording page.
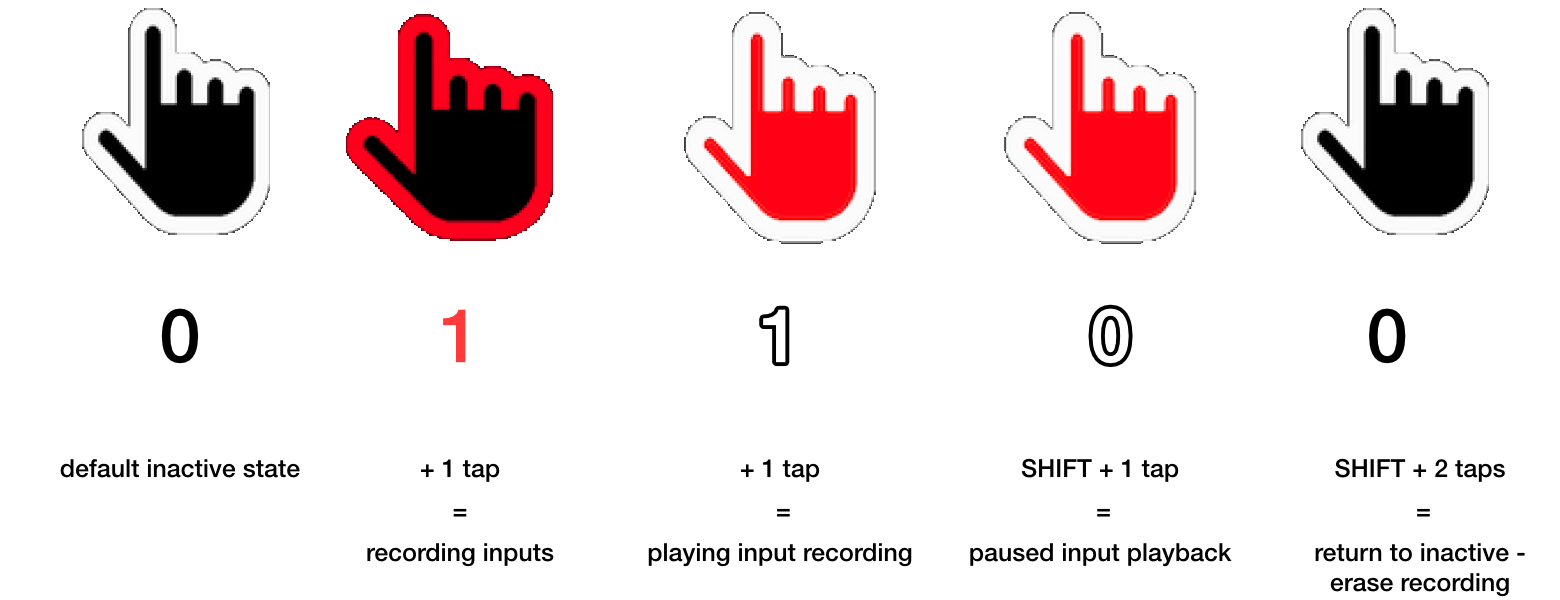
Action Sequencer
Records up to 16 bars of user actions:
Tap once to activate Action Sequence recording
Tap again to close the Action Sequencer loop at the end of the next bar , typically then giving a 1, 2, 4, or 8 bar Action Sequence loop, and return to bar 0, from here you can add new actions in an “overdub” mode.
Once you have the Action Sequence loop made, you can single tap to move to “playback mode” where no new actions will be recorded.
This needs attention: in playback mode playback clip and channel mute changes will be overridden by the Action Sequence as it plays back, but can be good for extra stabs and effects. If u need to change clips and channel mutes, tap again to drop back into Overdub mode, dropping out again if you want to preserve any of the Sequence previously recorded, else it will be overwritten.
Also, preset recall cannot be done whilst an Action Sequence is playing back.
Double Tap the Action Sequencer icon to pause Sequence playback and return to bar 0. In this mode presets CAN be recalled, and then another Double Tap can restart Action Sequence playback.
Shift + One Tap on the Action Sequencer icon PAUSES playback indicated by an active Red icon but bar 0.
Shift + Double Tap resets the Action Sequencer entirely, a clean slate.
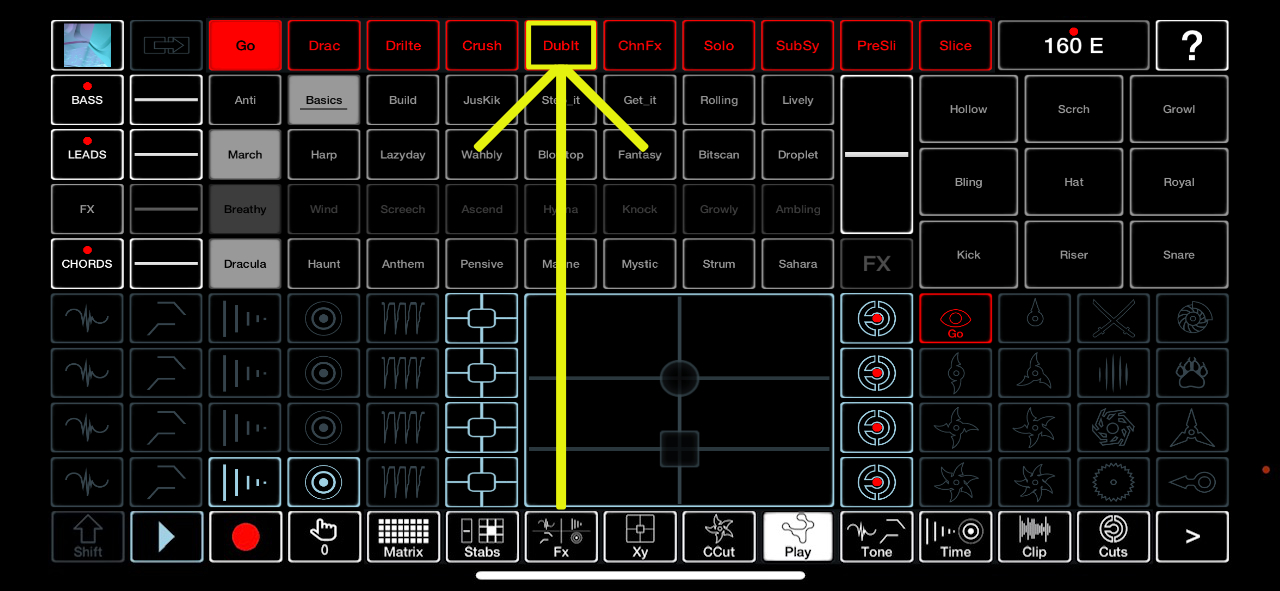
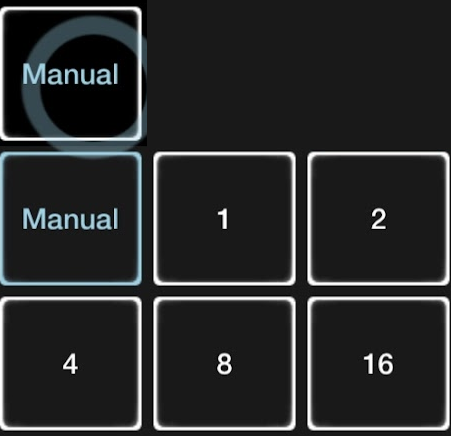
Patch Selectors
Jamm has 64 Patch selectors at the top of the screen for saving combinations of clips and effects you like.
By default they are called A, B, C...swipe horizontally on the displayed 8 patches to access the next bank of patches. If you swipe the patches to Z you will see a selection of ‘Factory patches’: these are complex patches you can examine and use. See Recall Patch FX settings only , below.

Recall Patch
Tap a Patch to recall it. Recall happens at the start of the next bar.
NB Patch recall is resource heavy. It's best done in the main Jamm screen to avoid glitches.
Recall Patch FX settings only
Double tap a Patch to recall FX settings only - this is a very useful function which means we can build general purpose patches which can work with any combination of clips. Say you have a sweet combination of clips playing and you want to apply a patch you know has some great FX and ColdCutter settings to that clip combination. Tapping the patch to recall it would also recall the clips that were playing when the patch was saved, supplanting the ones you have playing. Instead, use Double tap to recall all the Patch settings EXCEPT the playing clips and thus apply the Patch to your currently playing clips.
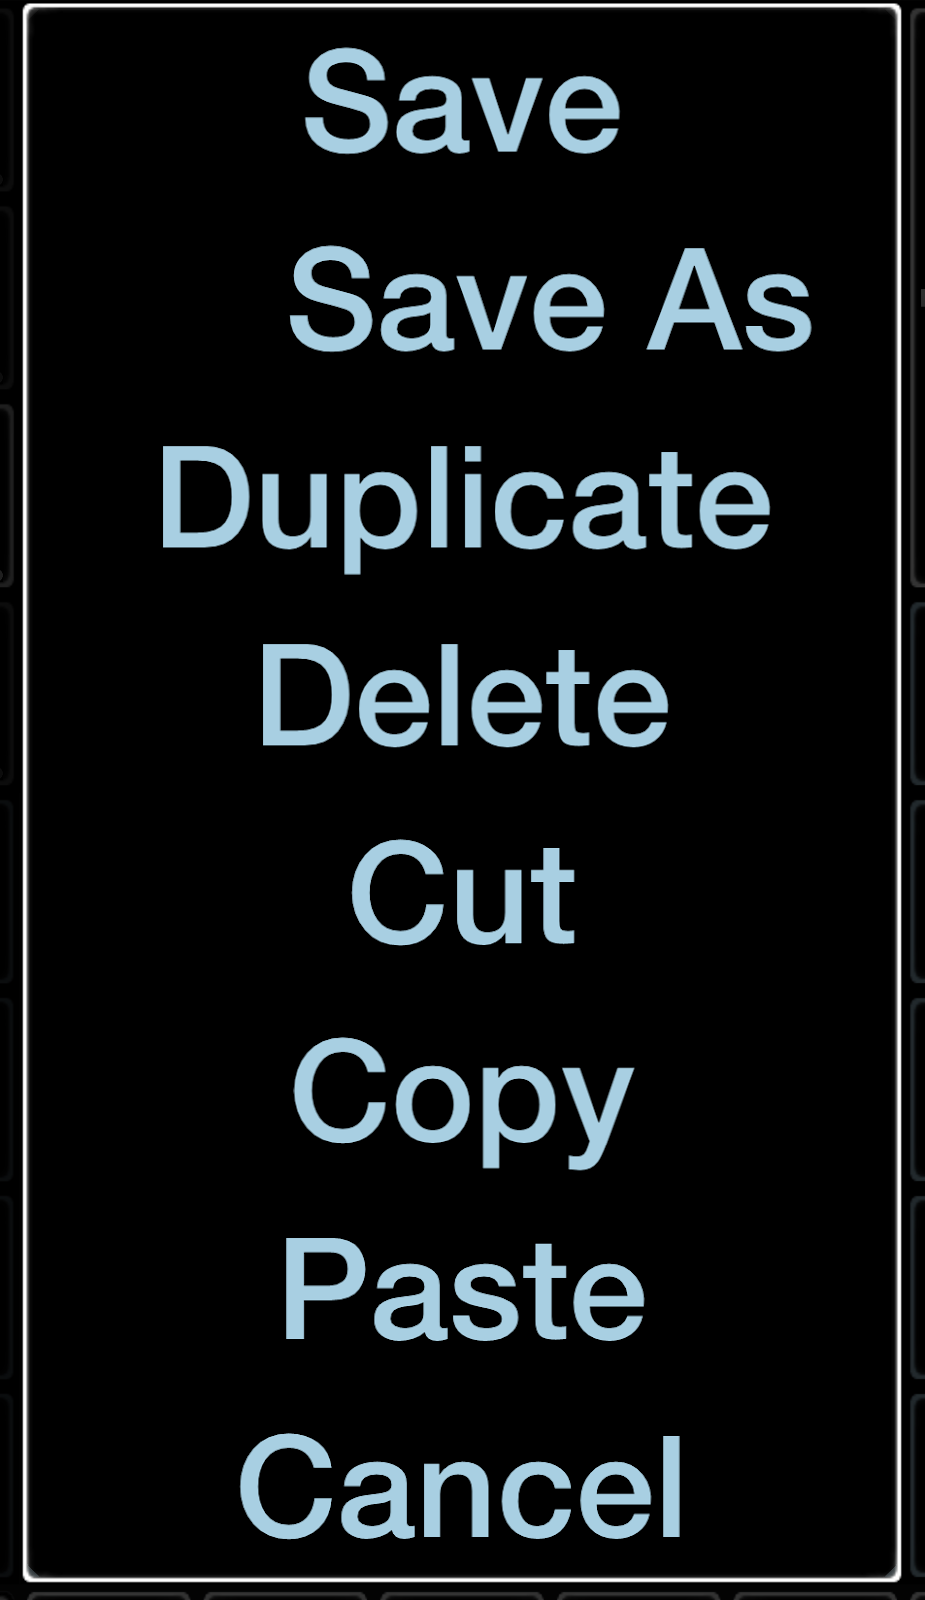
Patch Edit
Long hold on a Patch to bring up a menu of Patch Operations.
Here’s a 1min video showing this.
Patches store the current state of the app. Nearly all params are stored.
Save As lets you change the name of a Patch.
Duplicate places a new copy of the Patch you are on after it. Other functions work as named!
NOT Stored in Patches:
BPM. Else patch recall would always reset the BPM of everyone on LINK to what the BPM was when Patch was stored. This might not be popular with others in the session. :)
Master FX. We considered that these are Global, i.e. set once as they affect all Patches. Subass IS Stored.
Changes to the state of clip parameters e.g. Volume, Pan, Timestretch are stored ‘globally’ for each clip in a Set, and are recalled whenever a clip is manually tapped.
However, clip parameter states are also saved on a per patch basis, which allows you to override the “global” clip state when a patch is saved and recalled.
(Note, only the clip parameter states for the active clip in each channel is saved with a patch.)
Patch name length
8 Characters max. We recommend using leading Capitals e.g. DrumMod, not DRUMMOD - Caps take more space and these fields can overflow which looks untidy.
Patch Follow
Toggle Patch follow on and off using the first button to the right of the top left artwork. Patch follow is off by default. When switched on, each Patch plays for the length of the longest clip it's using, then automatically triggers the next patch. You can use this to build a whole song as a patch sequence.
BPM and Key module
Tap on the BPM /Key (top right, eg 120 C_m) module to popup this module. Hold and drag your finger left or right on this BPM value to nudge BPM up/down 5% till you release your finger (simulates a turntable nudge).

BPM
Sets the playback speed for the whole set. You can Slide with the slider or nudge with the < > arrows to set BPM.
Tip: Hold Shift+tap a BPM < or > arrow to FineAdjust the BPM up or down.

Reset BPM
reset to the Sets saved BPM by double tap on the BPM.
Global Time Stretch and BPM
The Global TimeStretch mode in Settings controls how all clips respond to BPM. If set to Repitch All, changing the BPM will also change the pitch of all clips , like a record slowing down or speeding up. If set to Per Clip, each clip will be Timestretched using its Timestretch mode to adapt to the new BPM.
Key
Sets the global key of the Set.
Nudge with ↑ ↓ , reset by double tapping the Key icon (Treble stave).
The Global TimeStretch mode in Settings affects how all clips respond to Key changes. If set to Per Clip, then the best mode for key changes of each clip is often FFT.
Swing
Applies a Swing ('Shuffle') effect to each channel. In most music software Swing is applied using Midi, whereas uniquely in Jamm this is done using Timestretching. Your mileage may vary but some cool effects are possible.
Swing Link
forces all channels Swing to be the same.
File Menu
Hold the artwork icon in the top left to popup the File menu. Slide down to perform various Set file operations.

Edit
Takes you to the Set Detail page when you can e.g. edit Channel names, change the Key. Tap ‘Back’ top left to return to the Main interface.
Close
Close The Set and return to the Store.
Save
Saves the Set without closing it. This does not stop playback so you can save as you Jamm!
Save a Copy
Lets you make a copy of the current Set and give it a different name. The option to ‘clean up’ the Set by deleting unused samples is given.
Save a Copy moves all samples out of the User subdirectory and into the main Soundfiles folder for that Set, and updates the relevant Soundfiles xml list. Stops playback to do the Save.
Export and Close
Copies the entire Set including all samples and patches to a zip file that can be shared/copied where you like.
NB It is highly recommended to make a copy of any Sets you create and back it up eg to your computer or a cloud service using this function or the iOS Files app.
On Android, this uses your device’s default file manager, which may vary between manufacturers. Make sure to use “Full Set” if you’re on iOS and are intending to send the file to an Android device, backups of patch level information by itself aren’t supported on that platform. If you need help moving your sets and samples around, check our File Management guide.
Restore and Close
Restores the Set from the last Saved version.
Undo Audio
Undo the last Audio record or load clip.
Screen Selectors
The screen selectors which access all Jamm Pros main modules and screens are always at the bottom of the interface. The most important is the Play Screen which contains the most crucial modules for Jamming. The current screen is highlighted.
On Tablet these Screens are arranged as shown above: from left to right Play, Tone, Time, Pump (Sidechain), CCut (Coldcutter), Master, Clip, Recording Mode, Mixer, Midi.

These are the main screens; you can tap on the bottom right arrow to get even more screens, the most important of which is the Settings screen. Tapping that arrow again goes back to the main screen selectors, and re-selects the Play Screen.
Some screens may contain complex modules e.g. Coldcutter which use the whole screen, or keep the crucial Loop and Stab from the upper half of the Jamm screen whilst swapping those in the lower half for other modules e.g. Channel FX, Pump.
If you’re on a smartphone, we recommend the “Large Format” screens, they’re as multi-touch friendly as the rest of the interface :)
These have been arranged for easy access as shown below. Matrix, Stabs, Fx, Xy, CCSlots. Then the smaller format screens, Play, Tone, Time, Clip, Cuts and more pages.

Description of Main Modules and Screens
Play screen
This is the main screen for performance on large screen devices, containing the most crucial performance modules:
The Loop Matrix, the Stabs Matrix, the DJ FX, the XY FX, the Coldcutter.
Loop Matrix
The Loop matrix is the heart of Jamm. It consists of 4 channels each of 8 clips slots, holding one clip per slot; each channel only plays 1 clip at a time. You can slide from one clip in a channel to another and Jamm will swap instantly and smoothly between them. Indeed you can slide all over the loop matrix with one or many fingers and Jamm will follow the multiple triggers as you freak out with no idea needed of which clip is which as it all sounds grooovy.
Loop Matrix Channel Options
These control how the clip slots in a channel behave when triggered. Jamm has been designed to give the Jammer a lot of flexibility over how clips are played back. This flexibility means there is more to understand. The good news is all defaults are set up to be instantly playable and other options can be ignored until the need to master them arises.
Each channel has these pairs of options.
Sync Mode: Jsync or Free
Loop Mode: Loop or One Shot
Launch Mode: Trigger or Gate
Normally clips in the Loop Matrix (ie the main 4 channels) play in Loop mode, Jsync mode, and Trigger. Clips in the separate Stab Matrix to the right of the Loop Matrix play in Loop, Free and Gate.
Sync option
Jsync means all 8 clips in a channel can be regarded as playing simultaneously, like an 8 track multitrack where 1 track at a time can be soloed. Playback is locked in sync to the master sequencer clock. So whenever a clip is tapped, it plays from the point in its timeline where it has gotten to, not from its start. The current point in a clips timeline is called its Phase (each clip has a Phase indicator which displays this) . So triggering a clip does not restart it, it simply unmutes it (and mutes whatever clip on that channel was playing if any.) Jsync is a nice feature of Jamm which means the response of triggering clips is instant but always in sync. It's a big part of the playability of Jamm and different to most other loop software.
The opposite of Jsync is Free. Clips in the Stab Matrix are in free mode by default: when triggered they start playing from the beginning and are not locked to the Phase clock..
Loop option
Whether the clip loop is controlled by the Loop/OneShot option.
Launch option
How clips respond to touches is controlled by the Trigger/Gate option. When set to Trigger, a clip that is touched will trigger and play its whole length. If set to Gate, then a clip will only play whilst its slot is held down.
Learning about Channel Modes
See this video for an explanation of the Channel Modes as it may be easier to see in action than read about.
Jamm provides a simple way of switching the 4 main channels (i.e. the loop Matrix channels) between the 2 most useful modes i.e. combination of these 3 options:
By default, Clips in the Loop matrix play in 'Loop' mode which is Jsync, Trigger, and Loop.
Holding Shift and a channel mute button toggles its mode to 'Stab' mode (so called because it is the default mode for clips in the Stab Matrix): Free, Gate, and Loop. The Channel mute button goes Red instead of Blue to indicate this.
When a channel is in Loop mode, and a clip is looked at in the Clip page then no options for Loop, Sync or Launch modes are shown. When a channel is in Stab mode, these options are shown per clip.
Experiment with this: play a clip in channel 1, then hold down Shift and tap the channel1 mute button to switch that channel to Stab mode. The clip stops playing. Tap the Clip screen button and you'll see that clip shows Gated and Loop selected on the right hand side. Tap and hold the clip and it will play from the start, in Free mode not synced to the clock. Release the clip and it will stop. Now tap and hold another channel 1 clip. That will play from the start, whilst the clip is held down. To KEEP that clip playing, hold down SHIFT and then release the clip, then release Shift. The clip properties change to Trigger. You can retrigger the clip by tapping it again but now you don’t have to hold it down because it’s still in Trigger mode. To turn it back to Gate mode, hold Shift and tap it again.
These modes have been developed to give users the most fun and expression. The 'Stabs' mode for what are normally loops allow the Loop Matrix to be played like a Hardware Sampler like the Roland SP404.
One important use of Stab mode for the Loop Matrix is to offset a loop from its normal phase.
Play some clips and hold Shift and tap channel 2 mute to put it in Stab mode. Play a clip on channel 2 at some point offbeat 1 and hold it down. You've changed the phase of that clip with respect to the phase of the other clips. Now hold Shift down again and let go of the clip slot. The clip continues to loop - it's now ‘locked on’ in Loop and Trigger mode. If you now store this as a Patch you can recall it with the phase-shifted clip still as you played it. The ‘Start point’ of that clip is updated to store the phase shift.
Channel Pitch

Move the Horizontal small blue Pitch slider next to a channel Mute button up and down and it will pitch the current clip up and down. This is done using a ‘conform to scale’ effect to get musically pleasing changes in the note. So it's not like a normal pitch.
The intervals in are:
Centered = No pitch shift.
Semitone shift up: +2, +5, +7, +9, +12
Semitone shift down pattern: -2, -5, -7, -9, -12
To Lock a Channel Pitch button's offset position, hold the channel Pitch slider and hold Shift down and release both.
Channel Scratch

Hold Shift and tap a channel Pitch slider. It will go red. Move the slider up and down, and it will apply a scratching effect to the current clip.
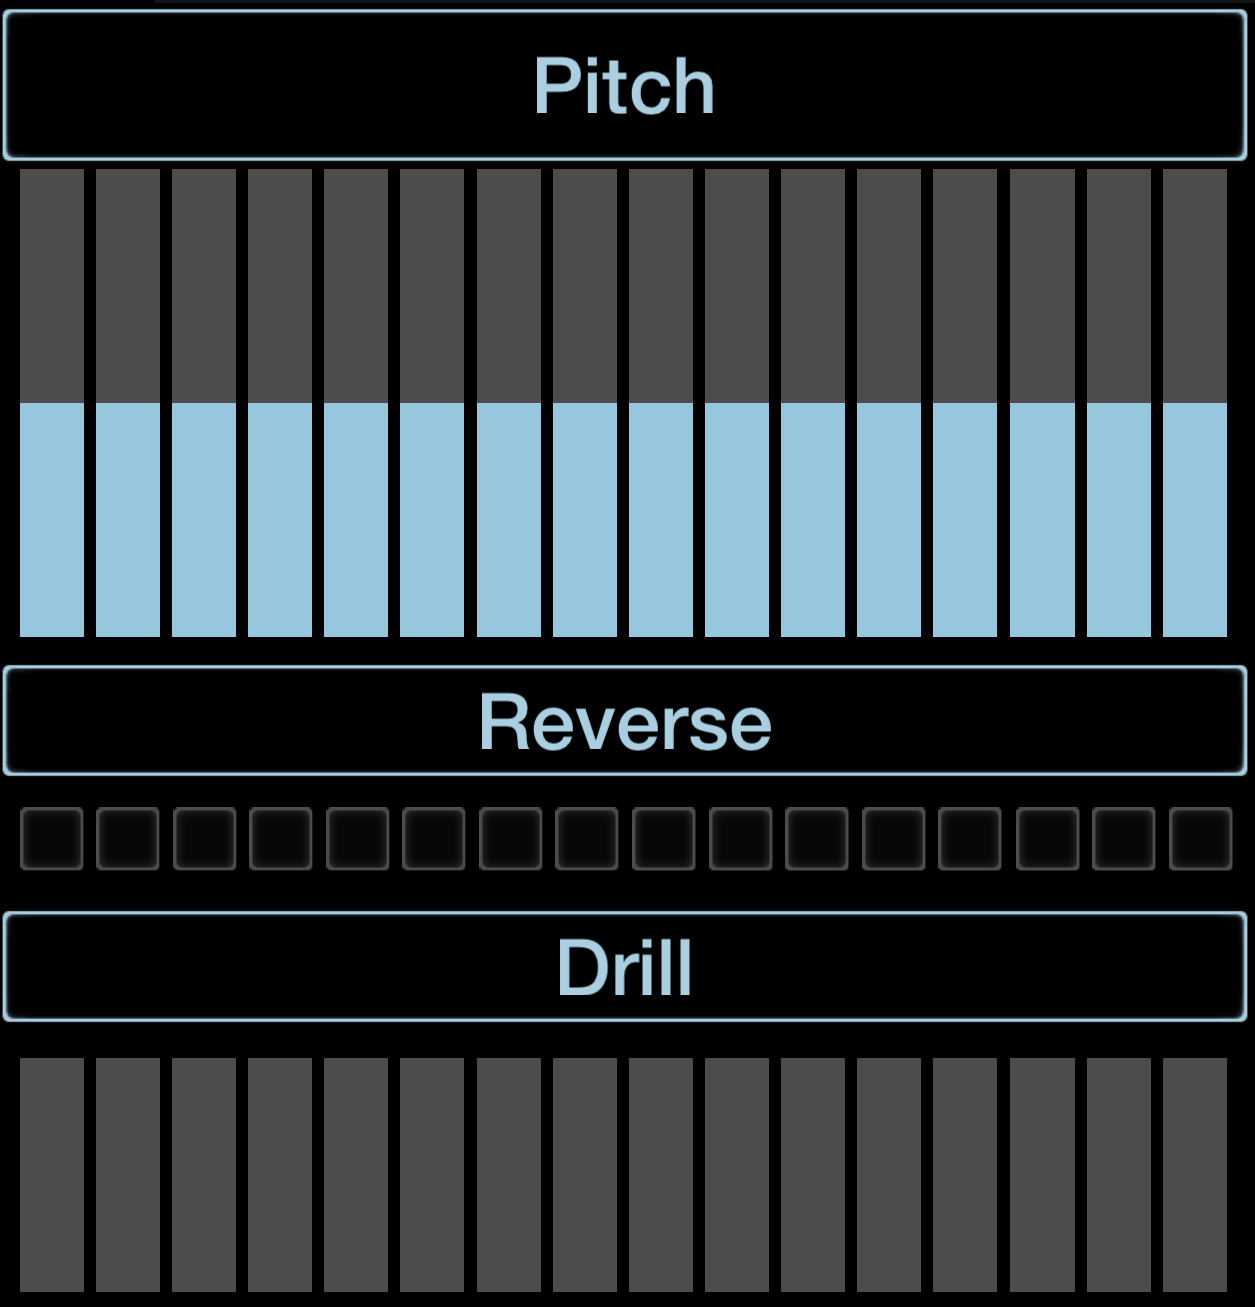
Drillter
The drilter is a per-clip effect. Holding a clip down that is already playing triggers the Drilter effect- and that slot becomes the centre of a ‘mini XY controller’ for the drilter: it applies a ‘dril’ (short repeated loop) effect where the x position of one's finger controls the length of the loop. The Y position controls a filter effect. Small subtle tip of the finger movements can create a sensual effect...this is called tip control...use wisely.
All of the 4 main channels can have their drilter active at once. The top left of the interface is overlayed with up to 4 Mini XY displays to give visual feedback of what's occurring.
Drilter Settings
The way in which Mini XY tip controls the drilter can be set in Settings
Stabs

Play the Stab Slots to trigger clips which by default do not loop and play only while held down. Typically Stab clips are shorter than the clips in the Loop Matrix. We usually put a Kick, a Snare and a Hat in slots 7, 9, and 5 to facilitate finger drumming. Also there is usually a Riser on 8 and a melodic Clip on 4 and a stab on 3 but Sets vary.
Stab Pitch Slider
Move the Stab pitch bend slider up and down to change the pitch of whatever Stabs are playing.
Like the channel pitch bend, this is done using a conform to scale effect to get musically pleasing changes in the note. So it's not like a normal pitch bend. The intervals are:
Centered = No pitch shift.
Semitone shift up pattern: +2, +5, +7, +9, +12
Semitone shift down pattern: -2, -5, -7, -9, -12
Stab Scratch
Hold Shift and tap the Stab Pitch slider. It will go red. Move the slider up and down and it will apply a scratching effect to any stabs playing.
Stabs FX toggle
The button labeled FX turns effects on and off for the Stab Matrix. The Stabs channel has a full set of effects which can be accessed through the channel FX ‘Tone’ and ‘Time’ screens. So the Stabs FX button enables whatever effects are already on for the Stabs channel. By default the Delay and Reverb are turned on in the Stabs channel Time page. To add Distortion to Stabs, turn it on in the Stabs Tone page. It will only be active if the Stabs FX button is on.
Stabs FX Mini XY
The Stabs FX button is also a Mini XY which controls the Delay Time and Depth for the Stabs Delay effect.
DJ FX

4 rows of FX buttons correspond horizontally to individual Distortion, Filter, Delay, Reverb and Pump for each channel. Each button is a toggle for Effect on/off. The returns are combined back into the channels.
NB Please note: the returns are both post Mute and post Effect on/off so that e.g. a delay’s tail remains when the channel is muted, or the Effect turned off, for more dubtastic possibilities. Please see note below about the dangers of extreme feedback.
DJ FX Mini XY
Each DJ FX button is also a Mini XY controller which can tip control 2 params of that effect.
See Settings for how to set Mini XY response.
More FX control
More detailed control of all FX params is available from the Tone (Filter and Distortion), Time (Delay and Reverb) and Pump (Side chain) screens.
XY Multi FX Pad
The XY Multi FX Pad is a controller and multi effect module. It uses the same per channel effects as the DJ FX but gives one a different way of controlling them.
XY Cursors Multi FX assignment

There are 2 XY controller cursors : Circle and Square
Circle : X= Filter cutoff, Y = Filter Resonance
Square: X = Reverb, Delay, Crush
Whilst the XY Pad is active it overrides the channel settings for the effects it’s controlling. On release of the XY cursors, the channel settings take over again.
The ability to have different XY Pad assignments and generally make this module more powerful is on the dev list. Still, it's a heap of fun.
XY Send
Each channel has an XY FX Send button which controls whether it is routed into the XY FX: if that’s turned off for a channel, then the XY pad will have no effect on that channel.
XY Hold
Holding one of both of the cursors down for more than 3 secs locks them on and Holds their position. Tapping them again releases the Hold.
CCut (Coldcutter) Slot Rack Submodule
The CCut Slot Rack is a performance oriented submodule of the full ColdCutter CCut module. The full CCut module (available from the 'CCut' screen) is where one selects, edits and programs the Coldcutter's operations so that a set of favourite operations are instantly available in the CCut Slot Rack via its 16 slots.
Hence these 16 slots can be freely programmed, but by default they contain preprogrammed Coldcutter operations:

An important concept to grasp is that only Slot Zero is ever saved and recalled when a Patch is saved:
Polymorphic Slot Zero vs Monomorphic Slots 1-15
Slot Zero is the special, patchable polymorphically perverse Slot which is automatically selected for Patch Store/Recall.
i.e. when the Jammer wants to save a currently active Slot or particularly dope CCut Sequence in a Patch, the Patch Store operation will copy the Slot and its sequence to Slot Zero and on recall will recall it into Slot Zero.
CCut Slots 1-15 are monomorphic: if you edit them, that edit will persist ignoring Patch recall because only Slot Zero is polymorphic. Think of Slots 1-15 as 'lenses' which can be reliably switched in at any time without considering Patch state. You can edit them, but within a Set each can only have one state. Slot Zero can have multiple states as it saves and recalls its state via every Patch store/recall.
Hopefully playing with the app will make it clearer why this is the best way to do things...we thought long and hard about this and concluded that 64 patches saving all 16 slots would be resource bloated and confusing.
Default states for Slots 1-15
Slots 1-7 are toggles and have various CCut Slice Shuffle and modulation operations
1-Kick fill
2-Crazy Riddim
3-Call and Response with 8 bar changing Crush action
4-Spacemaker Glitch
5-Evolve+Reverse
6-Riddimer
7-Superfill Ninja Master 7
Slots 8-15 are momentary action. They are called 'Superfills'. On pressing them they take over from what every CCut Slot is active, but on release return to that slot (even if its off)
8- 16th transform
9-Deck Stop
10-Filter down+Pan
11-Scratch
12-Glitch
13-Flowcoma triplet
14-16th drill - try shaking your device while playback is active!
15-Reverse
For CCut slots which have Slice Shuffle enabled, Shift + Double tap on a slot will reshuffle it
For detailed info on the CCut module which is the most complex module in Jamm, see the full CCut section
This concludes the Main Jamm page summary.
Following are the other Screens accessible from the Screen Selectors at the bottom of the UI.
Tone FX
Houses detailed controls for each channel's Distortion and Filter. These are the same Distortion and Filter available from the Jamm screen in the DJ FX module.
NB Fine control : hold Shift and dragging any slider in Jamm will adjust it in small increments, aiding fine adjustment.
Channel Selector
At the middle left of the screen, the channel button selects which channel’s Tone FX settings are currently shown. Hold this button to popup a channel selector to select between the 5 channels.
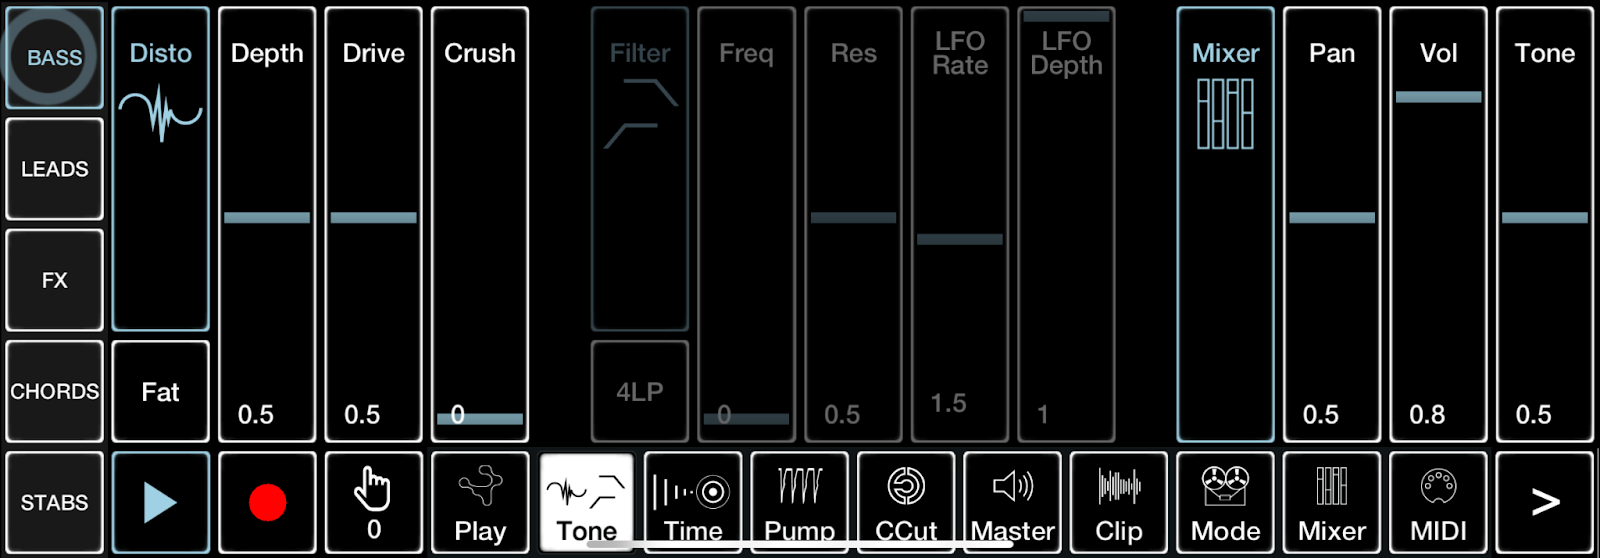
Disto
Various controls and settings for each channel's Distortion effect. Double tap a control to return to its default settings.
Distortion Type
This defaults to ‘Fat’, an effect like valve distortion. Hold down this Disto type button (under the Disto on/off button) to popup 5 different distortion types: Solid, Tube, Fuzz, Fat, Shaper. Shaper can give some extreme electronic sounding overtones to drums for example.
Crush
This is an additional bitcrusher stage to the Disto effect and is not affected by the Disto Depth control.
Filter
Various controls and settings for each channel’s Filter effect. Double tap a control to return to its default settings.
Filter Type
Hold down The Filter type button (under the Filter on/off button) to popup 5 different filter types:
DJ = Dual Low Pass + High Pass (centre is off, effectively)
4LP = 4 Pole Low Pass (default)
2LP = 2 Pole Low Pass
BP = Band Pass
HP = High Pass
Freq
The Filter Cutoff Frequency at which the Filter is shelving off part of the signal; which part gets shelved off depends on Filter Type.
By default, the Freq is turned down - that way the LFO can control the Freq - as the LFO Depth and LFO Rate are available from the Play screen Filter Mini XYs you can immediately use them to get some cool ‘womp’ style Filter modulations.
Res
Filter Resonance, the amount of output that is fed back to the Filter’s input, also called Q.
LFO Rate
Each Filter has an LFO, a low frequency oscillator which acts to automatically sweep the Cutoff Freq of the Filter up and down. That kind of movement action is called ‘Modulation’ - you can say the LFO is modulating the Filter Cutoff Freq. However, unlike some types of Modulation, you don't actually see the Freq moving up and down, it happens ‘under the hood’.
LFO Depth
The amount by which this LFO moves the Cutoff Freq of the Filter.
Note that if Freq is near max then LFO depth won't have much effect, because both the Freq slider setting and the LFO are controlling the overall Filter Cutoff Freq and that total Freq cannot be higher than the max.
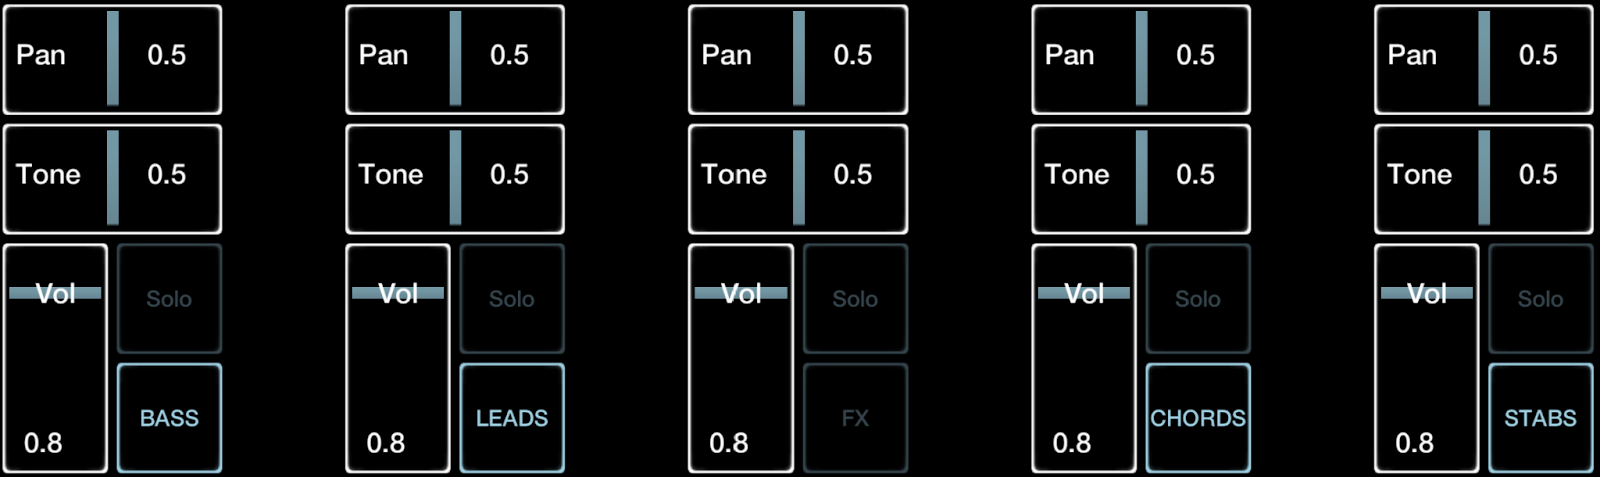
Mixer
Various controls and settings for each channel’s Mixer. Double tap a control to return to its default settings. Tone is emphasising treble at the top, bass at the bottom.
Time FX
Detailed controls for each channel’s Delay and Reverb. These are the same Delay and Reverb available from the Jamm screen in the DJ FX module.
NB Fine control : hold Shift and dragging any slider in Jamm will adjust it in small increments, aiding fine adjustment
Channel Selector
At the middle left of the screen a button selects which channel’s Time FX settings are currently shown. Hold this button to popup a channel selector to select between the 5 channels.

Delay
Contains various controls and settings for each channel’s Delay. double tap a control to return to its default settings.
NB Please note each of the 5 channels has its own separate Delay module.
The Delay returns are both post Mute and post Effect on/off so that a delay’s tail is not cut off when the channel is Muted, or the Effect turned off, for more dubtastic possibilities.
Please see note below about the dangers of extreme feedback.
Delay on/off
The big button with the Delay icon toggles it on and off.
Delay type
hold to popup: Digi or Tape.
Sync
This toggle when on forces longer delay times to be fractions of the BPM/bar length so repeats are in time with the beat. When off, delay times are freely set from 1-4000ms, a more dubtastic approach as odder cross rhythms with the beat result.
Tape-Wild FB
When using Tape delay, an extra Button pops up: ‘Wild Feedback’ , where extreme self oscillation can be produced by high feedback settings
Danger : Extreme Feedback!
Wild Feedback is a potentially dangerous feedback setting where self oscillation can build up to an ear damaging level. Whilst this is no different to many delay effects on the market, please take care. Please note that if Wild Feedback is on, and Feedback has been pushed up, even turning the delay off for that channel will not stop the feedback. You will need to actually turn down the Feedback using the Feedback slider for the channel that is feeding back, to get rid of it. Take care of other people’s ears and your own. Sound frequencies can be dangerous. We accept no responsibility for any damage from use of the app. You have been warned!
Time
Delay time has a range of 1 to 4000ms.
For short delays less than one step in length, the delay time is scaled smoothly without bpm sync. For delays longer than one step, the delay time is quantised to multiples of step length:
1,2,3,4,6,8,12,16,24,32,48,64
Feedback
The amount of Delay fed back from the Delay output to the input. A high setting can cause feedback that builds up to a dangerous level, see above note ‘Danger-Extreme Feedback!’
Depth
The amount of Delay compared to the original signal , also called Wet/Dry. Higher depth = more Delay.
Warbl
Introduces a ‘lofi’ degradation of the delay repeats.
Width
Introduces a Stereo ping-pong effect on the delay repeats.
Revrb
Reverb effect control panel
NB Please note each of the 5 channels has its own separate Reverb module.
Reverb on/off
The big button with the Reverb icon toggles it on and off.
Reverb type
Hold to popup and select between: Jamm, Pure, or Wes Reverb type. These are slightly random names but basically they all sound a bit different. Try!
Freeze
Only Jamm reverb type allows a 2nd button labelled Freeze which freezes the Reverb memory buffer creating a looping block of reverberated sonic which can be a trip in itself.
Depth
The amount of Reverb compared to the original signal , also called Wet/Dry. Higher depth = more Reverb.
Feedback
The amount of Reverb feedback which amounts to the same thing as Reverb time or decay….the length of time it takes for the Reverb to die away.
Pre Delay
Inserts a delay in the Send to the Reverb with the result that the Reverb appears later than it normally would- the higher the Pre Delay the later it gets. Thanks to Prince Fatty dub maestro for this suggestion.
Mixer
Various controls and settings for each channel’s Mixer from the Tone page are repeated here.. double tap a control to return to its default settings. Tone is emphasising treble at the top, bass at the bottom.
Pump
The Pump screen contains Pump controls for all 4 loop channels. Pump can be turned on and off from the DJ FX per channel but here further controls are given.
Pump is an effect ( also called Sidechaining) which uses an input from a Key channel to alter the volume of Target channels.

Typically the Key channel is the drums channel and a filter tries to focus on the kick drum by filtering out other frequencies. So that the Key signal 'pumps' = 'ducks' = reduces the vol of the Target channels when the Kick plays, and in the spaces between the Kick beats, the Target channels pump back in.
The Stabs channel can also be selected as a Key input channel.
Jamm’s Pump module has various functions for configuring the Pump functions. Often Pump can just be turned on/off but sometimes settings may need to be played with to get the desired effect or for special uses.
Analysis section
On the right of the Pump module is the Analysis section. This allows you to Isolate the Key input to better pick out the desired frequency and behaviour of the Key input, and have more control over how the Key affects the Target channels.
NB Please note that the Analysis section parameters are an exception to the rule in that they are NOT stored in Patches - they are Global i.e. there is only one setting for them per Set.

Key Trigger LED
This LED lights when Key triggers happen.
Release
After a Key trigger event, Release controls how long the Key event is held before releasing.
Isolate
A filter to filter out frequencies of the Key Input so that only the desired part of it is applied, typically the bass of the kick drum. On the left no filtering takes place; moving it right reduces the cutoff frequency cutting off frequencies above it, so only the bassier part is left. If you are not getting the Pump effect you want from a drum clip, try increasing the Isolate slider to get the Trigger LED to be on less.
Makeup
Sometimes the Pump effect lowers the perceived vol of the Target channels overall. Makeup can compensate for this.
Pump on/off
The column of Pump buttons on the left turn Pump on and off for each of the 4 main channels.
Pump Amount
This column of Pump sliders controls the degree of Pump for Channels 1-4.
What is Pump Amount? It is the amount of influence the Kick (the typical Key Input) has on ducking the Target channels DOWN when the Kick plays.
Normally Pump 1 is off because channel1 pumping itself usually is not what you want. It's Channel 1 which pumps the OTHER channels. However, it can on occasion have an interesting effect.
Chain
If Chain is on, Channel 2s Pump setting is copied to Channels 3 and 4. Channel 1 is not linked.
NB if the Pump Mini XYs are used they can override a Channels Pump settings even if Link is On.
Offset
Per channel Pump offset, ie the time taken before the Key event triggers the Pump effect.
Adjusting this can create interesting effects for changing the perceived rhythmic results of the Pump effect, shuffling or making the Target channel sound more urgent or lazier.
Key
Per channel Key selectors. Sets which channel(s) provide the crucial Key to pump the Target channels. Usually left on channel 1.
Invert
Per Channel Pump invert. Invert causes the Target channel to decrease in vol when Key is off rather than on.
Stabs Key Input
Adds the Stabs channel to the Key Input. So, for example, playing manual Kicks from the Stabs module will pump Target Channels.
CCut aka the ColdCutter
The CCut screen contains the full ColdCutter module, the most complex module in Jamm.
It contains these submodules: CCut Slot Rack (the same CCut Slot Rack as in the Play page), Slice Shuffle, Slice Sequencer, Gate Sequencer, PitchDrill Reverse Sequencer, Call and Response module, 3 pairs of Modulation Sequencers, Slot Editor.
The CCut Slice Shuffle submodule and the CCut Slot Rack are always shown in the full CCut Screen on the right. The Slice Shuffle is on top , this also contains some CCut Master controls. The Slot Rack is underneath.
CCut Slice Shuffle submodule (Slice sliders etc) and underneath it the Slot Rack submodule.
Then a number of submodules are available from the vertical Submodule selector to the left of them. These submodules will appear on the Left hand side of the screen and may use the whole vertical area or only the lower area.
If it is not desired for a channel to be affected by the CCut, then turn that channel’s CCut Send (the 4 Coldcut ‘copyleft’ logos) off in the Slot Rack.

CCut Edit Channel Selector
Generally, the CCut submodules are per Channel Sequencers and the Channel Selector on the left selects which Channels Sequencers are being viewed/edited. As with the Time/Tone screens, the Channel names are given.
Slice Shuffle and CCut Options
CCut uses the Slice Shuffle technique developed by Coldcut and Hex in the 90s and also known as ‘Buffer Shuffle’ to treat clips as a sequence of equal sized small slices of audio. This sequence can then be operated on, to change or shuffle the order of the slices, each of which is a fraction ( a 16th) of a bar. As all slices are of equal size they can be freely combined and still always create a rhythmic pattern, like shuffling a deck of cards , a shuffle clip remains the same total size. Using a combination of randomness and control, we have found that Slice Shuffle yields intriguing mutations of rhythms and is an idea generator. CCut gives you the ability to freak out generating new rhythmic patterns and save the ones you like.

In the top right quadrant of the CCut screen you will find the Slice Shuffle controls and some CCut Options.
Concept to understand: the CCut has a separate Slice Sequence for each channel (i.e. a separate sequence of slices to play per channel), but all 4 channels CCut Slice Sequence are subject to the same set of Slice Shuffle Controls. So for example each Channel might be set to randomise the same amount but that does not mean the results of the randomisation would be the same for all Channels. (But, see Chain from Channel 1)
CCut Options
Loop 1 Bar
Represented by a looping arrow icon. When on, only 1 bar is looped rather than the app playing through the longest current clip before it loops. It’s worth noting that clips can be many bars long (typically 1,2,4, or 8) but all the CCut Sequencers, including the Slice Sequencers are only 1 bar of 16 steps.
Also, Modulation sequencers and Slice Shuffle Evolution settings keep evolving even if Loop 1 Bar is On. It’s looping 1 bar of the clips, not the sequence data. To stop evolving and loop 1 bar of everything, use Freeze, to its right.
Chain from Channel 1
Represented by a chain + from “name of channel one” When this is on, all channels are controlled from Channel 1s Seqs. Channel 1 is given its per Set name for clarity. In this case, the other Channel Selectors are not available because only Channel 1 is in effect.
Freeze
A snowflake icon. Loop 1 bar without allowing any evolution of Slice Sequence or modulation sequencers. ‘My God - we’ve found the perfect beat. Quick, before this crazy program changes it...hit FREEEZE!’
Reset
Tap to Reset the displayed Sequencer to default.
Slice Shuffle Controls
To recap, Slice Shuffle and the related Slice Sequencer treats a loop as a sequence of same size ‘Slices’ (each a 16th of a bar) which can be shuffled - i.e. repeated, reordered, and reversed - to create variations on the original source loop.
The Shuffling operations are not completely random, they offer controllable randomness, a favourite Coldcut technique which has a relationship to the Indeterminacy techniques of e.g. John Cage, Nam June Paik, William Burroughs and also Steve Reich’s Systems music. In fact Shuffling does not just operate on the Slice level - internally it works by cutting a bar into sections, and then repeating steps within those sections. This gives a more controlled musical randomisation than just shuffling all steps independently.
Before any shuffle takes place, the Slice Sequence is 1,2,3,4...16.
This sequence can be seen and manually edited in the Slice Sequencer. The Slice Shuffle controls provide means for automatically shuffling the sequence of Slices. These are the Slice Shuffle controls:
Slice
The probability a shuffle will reorder slices from 0-100%.
Trig
Controls how often the bar is randomised.
Value 0 = very often.
Value 5 = less often.
Retrig
Controls how many steps are repeated between randomisations.
Value 0 = 1 step is repeated.
Value 7 = many steps between repeats.
We suggest just playing with the sliders and seeing the results for yourself. It’s kind of mysterious even to us!
Evolve
How often an Evolve -ie an automatic shuffle - happens, in bars. 0= never, 1= every bar, 2= every 2 bars…
NB to force an Evolve of the currently active CCut Slot, hold Shift and double tap that Slot in the Slot Rack. The effect of the Evolve will be governed by the Slice Shuffle controls. If the Slice Sequencer is displayed you will see the reshuffled Sequence there.
Mute
Probability of slices being muted by a shuffle.
Reverse
Proportion of slices being reversed by a shuffle 0 = none 3 = all.
CCut Sequencer Submodules
CCut contains a number of 16 step sequencers some of which have dedicated functions to act on the slices and some of which can be freely patched to control other operations in Jamm.
Slice Sequencer
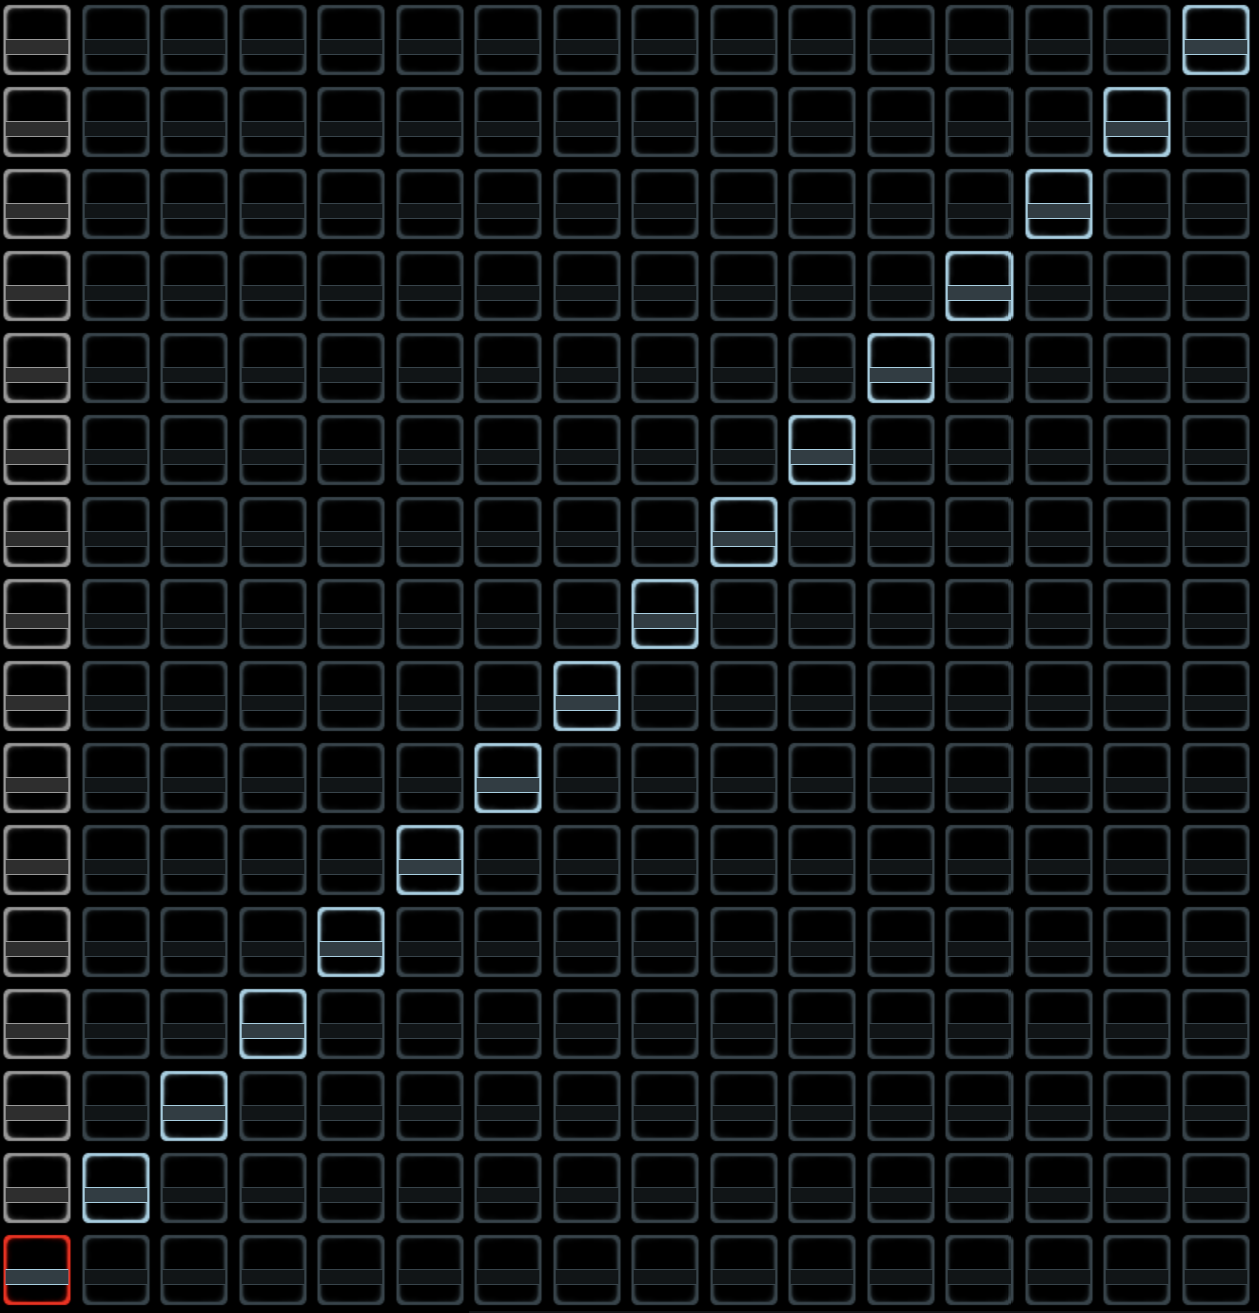
A 16 x 16 matrix in which X axis is Step number (i.e.1 step = a 16th of a bar) and Y axis is Slice number, of 16 Slices per bar, of the current Clip in the selected Channel. The default is to play Slice 1 on step 1, Slice 2 on step 2....Slice 16 on step 16. Slices can be reordered by drawing on the Slice matrix. Slice Shuffle operations will also alter the Slice Sequencer - the Slice Sequencer IS what the Slice Shuffle operates on.
Tap a Slice that is on to mute it. Reset to default ( slice 1,2,3,4...16) using the Reset button top right.
Gate Sequencer

Each channel has a 16 Step Gate sequencer. This reflects the Slice Sequencer but the Gate Seq allows one to see all 4 Channels at once and has other cool looping operations.
The Gate Seq module does not have channel selectors as all 4 channels are available at once in the module.
Gate Slices
Tap on Slices to Gate them ie turn them on/off.
Swipe from Slice 1 to Slice 16 to turn all on, 16->1 to turn them all off.
Create Lockloop
Hold a Slice down with 1 finger then a 2nd Slice with a 2nd finger to create a ‘lockloop’ between them.
Hold a Slice and then a 2nd slice to its left to set a reverse loop.
Clear Lock loop
Tap slices 1 and 16 to clear the loop.
As Loops can be set for each channel independently, it's easy to create polyrhythms by setting different loop lengths for different channels. Also, by using 2 fingers on just 1 slice, a granular effect where just that 1 slice is repeated can be created.
PRD (Pitch Reverse Drill) Sequencer
Each channel has a set of 3 sequencers controlling Pitch, Reverse and Drill for each channel's component slices.
Each of these 3 PRD sequencers 16 steps is controlled with a slider or a button.
Each PRD Seq can be turned on independently using the buttons which say Pitch, Reverse, Drill.
Pitch unlike the ‘Smart Pitch Bend’ controls is not conformed to scale.
Reverse steps are toggles.
Dril steps loop a slice for 1/32 or 1/64 of a bar depending on the setting for that step: 0 = no drill, mid =1/32, full =1/64.
Call+Response

Call and Response is a core musical technique in which one phrase first plays and is then answered by another. The CAR submodule generates Call and Response between channels.
CAR on/off
CAR is organised into 2 CAR pairs : Channels 1+2, and Channels 3+4. On the left, 2 buttons activate CAR for these pairs and show the names of the Channels. (CAR between e.g. Channel 1 and 3 is not implemented.)
CAR XY
When CAR is turned on for a pair, then the first channel of the pair (the Caller) will play whilst the second is muted (the Responder). Then the Caller is muted and the Responder unmuted. The speed at which this swapping occurs is controlled by the Speed (Y) of the CAR cursor. The ratio between Call and Response is set by the Ratio (X). So one of the pairs can be dominant in terms of the amount of time its channel is heard.
CAR Mode
Using the mode button one can toggle through 3 settings: CAR, Hold Channel1, Hold Channel 2
So you can set one of the channels to be on Hold, i.e. be on all the time whilst the other is cut in and out.
CAR Direction
The Call direction controls which of the pair is the Caller which the Responder. If one sets the speed very high, then the CAR may behave erratically.
CAR activity Leds
The red CAR Leds in the centre of the CCut Channel sends indicate the activity of the CAR - Red = channel on, off= channel off.
To make CAR smoother, try using a subtle reverb or delay so that cuts in and out have a 'tail'
The CAR module does not have channel selectors as all 4 channels are available at once in the module.
Modulation Sequencers 1+2 , 3+4, 5+6
Each channel has a set of 6 Sequencers of 16 Steps, organised as 3 pairs. Each Mod Seq can be individually patched to modulate most of Jamms parameters, allowing the creation of complex patches.
Sliders
Move the sliders up and down to set them. Shift+ drag on a slider copies its value to other sliders in the drag direction.
Double tap a slider to reset it to default.
Mod Seq Mapping to Target Parameters
Mapping a Mod Seq is mapping it to a Target, i.e. a parameter which it's targeted to control.
Hold the Mod Seq Target button (which either says NONE or shows the current Target) to bring up a menu of the available Target parameters which can be modulated. Slide up to a subset menu e.g. Channel, Filter, Distortion... to reveal the set of parameters for that function which can be modulated. Keep holding and slide to the one you want to set it as the Target. The example below shows Reverb Depth being selected as Target.
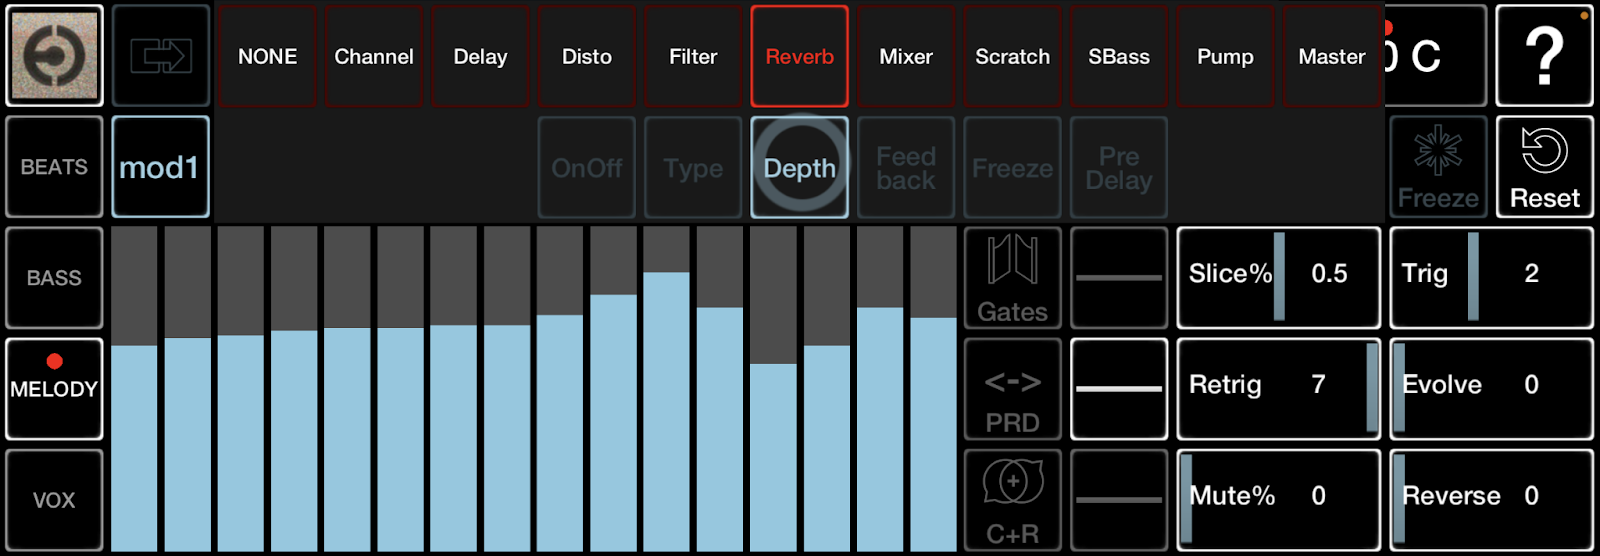
If Channel/Clip is selected, that will cause the current clip which is being played on that channel to be rapidly switched between (depending on the clock speed for that Mod Seq), a kind of 'Sample wavetable' effect.
Copy/Paste Mod data
The Mod sequencers can be copied and pasted between Channels, and also to the Mod sequencers in the same channel by holding the Mod button down to access Copy/Paste/Clear. Turn the Mod Seq on/off by toggling the same button.
Clock Divide
A popup which controls the clock speed of that Sequencer. 0.25 is the fastest (4 x normal speed) whilst 16 is the slowest, dividing the normal clock rate by 16 and so will take 16 bars to play the Sequence.
Step/Smooth
Controls whether values are stepped i.e. discrete, or smoothed. Smoothed is often better for e.g. filter modulations where one doesn't want jerky changes in value.
Evolve Strength and Evolve Rate
The Evolve Strength and Evolve Rate popups allow the Jammer to set Mod Seq values to 'Evolve' = change automatically.
Strength is low, med or high.
Rate is measured in Clock cycles, not bars. So if Clock Divide is set to e.g. 4, meaning the Sequence will play over 4 bars, then a Rate of 2 would mean an Evolve would happen every 2 cycles = 8 bars.
Reset
Reset whole Mod sequencer with Reset button top right.
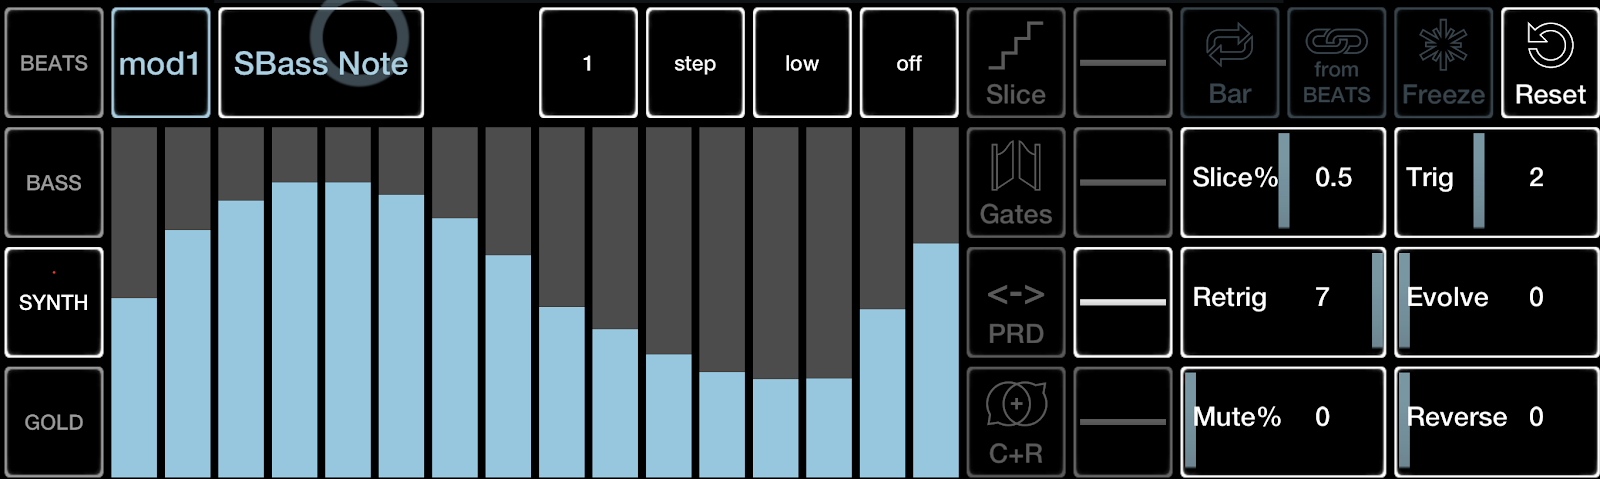
CCut Slot Rack

The CCut has 16 slots which are like presets for its operations, called the CCut Slot Rack. Usually one Slot is on. Then the Slice Shuffle controls and the CCut Options above the Slot Rack will show the settings for that Slot. However if the active Slot is tapped again, it will go off. Then no Slot is active, and so the Slice Shuffle and CCut Options disappear as they have no active Slot data to show.
Refer back to the default settings for Slots 1-15.
Hold Shift and double tap a Slot to reshuffle its Slice Sequencer.
However an important concept to grasp is that only Slot Zero is ever saved and recalled when a Patch is saved.
Polymorphic Slot Zero vs Monomorphic Slots 1-15
Slot Zero is the special, patchable polymorphically perverse Slot which is automatically selected for Patch Store/Recall.
i.e. when the Jammer wants to save a currently active Slot or particularly hot CCut Sequence, in a Patch, the Patch Store operation will copy the Slot and its sequence to Slot Zero- and on recall will recall it into Slot Zero.
CCut Slots 1-15 are monomorphic: if you edit them, that edit will persist ignoring Patch recall because only Slot Zero is polymorphic. Think of Slots 1-15 as 'lenses' which can be reliably switched in at any time without considering Patch state. You can edit them, but within a Set each can only have one state. Slot Zero can have multiple states as it saves and recalls its state via every Patch store/recall.
Hopefully playing with the app will make it clearer why this is the best way to do things...we thought long and hard about this and concluded that 64 patches saving all 16 slots would be resource bloated and confusing.
CCut Slot Edit
This allows the behaviour of the current CCut slot to be set. So you can customise the 16 slots with CCut operations you like, for example combinations of Slice shuffle settings, Slice Sequences and Modulations. These can then be used as fills and variations. Refer back to the default settings for Slots 1-15.
Chain from Channel1

Also available in top right, CCut Options. When this is on, all channels are controlled from Channel 1’s set of Sequencers. Channel 1 is given its per Set name for clarity. In this case, the other Channel Selectors are not available because only Channel 1 is in effect.
Loop 1 Bar

Also available in top rt, CC Options. When on, only 1 bar is looped rather than the app playing through the longest currently clip before it loops. It’s worth noting that clips can be many bars long (typically 1,2,4, or 8) but all the CCut Sequencers, including the Slice Sequencers are only 1 bar of 16 steps.
Mod Sequence Lockloops

When a slot has a lockloop ie it is looping round only some of its slice steps, use only those steps within its Mod sequencers.
Lockloop Start on Trigger

When a Slot has a lockloop set, and that slot is triggered, tell the lockloop to start at whatever slice has been reached.
Slot Quantise

When a slot is triggered, quantise the trigger to the nearest step. Useful for highly rhythmic operations e.g. 16th Gate (Slot 8).
Slot touch action
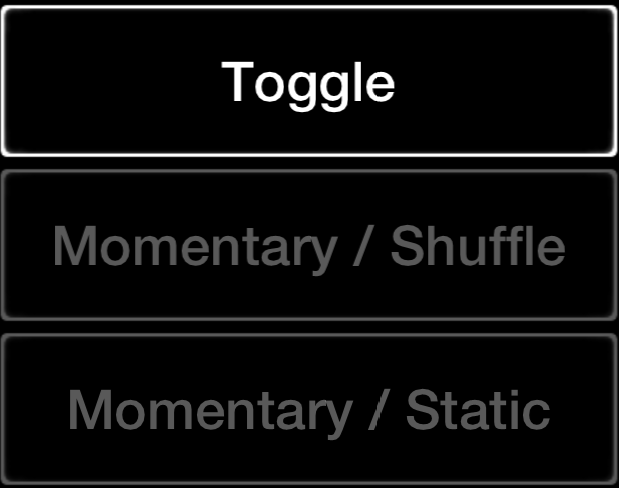
Controls how to get the action you want on touching a slot. 3 actions:
Toggle- tap once to activate, tap again to deactivate
Momentary Shuffle -hold to activate, release to deactivate; Shuffle Slices
Momentary Static-hold to activate, release to deactivate, Don't Shuffle Slices.
When a Slot has been set to Momentary, and you want to edit it, hold it down and then press Shift. This will temporarily leave it on. When you've set the Slot tap it again to return it to Momentary mode. This also works if you want to hold a Momentary Slot on without having to hold it down.
This concludes the monster ColdCutter section of the manual.
Master
The Master screen contains 2 SubModules : Master FX and SubBass
Master FX
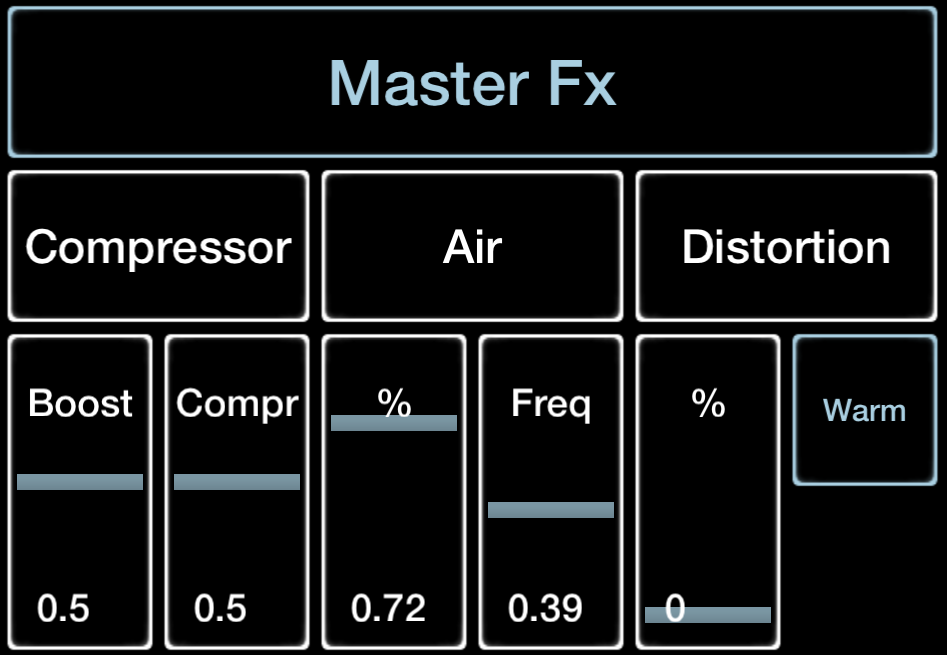
This module is to compress and boost the overall output of Jamm. Turn on/off Master FX by tapping where it says Master FX. Boost and Compress can usually be left as they are. Air creates 'air' or 'presence' to enhance top-end frequencies and make output sound more sparkly. Also there is a Distortion control to add crunch with a Warm on/off toggle, Warm being a tape saturation type of sound.
NB Master FX is an exception to the other modules in that its settings are not stored in Patches. It was felt better to have one Master FX setting that is Global for the Set.
SubBass

This is a Synth which generates sub bass tones using the same principle as the Pump (Side chain) module: using the Kick from whatever clip is playing in channel 1 to derive a Key trigger impulse. In this case the Key triggers a sub pulse.
Steps/Bars XY
Setting Steps and Bars allows some triggers to be ignored allowing the density of the generated sub to be varied. So reducing Bars for example will mean that Sub is not triggered on all bars where it would otherwise be booming.
Pitch Ramp
Vary the frequency of the Sub as it plays.
Sine/Dyn subbass type
Two different styles of Sub Bass tones. Default is Sine.
Follow Current Key
Makes the tuning of the Sub follow the global pitch...so the sub automatically is in tune with each Sets root key, and if this changes so does the Sub.
Autocool Dril BLine generation
Cool basslines can be easily generated using a CCut Mod Sequencers set to Target the Sub note...in such a case Follow will be ignored until the Mod is turned off. Smooth and Step will have much different effects on the B-line..
Vol
Master Vol control for Jamm; goes up to 11 but….
Output Meter
Gives an indication of Output level. Advise - don’t pump everything up till it's always in the red as digital clipping distortion rarely sounds great.
Famous DJ 'what's this shit you're playing, it sounds terrible.’ Soundman ‘Thats your Set from last night, mate. I kept saying stay out of the red and I’d turn it up on the PA but you didn’t listen…’ True tour bus story. Who was it?
Brake
Controls how quickly the sound stops when the deckstop effect is triggered. The higher the Brake, the more quickly it stops.
Clip
In this screen you can load clips/samples into slots and adjust their settings.
Select Clip
Tap any clip in the Clip matrix or Stab matrix to make it the selected clip i.e. the clip which appears in the Clip screen ready to be edited/replaced. The waveform of this clip is displayed.
Load (Import) Clips

Requires ‘Jamm Creator’ pack.
Tap on a clip’s name.wav to go to the Files App where you can browse various locations to find clips to load. iCloud* Drive, Dropbox, Gdrive and the Audioshare* apps are supported. For best compatibility please use WAV 16 bit, 44.1khz,or 48khz , stereo samples. Mono Is supported. 24/32 bit , or Higher sampling rates eg 96k, may work but are not officially supported at this time. Lower sampling rates are not recommended.
There’s no “file size” limitations as such, but there is a time limit per sample of 1m30s, if your sample isn’t loading please check the duration of the file.
*iCloud and Audioshare are iOS exclusive
IMPORTANT
Batch Import of samples is only supported on Channel 1-4, add samples to stabs 1 by 1.
The following instructions are divided up by platform.
iOS
On iOS you can also browse to ‘On my Ipad’ some apps save their samples within their program folders and you can load these. Within the JammPro folder you can browse the Samples folder, or the Packs folder. In the latter you can load Clips from other Sets (formerly called Packs :) -from each one's Soundfiles folder.
Tap a clip’s file name to load just that one and it will Immediately load.
Tap ‘Select’ in the top right of the file browser to Select multiple files.

For multiple files, Select each file you want by tapping its circle on the left. Then tap ‘Open’ and a confirm dialog will appear. Clips will be loaded in alphabetical order starting from the Clip slot you were on when you started the Load operation- and will overwrite previous clips in the subsequent slots. Undo will not undo such multiple overwriting!
‘Select All’ selects all files in a folder...however if any non-audio files are selected (e.g. a folder, or a text file) , then the Open button will be ghosted. Scroll down until you see the unsuitable file or folder and deselect it.
The maximum length stereo sample @ 44.1khz that can be loaded into a clip is 90 sec.
Be aware that if the sample that is loaded was recorded at a different BPM to the current BPM in Jamm, then the sample will be stretched according to whatever time stretch algorithm is selected for it. Time stretching always introduces some artefacts. See the Time stretch Mode section below.
For More Information
Here is is a doc with more info on Loading samples and making your own sets.
Android

On Android, Jamm Pro Sets are held within a partitioned folder, while it was possible to force access to that folder using a 3rd party file manager, Android 13 disabled this functionality for security reasons. If you want to mix and match sets you will have to Export your collection to Zips and then decompress them in your documents folder.
From the android file manager you can choose any linked storage location as a source for samples, tap a clip’s file name to load just that one and it will Immediately load. To select multiple samples while in your file manager hold press on an audio file, and a tick will appear, then choose your selection of items, or hit the 3 dots on the top right and Select All, samples will load in alphabetical order, from the slot you are highlighting onwards.
The maximum length stereo sample @ 44.1khz that can be loaded into a clip is 90 sec.
Be aware that if the sample that is loaded was recorded at a different BPM to the current BPM in Jamm, then the sample will be stretched according to whatever time stretch algorithm is selected for it. Time stretching always introduces some artefacts. See the Time stretch Mode section below.
For More Information
Here is is a doc with more info on Loading samples and making your own sets
Clip Pitch

Adjust the pitch of a clip. Changes in Clip pitch often work best with Clip set to FFT Timestretch mode. When the Timestretch mode in Settings is on Repitch All, this means that all clips are in FFT mode by default.
Gain, Pan, Stereo

Is what they are. Turn Stereo down to reduce stereo width to mono at minimum.
Start Point
The Red cursor in the clip waveform sets the Start point of the clip by dragging it. Holding Shift and dragging gives finer control. A clip having its Start point edited is muted until the Start button is released. It's best to set the Start approximately with dragging, THEN Shift drag. This is on the dev list to sort.
As is the ability to set an End point as well as a Start point so clips can be edited in Jamm. For now we have taken the attitude that clips need to be correct loops before being loaded into Jamm.
You can also Jumpstart on the clip waveform, tap in the upper region where the red cursor is narrowest and the Start Point will jump to your finger’s location. Jumpstart can be quantized to either 16th or dynamically based on clip length (See Settings Page)
Swap
A quick way to arrange clips in the Clip matrix. In the clip panel, tap Swap - you are prompted to tap another clip and then this and the first clip will have their positions swapped.
Edit Name
Change the name of the Clip. 10 Chars max, best if less.
NB *Using ‘Rename’ directly changes the Set you have loaded. If you want to rename clips, it is recommended to first save a copy of the Set using the Save and Close option from the File menu*
Edit Bars
Change the number of bars that the app thinks the clip is. Jamm will always try to guess the number of bars of a clip but sometimes may get it wrong. Our fave lengths are 1,2,4,8,16 bars, but you can set other values with this.
Clear
Removes clip.
Time Stretch Mode popup

Sets the time stretch mode: different modes suit different material; also what Timestretch /Repitch operations you are doing will affect which TS mode is best.
NB see Global Settings Menu to set the global time stretch mode. If this is set to the Repitch all, Individual clips cannot have an Individual Time stretch mode set mode set. Repitch all applies FFT Timestretching to every clip.


Time stretch modes are:
Repitch
On slowing down or speeding up, like a turntable the pitch will change. NB for pitch changes, Repitch will use the Beats mode.
Beats
Good for beats, where the timing is crucial, also preserves transients well.
Stretch
General purpose mode, the default.
FFT
Good for melodic clips, but timing may wobble. Used on ‘Repitch All’
Jungle
Special mode for Junglists. Try it. See Speed options below.
Speed
½, 1, 2 : half, normal or double the speed of a clip.
NB for Jungle, ⅛, ¼ and ½ are available for extreme effect.
Declick
Declick reduces zero crossing points which can make some clips click. But if it’s on, sometimes the initial attack can be lost, especially on the first kick of a clip. Try turning Declick off if that happens.
Direction
Either > forward or < reverse.
Vib Amt
Applies a vibrato effect to the clip.

Vib Speed
Changes the speed of that vibrato.

Depending on the TS mode that's on for that clip, the effect of vibrato will vary. Beats mode with a high speed and high Amt can add an interesting extra overtone.
FFT Phase
Only displayed for FFT mode, an extra experimental effect.
Follow Global Pitch
A PER CHANNEL setting which allows one to stop a channel being affected by Global Pitch changes (e.g. from a Mod Seq doing key changes). Typically used for the Beats channel as you don't want the beats to be affected by key changes.
Trigger mode
Trigger mode controls how clips respond to touches. For Stab Matrix clips, these 2 options are always shown:
Loop option (on/off) - whether a clip loops after it finishes or just plays once.
Launch option (Gated/Trigger) -whether a clip continues playing after the button triggering it has been released.
For Loop Matrix clips, if its channel is set to Stab mode then the clip will show these 2 further options; in normal Loop Matrix mode, then these options are not shown because the mode forces all clips to behave as per defaults i.e Trigger+Loop.
See the section Learning about channel modes for more info on this.
Append Length
Append Length is a special function shown for Stabs only.
When Append Length is ON, the length of the sample is extended to the nearest bar length by adding silence, or in the case of a sample where it is already cut to an even bar length, nothing is added and there is no need.
The purpose of the function is to deal with JP’s playback engine where all samples are always stretched to keep in time with the current BPM, either by one of the timestretching algorithms or sped up/slowed down with Repitch.
TRIM
When trimming a clip, you won’t be able to select another clip in your set, please SAVE/Revert if you wish to switch clipslot.
This button accesses a clip Trimming set of functions. The waveform background changes to Red.
The idea is you Trim a sample till it loops correctly, then hit SAVE to create a new version of the sample which is loaded in.
In- In+ change the In point of the sample. You can also drag the bottom In point cursor directly, and you can hold Shift to make fine changes of the In point as you drag.
Out - Out + change the Out point of the sample. You can also drag the bottom Out point cursor directly, and you can hold Shift to make fine changes of the Out point as you drag.

Region - Region + nudge which bit of the sample is being used, this will only be relevant if the In and Out Points do not include the whole sample.
Jump - Jump + move the looped region in jumps of a bar
You can also move the Start point within the In and Out Points if you wish to force the Start point to somewhere else than the In point.
When doing In and Out operations, Jamm attempts to refit the region you are editing to be in sync with global playback of other clips by retriggering the clip. It may take a couple of loop cycles for it to sound as it should. You can force a Retrigger with the Trigger button or the Bar Trig button. The latter waits till the next bar to retrigger which is often the most useful.
Select All selects the whole waveform.
SAVE creates a new version of the sample and assigns it a default name which you can change. This is loaded into the Slot replacing the original pre-trimmed version.
REVERT exits the TRIM editor without changing anything.
The TRIM editor was included in response to user requests. It works quite well but you may find it easier to use an external editor.
Record Mode
This screen allows swapping between the 2 record Modes of Recording Out and Sampling In, and settings for each.
Hit Shift + Mode to swap between them while on other screens.
NB All Recording in Jamm is ‘bar safe’ i.e. Recording always starts exactly at the start of a bar and ends at the end of a bar. This makes for exact loops and simplifies editing.
Recording Out
Recording Out is the mode for making Stereo Mixdowns, Stem Recording and Resampling.
Here is a video explaining all 3 Recording Out processes.
When Mode is set to Recording Out, the Record button near the bottom left of the app is a red circle. If the app is playing, on pressing the Recording button it goes red; after blinking red for a time set in the PreRoll it will go solid red, and Recording will start. If the app is not playing, pressing Record will not do anything till play commences, triggering any PreRoll, and the Record.
Tapping the Record button again will stop Recording and the next step i.e. what to do with what has just been recorded will depend on which of the 2 sub modes, Export Recording and Resampling is set.
MaxBars, Export Recording and Resampling
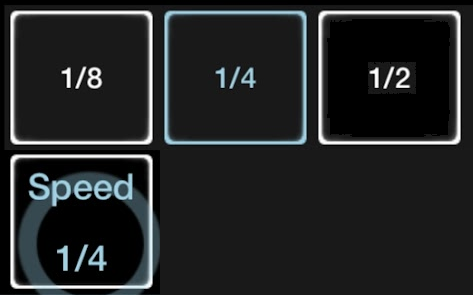
Export Recording and Resampling are switched between using the MaxBars setting of the Recording Out page. Fundamentally MaxBars specifies how long a Recording is wanted: Manual (can be any length because user manually decides when to end ) OR 1,2,4,8 bars. Hold the MaxBars button to set it from the popup.
Export Recording
When MaxBars is set to Manual (default), Jamm assumes that you want to make an Export Recording. Used to make any length stereo or stems* recording of your Jamm performance. When you press the Record button to Manually STOP an Export Recording, you go to the Export Recording Screen where you have various options with what to do with your Recording.
*Stem Recording requires the ‘Jamm Creator’ pack to be purchased.
Share As Wav
Creates a 16 bit WAV stereo mix of your performance.
Share As AAC (Also attaches Album art, tap to change the album art if you want)
brings up a standard iOS and Android Share menu screens where you can use Airdrop, Email, Save to Dropbox or GDrive, and various other sharing apps if you have them set up eg WhatsApp. You can also open with compatible, permissioned audio apps you have installed.
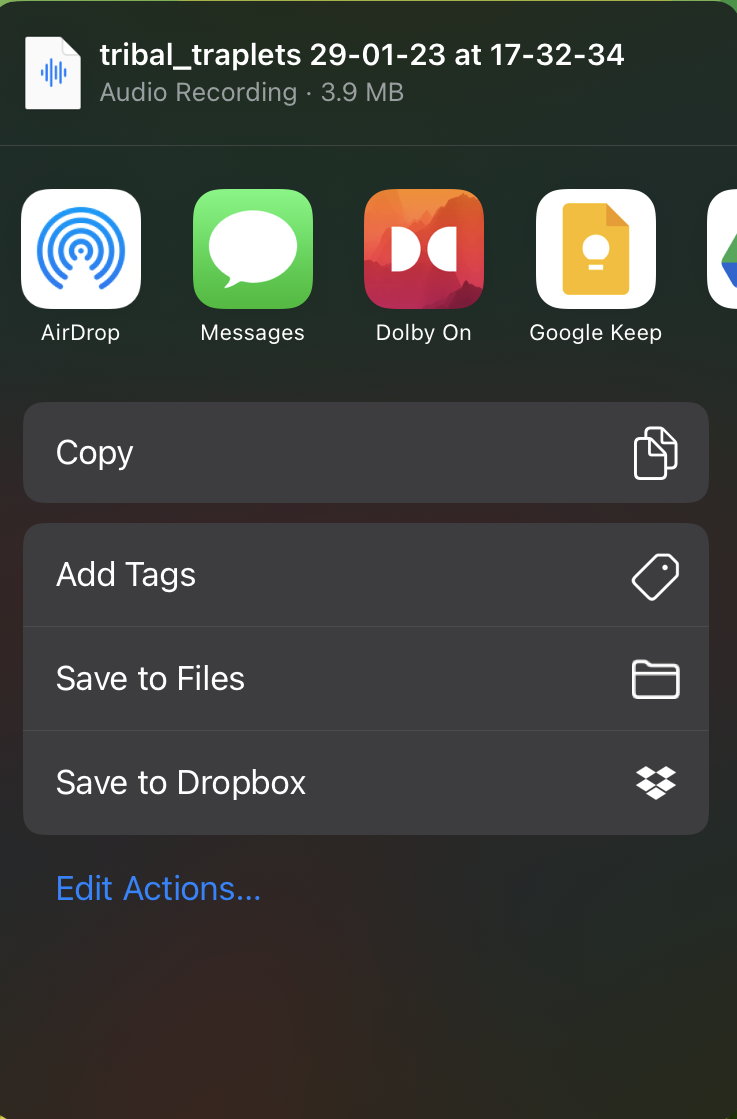
If Sharing as an AAC, longer recordings may take a moment to process, this is normal, and highlighted by a progress bar.

On Android, when you tap Share to Wav, or AAC, the file will be saved locally in the Music>JammPro folder, regardless of whether you share it (If you click “delete recording” it will be removed from this location too).

On iOS recordings are all saved (unless deleted) in JammPro>Recordings, accessible in the Files application.
Share as Video
Creates a video file of your performance, with a static album art as graphic, useful for social media posting!
Load Recording to Clip...used only for Resampling, see below
Delete deletes the last recording
Requires ‘Jamm Creator’ pack.
If Stems recording was selected, a slightly different set of Export options are present.
-Share… is the same as above except that for stems the app will zip all the stems into one zip file which can then be moved to your computer, unzipped and the Stems loaded into a DAW eg Logic where you can do further work on it.
iOS exclusive currently
-Ableton Live Set Export also zips the stems into a file, but formats them as an .als for Ableton Live which on unzipping can be loaded straight into Ableton!
Resampling
When MaxBars is set to 1,2,4, 8 or 16 bars, Jamm assumes you want to do Resampling. Resampling is the term for making short recordings of individual or combined channel outputs- and then immediately loading that recording into a clip Slot.
When Resampling is set, the Record button is a red circle as for Export Recording, and it works the same: tap the Record button to trigger a drop in to Record after any set PreRoll. Perform as you will. Recording will stop, after MaxBars number of bars, ‘bar safe’ i.e. at the end of the last bar.
The difference with Resampling is what happens after Recording. Instead of going to the Export Recording page, a red arrow pointing up replaces the Record button. This ‘Load Prompt’ has the same meaning as the message displayed at the top of the screen which prompts you: ‘Double Tap any Clip to load your recording’.
Double Tapping any Clip, including Stab Clips, will load in the Recording you just made.
NB This used to be just a single tap to load, but from v1.1 onwards we changed it to a double tap, after user feedback suggested that it was too easy to overwrite clips by mistake with a single tap.
PreRoll
When you hit the Record button, PreRoll will wait the specified number of bars till it drops into Record.
Pre-Post FX toggle
Controls whether the recording will include the FX. NB The ColdCutter is regarded as an effect!
Output
Controls whether the recording will be Stereo or Stems. For Stems, a separate recorded stereo track is made for each of the 4 main Channels of the Loop Matrix, and also the Stabs, and the Sub Bass, and also a stereo mix, so 7 stems in all. These will be labelled in line with the channel names you have set.
NB FX including Delay and Reverb in each channel are always per channel INSERTS so there are no separate Returns for the FX. What you hear per channel is what is recorded for that channel.
Include Channels
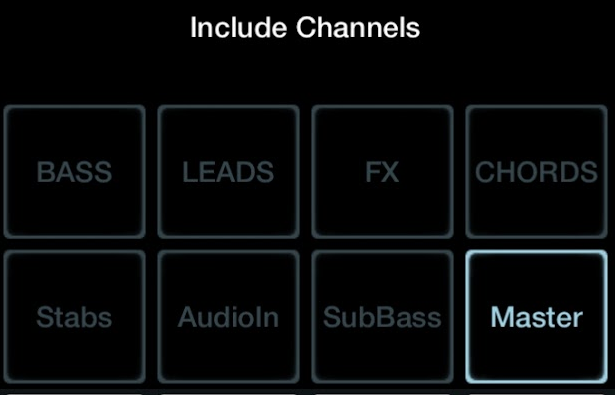
Controls what Channels are included in a Stereo Recording Output.
(If Output is set to Stems then Include Channels is not shown because all Channels are separately recorded).
Include Channels has a button for each of the 4 Loop Matrix Channels, the Stabs Channel, the Audio In, the SubBass and the Master.
For a normal Record Out Stereo Mixdown, only Master would be selected (which itself then includes all the channels).
However for Resampling or if for some reason you just want to Record Out a particular combination of channels, you can turn Master off and select the channels you want.
For example, say you want to Resample a riff you are playing on the Stabs. Turn Include OFF for everything except the Stabs. Now when you hit Record only the Stabs will be recorded.
Sampling - Requires ‘Jamm Creator’ pack
Sampling is the Recording In of audio from an Input Source, directly into a clip within Jamm.
When Sampling Mode is selected the Record Icon changes to a Red Microphone. Tapping that then makes it start flashing and the message at the top ‘Double tap any clip to start recording. Tap again to stop’ is shown.
So the flashing Red Mic means Sample Recording is ARMED i.e. ready to record - be aware then that double tapping any clip in the Loop or Stab Matrix will trigger Recording, and that the contents of that clip will be overwritten by the new Sample recording. You can use Undo Audio from the File menu to undo the last record.
NB This used to be just a single tap to load, but in v1.1 we changed it to a double tap, after user feedback suggested that it was too easy to overwrite clips by mistake with a single tap.
When you are confident that you do want to record into a clipslot, double tap it and it will drop into Record on the beat after any PreRoll that is set, see PreRoll below. The Record icon goes solid red. The clip during recording counts the number of bars recorded.
Sample Recording will stop automatically after whatever number of bars MaxBars is set to. Or, if the clip that's being sampled into or the Record button is tapped, that will manually stop recording at the end of the current bar. Either way, the Red Mic will go dim indicating that Record Arm is OFF.
After a Sample has been recorded into a Loop Matrix Slot, it will automatically start to play. If the recording was into a Stab slot, you would trigger that Stab slot to hear it.
Circular Sampling
Can be active on either type of recording (Recording-Out/Sampling-In) but not both at the same time. When the circle reaches the end of the MaxBars set (maximum 16 bars) the recording will loop round and begin overwriting your take, you can finalise your recording by hitting the microphone icon to disarm the recording.
Sampling Input Source
The Input Source describes where a recording is coming from. This could be the built in microphone your smartphone or tablet, a wired headset microphone plugged the device and fed into the app, a soundcard with any audio source connected to it and digitised by the sound card, or other apps (iOS only) on the same iPhone or iPad routed into Jamm using InterAppAudio solutions such as AudioBus and AUM. If using an interface, best practice is to load your Jamm Pro Session first, then connect the interface to your device.
NB there are issues with iOS and IAA which affect not just Jamm but many apps.. For both Audiobus and AUM we have found that it works best if one loads Jamm from the home screen, NOT from within AB/AUM. THEN when it’s loaded, select Jamm as the output or insert effect.
Audiobus
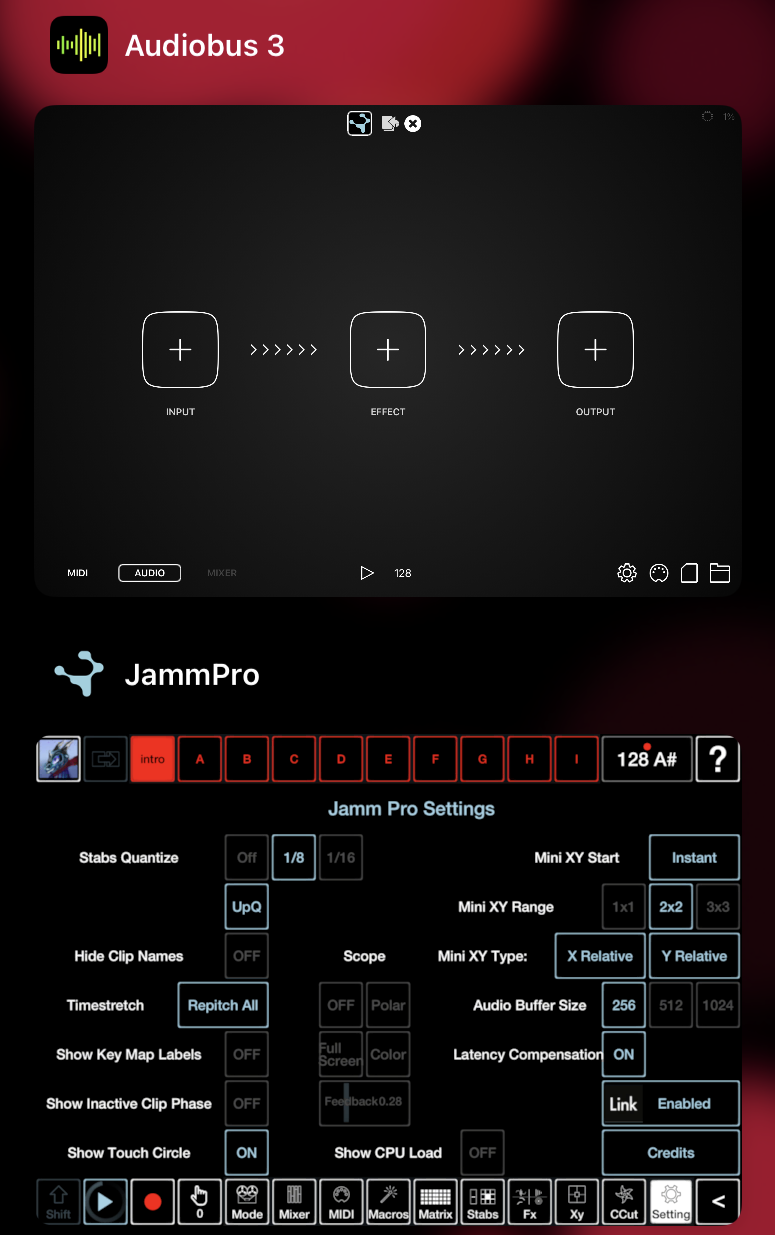
Audiobus is an app that allows for multi-input routing, this means that you can send app audio or midi to different locations, such as Jamm Pro, where it can be recorded and resampled.
If using this software, to start load up Jamm Pro, and jump into a set, if you want Audiobus to keep track of the tempo and other relevant information, please go to the settings and make sure Ableton Link is enabled.
Once you are in Audiobus, you are presented with 3 options on the bottom row, MIDI, AUDIO, and Mixer (greyed out till you create some inputs and outputs)
There are numerous possible routing options that you could use, so we’ll only explore a couple of them for clarity.
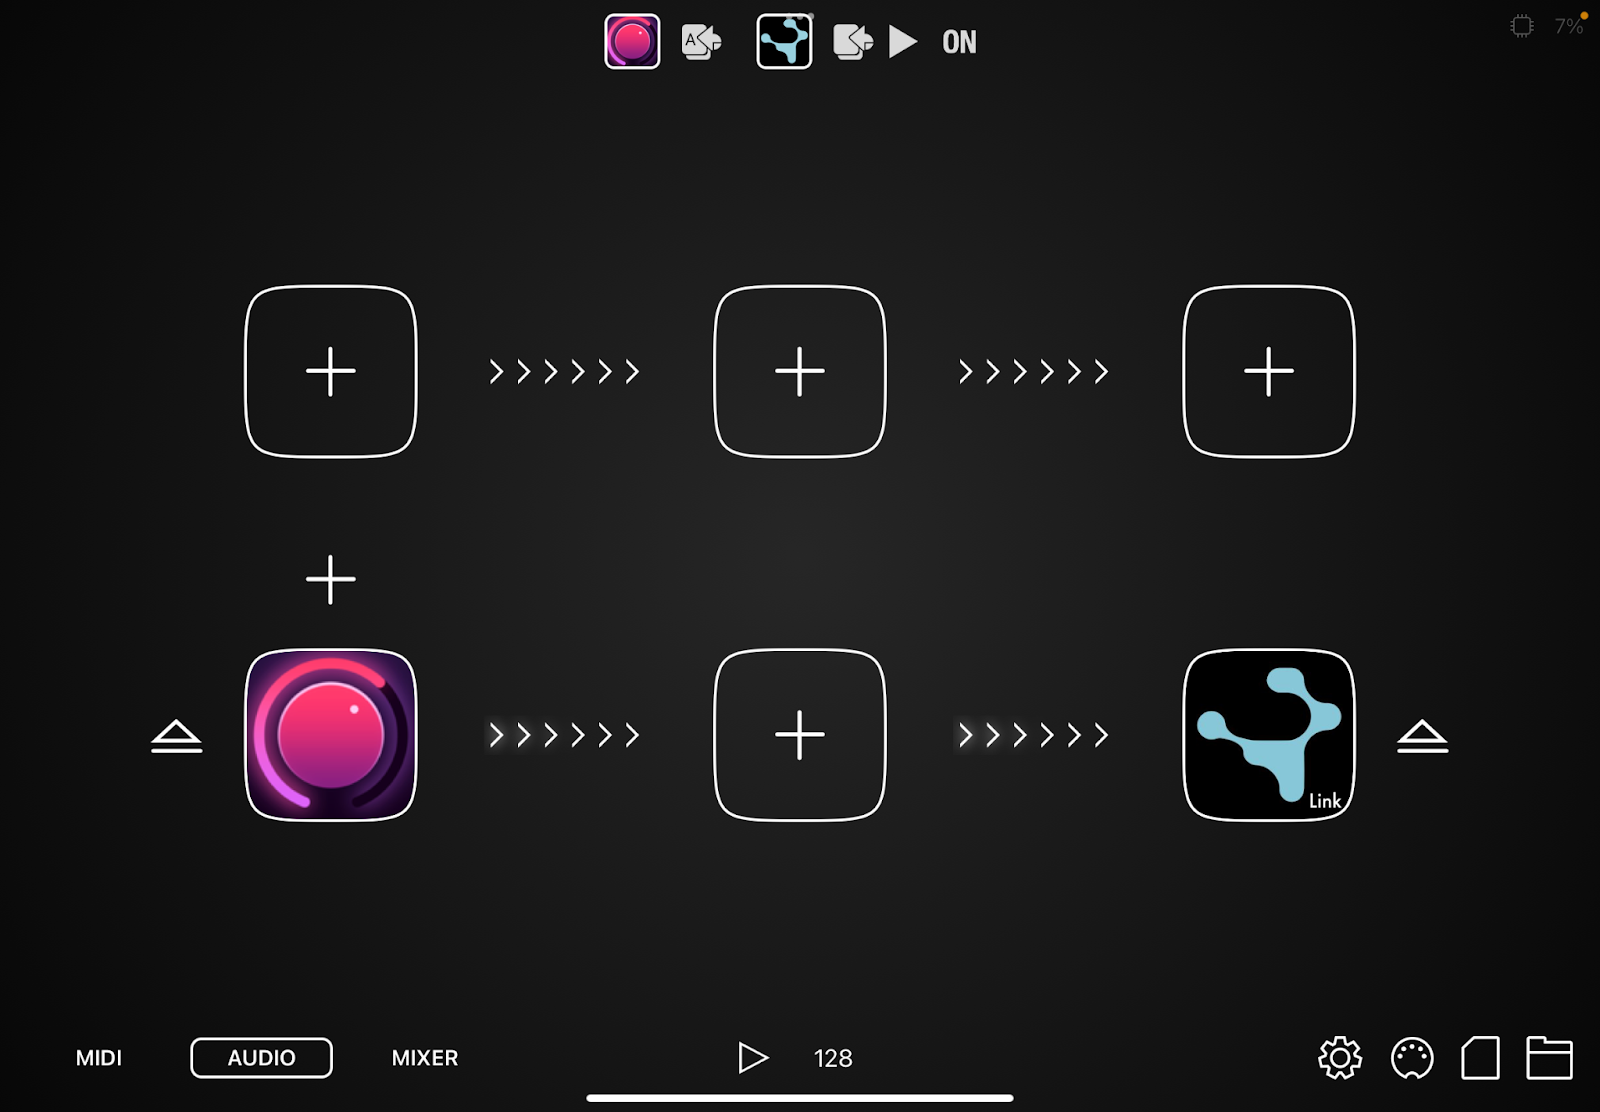
Scenario One: Synth-App into Jamm or Jamm into Daw
1: Tap input
2: Select an AUV3 or IAA compatible app (in this example I am using Overdrive Synth)
3: Tap Output
4:Select Jamm Pro
5: Tap on Jamm Pro’s input and it’ll take you back into the app direct from Audiobus.
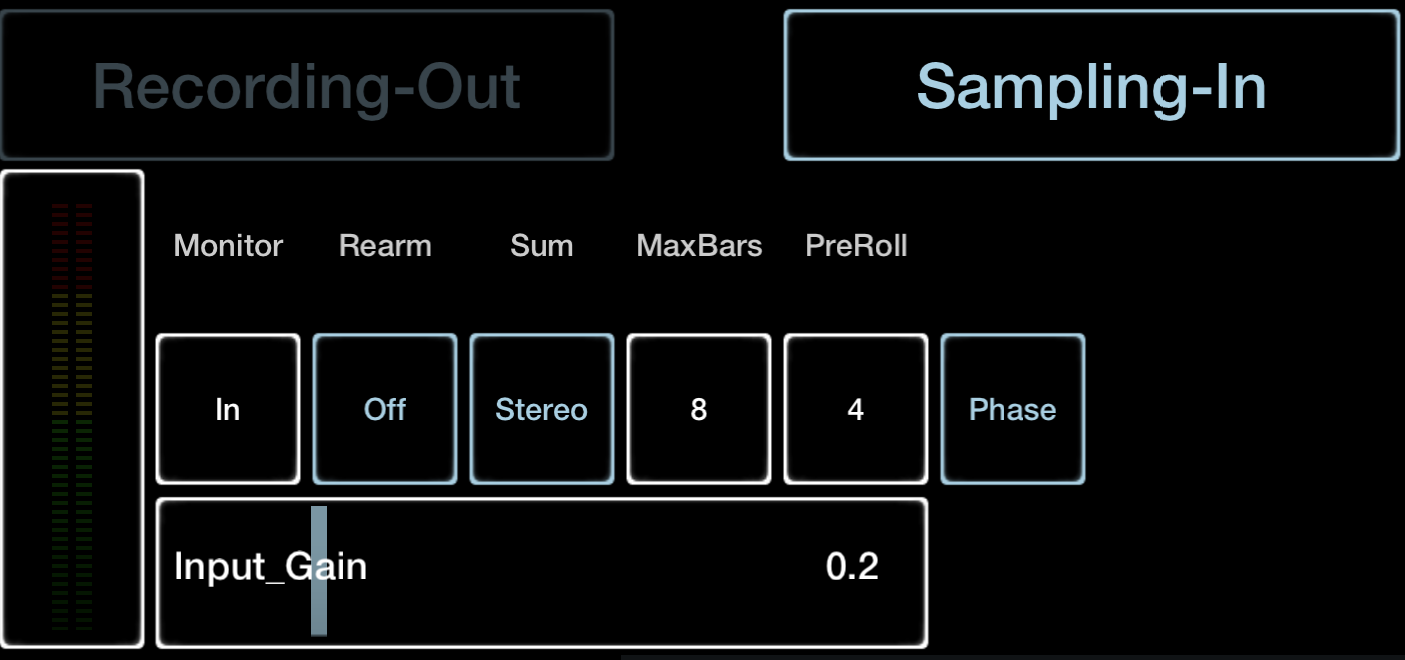
6:Go to the Mode Page, Choose Sampling in, and turn Monitoring to “In” this means you’ll be able to hear the source as it arrives in Jamm Pro.
7: Want to record a quick clip, set a recording pre-roll and hop back over to the synth, many have virtual keyboards you can use on the fly. Once recording is done it’ll automatically begin looping in Jamm, unless you’ve recorded to a Stab Slot or left the channel on “Stab Mode”
8: To take Jamm into a DAW, e.g. Apple Garageband, you can follow the same procedure, just swap the input to “Apps: Jamm Pro” and Output accordingly and it’ll work how you’d expect.
Scenario Two: Synth + External Audio Source into Jamm Pro

1: Make sure your USB audio source is connected properly to your iPad or iPhone. (Some interfaces may require more power than your device can output by default, please use a USB PD compatible adapter and hook up to mains/external battery for maximum compatibility)
2: Tap input>System (in this example I’m using a USB microphone)
3: Choose your interface channel or summed source.
4:Tap Output, Select Jamm Pro
5:You’ll notice a new input slot appeared when you created the first one, use this for your AUV3 or IAA apps, and repeat steps 2-4 accordingly.
6:Go to the Mode Page, Choose Sampling in, and turn Monitoring to “In” this means you’ll be able to hear the source as it arrives in Jamm Pro.
7:bonus step, if you want to host a midi controller for your external synth. Go to the MIDI page on audiobus, for input, choose your controller, for output, the app you want to control, make sure it’s the same “instance” that’s loaded in the AUDIO section.
8: If you want to monitor sounds outside of JP, please duplicate your input channels in Audiobus, and change the output to your headphones/interface etc.

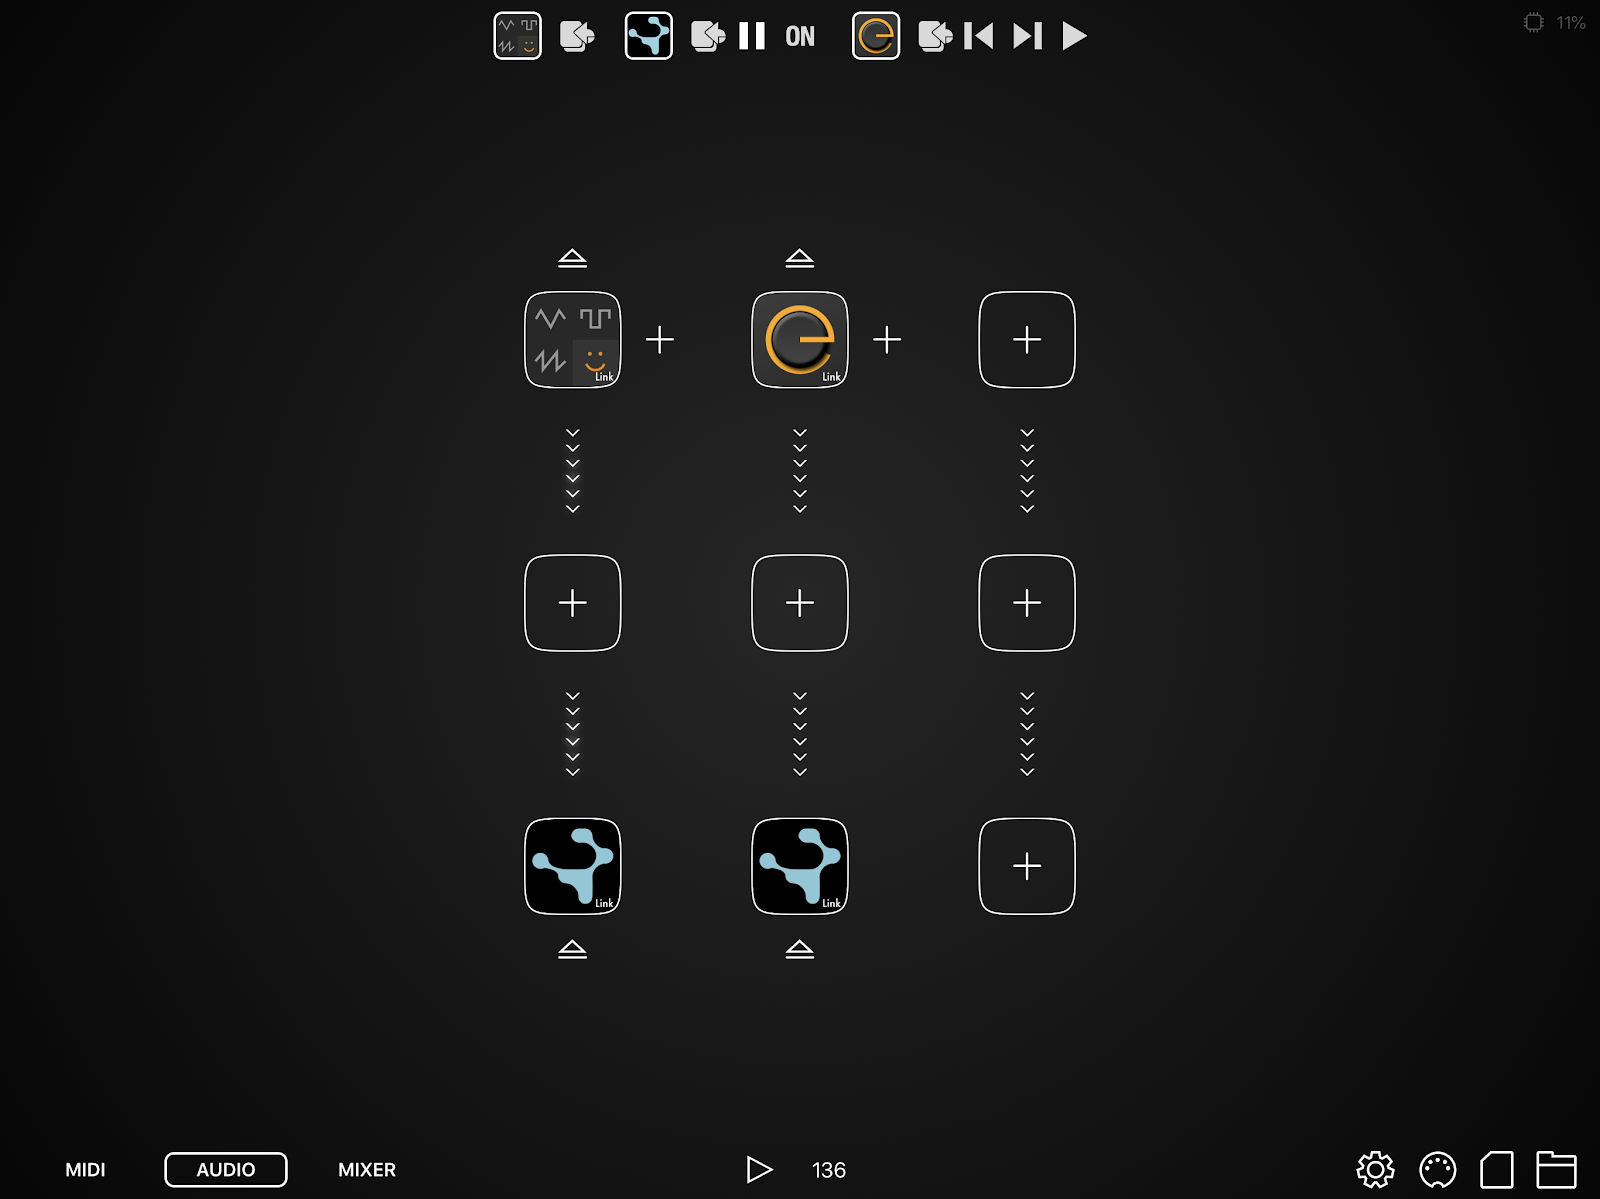
Here’s another example Audiobus setup so you can have 2 inputs both running into Jamm; you could switch between them with the Audiobus mixer.
Audiobus Control Panel

Available as of version 1.6, initiate playback from any audiobus connected application routed into Jamm Pro,
Arm a recording slot with the microphone icon (defaults to ch4, slot 8 with circular sampling if no clipslot has been preselected.)
Then start recording with the REC button. If using circular sampling, finalise your recording by hitting either button when you are happy.
ON is an audiobus function that acts as a hard bypass of your audio feed from the app.
AUM
For a howto using AUM see here.
Say you want to route various apps via AUM into Jamm.
You can't load multiple instances of JP in an iOS host, that's the nature of the complex libpd global issue that prevents us from making Jamm an Auv3 plugin. But, there’s always a workround!
To route two apps into JP using AUM you need to set up a mix bus and route the two apps into a bus, then choose that bus as the input for the channel you add JP on. See screenshot using bus A.
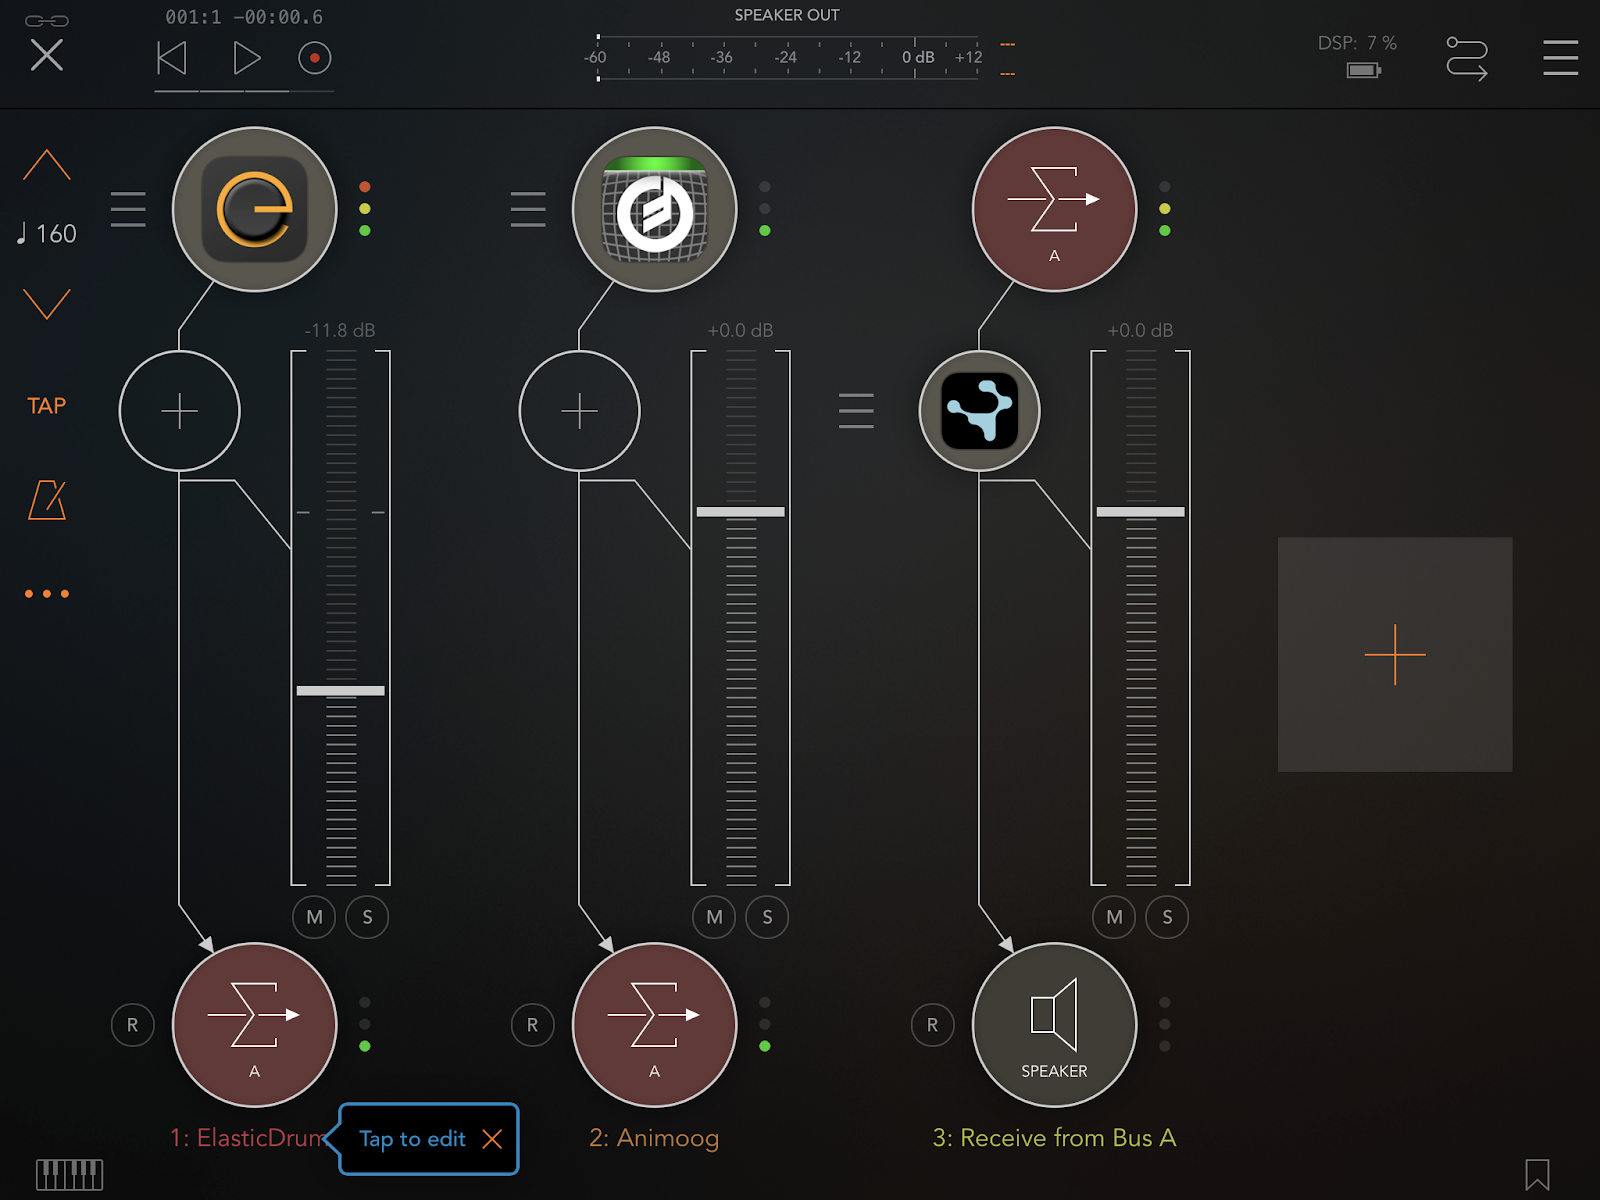
If no Soundcard is plugged into the iPad or iPhone, the input source will default to be the built in microphone, if a headset with Microphone on it is plugged in, then this Mic will be used.
If a Soundcard is plugged in, then that overrides the Mic and becomes the input, so whatever is plugged into the Soundcard can be recorded. If an audio routing app like Audiobus or AUM is used, then this can be used to switch between different sources including other apps on the Ipad or iPhone.
Input Gain
The Input Source level will always be seen on the meter to the left of the Input Gain slider no matter if Monitor is on or off. The level can be adjusted using the Sources own volume and the InputGain.
Keep the level out of the red to avoid distortion.
Monitor
Controls whether the Input Source will play through and be heard via Jamm.
Even if it’s off, it can still be recorded.
There are 3 settings, hold the button underneath where it says ‘Monitor’ to select from:
Off -the Input Source is not heard, though it can still be recorded
On-the Input Source is heard
Auto (default) - when Auto is on, the Input Source is only heard when Record Arm is on, ie the Red Mic is flashing, This works so that when Record Arm goes off, typically by the app having recorded Max bars of the source, the Input Source is muted. As after recording the new recording begins to play, this is handy as otherwise you would hear the Input Source AND the Recording which would be confusing. Auto ensures you hear EITHERr the Input Source OR the Clip recorded from it.
**FEEDBACK READ ME**
NB If the Input Source is the Inbuilt Mic, then be aware that feedback, a generally unwanted horrible whistling sound, can occur if no headphones are plugged in. So have Monitor OFF if using the internal Mic and the built in Speakers.
(Feedback occurs when a Mic is too near a Speaker so the sound of the Mic comes out of the Speaker, then goes back into the Mic...in a loop which gets out of control. Hendrix used it but he knew what he was doing :)
A typical situation in which this occurs is: a Headset with its own Mic is plugged in and Monitor is ON so you can hear your voice coming through Jamm. Feedback doesn't occur because the Headset Mic doesn't interfere with the Headset speakers. You record some stuff, then unplug the Headset. Feedback occurs with pain to everyone’s ears. The reason is that when you unplug the headset, the iPad switches back to the internal Mic and its own speakers and so Feedback happens. Turn Monitor off, or plug the Headset back in, or turn the Vol of the iPad right down to stop the feedback till you get a solid grip on the situation.
Rearm
Off by default. If this is on, then after a Sample Recording is dropped out of, the Record Red Mic goes back to flashing, meaning that we are still in Record Arm, and so double tapping a clip will immediately go into Record again without having to tap the Record button an extra time. This is useful if you want to quickly record several samples but you need to know what you are doing or you risk recording over clips you didn’t mean to. Still, Undo Audio from the File menu can help.
Sum
Sets whether recordings will be Stereo or Mono. Mono sums both left and right sides of a stereo input together to create a mono sample.
MaxBars
Preset the number of bars of Recording to be 1,2,4,8,16 bars.
PreRoll
When you hit the Record button, PreRoll will wait the specified number of bars till it drops into Record with a metronome helping count in.
Circular Sampling
Can be active on either type of recording (Recording-Out/Sampling-In) but not both at the same time. When the circle reaches the end of the MaxBars set (maximum 16 bars) the recording will loop round and begin overwriting your take, you can finalise your recording by hitting the microphone icon to disarm the recording.
Phase/Normal
Sometimes a recording source will benefit from phase correction, other times it may not, you can choose which works better for you.
Mixer
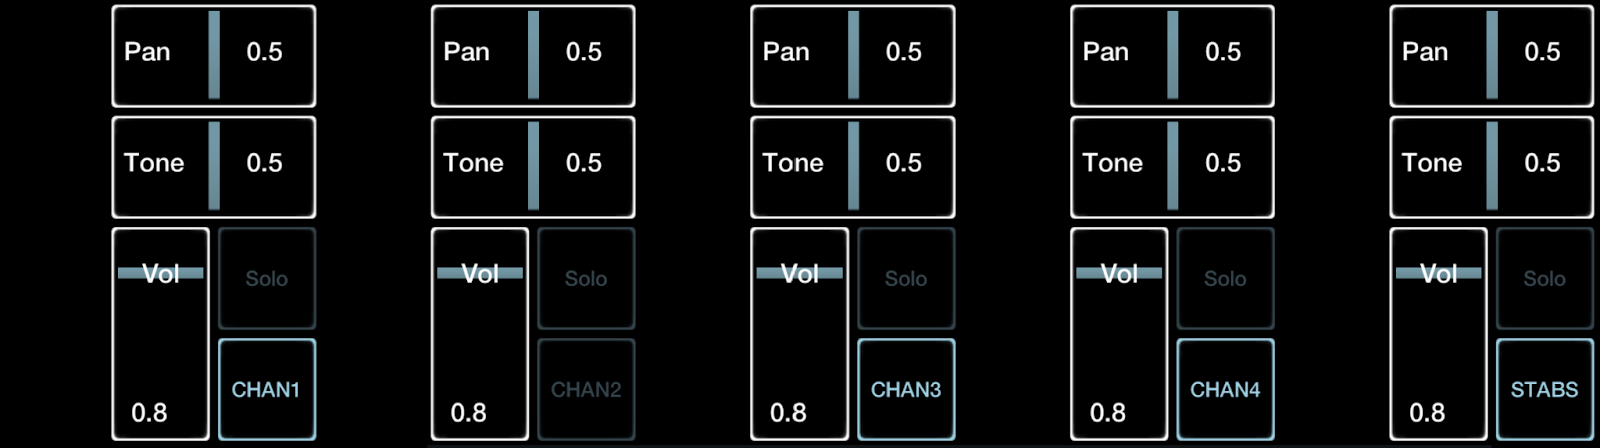
This screen houses a simple 5 channel mixer for the 4 Loop Matrix and the Stab Matrix channels. It's pretty straightforward.
Double tap a control to return to its default settings. Tone is emphasising treble at the top, bass at the bottom.
MIDI
The MIDI screen allows you to assign external MIDI hardware controllers to pretty much any Jamm function. NB Virtual MIDI and other MIDI routing may work on iOS but is not officially supported at this stage. Network MIDI from e.g. Mac OSX Network session seems to work well. Currently only one MIDI input at a time is supported. On Android, current technological limitations prevent Network Midi from being an option at this time, local USB and Bluetooth MIDI options are fine.
Input

Tap underneath MIDI Input to see what MIDI inputs are connected. Select the one you want, and if that has a specified channel select that from Channel. Default is Omni which means Jamm will receive MIDI on any channel.
MIDI Input Monitor
In the top right of the screen where the ? Help button is, a red LED will flash to indicate MIDI input to help you see what activity there is.
Underneath ‘Channel’ on the MIDI page, the most recent MIDI messages are shown.
MIDI-Map
Tapping this puts the app into Midi Mapping mode (= MIDI Learn). All params in Jamm are represented by white boxes and tapping on one highlights it blue. Moving any control on the connected MIDI controller then prompts you to accept the mapping i.e. the assignment of that control to that Jamm parameter.
Saving MIDI Map
The MIDI Map for your install of Jamm is saved when you save your Set, and that is global across all your Sets- ie currently a user can only have one MIDI map for their copy of Jamm.
Keyboard Mapping Support
Most of the functionality provided by keyboard support is intended for use on ARM Mac products, but it’s actually built right into the app on iOS, you can map the keys the same way as you would MIDI, though at this time it is limited to one or the other per parameter, i.e. you can have either CC #0 or Space to control the play button, not both. “Function” keys are not fully compatible at this time, so YMMV.
Clear Param
Clears the last param of its mapping.
Clear All
Clears all the current mappings.
Additional Modules and Screens
At the bottom right of Jamm is an arrowhead icon. Tapping this brings up a second bank of Screen Selectors, the most important of which is the last one on the right, the Settings screen
Tapping the arrow again takes you back to the Main bank of Screens, and reselects the primary home screen, on mobile initially this is “Matrix” on Tablet this is “Play”. Jamm Pro will then default to whichever of the two you’ve used last for this behaviour, until you restart the app.
Single Screen Modules
These are larger size layouts of the main Jamm modules which are good for beginners and mobile usage as they are not so packed
Loop Matrix: Move between loops, alter the pitch of a channel, or switch a channel to stab mode with Shift + Channel mute/unmute

Stab Matrix: Activate Stabs, switch to Scratch Mode with a shift + Fx slider, Turn Stab FX on/off, mute channels 1-4.

Channel FX: Turn fx on/off, change fx parameters by tapping and dragging on each icon, mute unmute channels.

XY Pad: Control Filters and Master FX, turn off XY fx on specific channels, mute channels. Hit Shift + XY page selector to switch to Gyroscopic control.

CCSlots: Coldcutter Fx triggers, enable/disable which channels it affects, Shift + tap on Slots 8-15 will lock them to active.
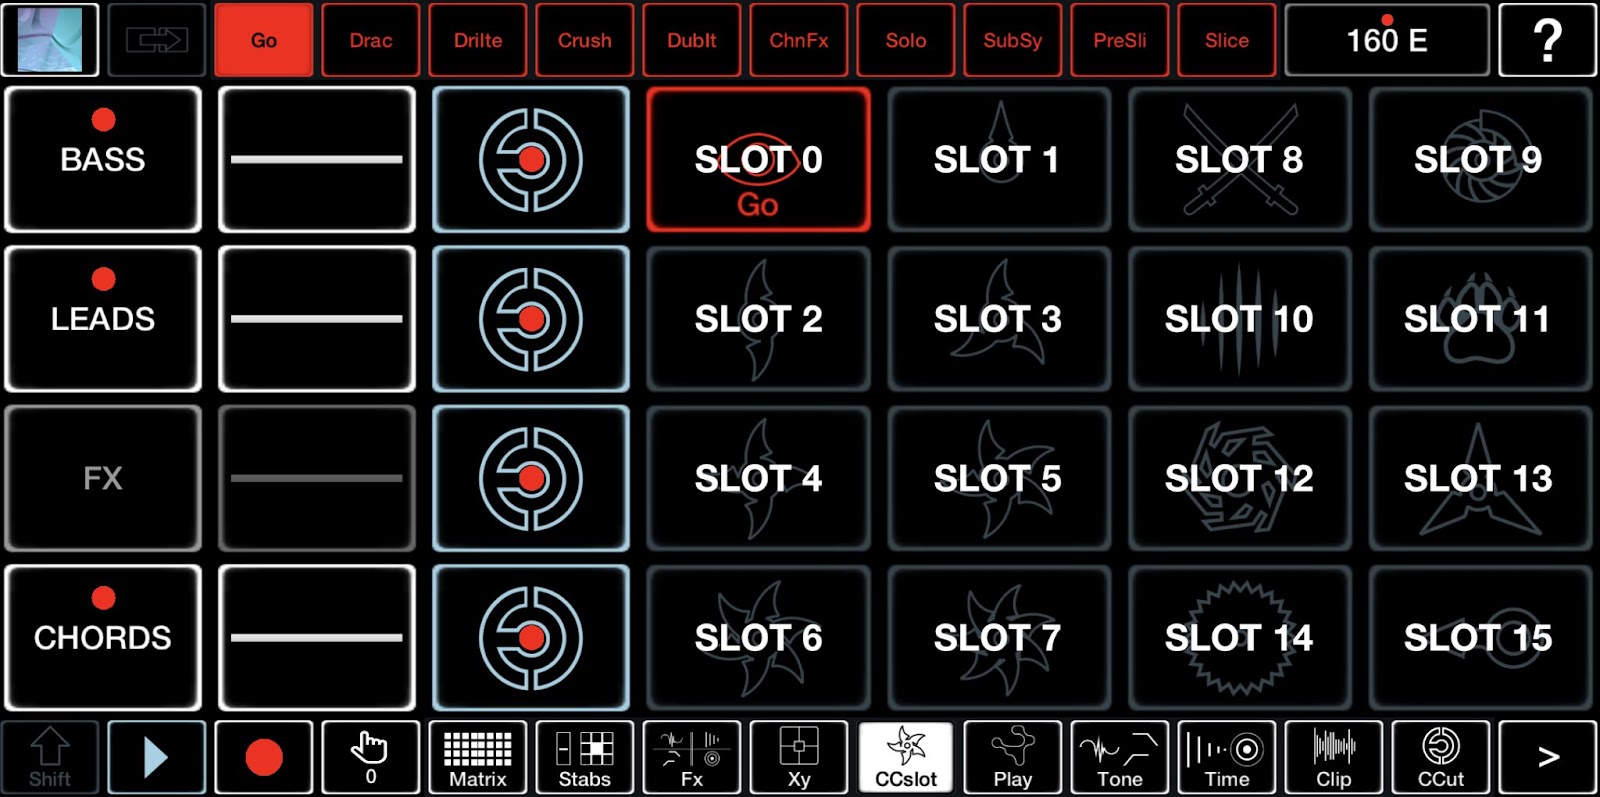
Settings
Some global settings for the app, these are generally remembered on closing and reopening the app. We are likely to change how this page is arranged in a future version, if you have any feedback, please poke us on the discord or social media with your comments 🙂.
JS QuantizeRange
Set Clip JumpStart quantisation properties, ON = 16ths, OFF is dynamic based on bar length, with longer clips being smaller sections, 1=16ths, 2=32ths etc. Experiment a bit to figure out which mode works best for you.
Stabs Quantize

Switch quantize to Off, and your stab triggers can be looser and more free flowing, want to have some assistance with keeping on beat, choose either 1/8 or 1/16.
UpQ controls the release timing of stabs, in the same way as Quantize influences the trigger timing. Have an experiment and see what you think works best for you.
BasicMode
Enabled by default on a fresh install of Jamm Pro, Basic Mode simplifies the interface to core functionality and prioritises the large screen variants of pages.
Hide/Show Clip Names
Sometimes you might not want to show the Clip names!
Timestretch

This is a Global Setting in that if Repitch All is selected, then all clips TS setting is locked to Repitch and cannot be changed in the clip panel. This is so that if you want to use the ‘vinyl- style’ mode whereby BPM changes also change the pitch, all clips will follow. This uses our FFT algorithm for the smoothest operation.
If PerClip is selected, each clip can have its own TS mode set. See the Clip Page for more info on that process.
Beats and Pieces Mode is enabled with the OFF/B+P button next to Timestretch, this sets the timestretch mode to Beats on Channel 1, and FFT on Channels 2,3 and 4.
Show Key Map Labels
If you’re not using an external controller, you may find the labels redundant, feel free to switch them on/off here 🙂
Show Inactive Clip Phase
If On, the Clip Phase bar for ALL clips is shown even if they are not playing. This can be useful when knowing when to swap from one clip to another on the same channel that is a different length so you don’t cut into e.g. the middle of a vocal clip.
Show Touch Circle
All Touches are visually indicated by a circle, useful for demonstration.
Scope Settings

Scopes are a brand new visual function within Jamm Pro, creating an audio-reactive abstract lightshow. This feature is off by default, in order to respect that our users may not desire it due to either personal preference or for health reasons, the first time you turn it on, you will be asked to confirm that you acknowledge the risk to those with photosensitivity and/or Epilepsy. If this is you, we recommend hitting “Cancel” which will leave Scopes disabled.
From there you get a choice in how Scopes operates, and we hope to continue expanding the capabilities of this function, so stay tuned for updates.
Polar/Rect: Describes the shape of the scope visual, centred within the specified output location.
XY/Full Screen: By default, the visuals live within the XY pad, this is present on the Play and XY pages. Full Screen appears on every page, you may find this too distracting during set building or performance, so we made it a toggle.
Color: Red, Green, Blue.
Feedback: Increase the intensity of the scope, and how much visual feedback and ghosting is generated by the visual. Also desaturates the colour a bit.
Scopes will also capture live inputs when monitoring is enabled. This will follow whatever location/colour/feedback settings you set above.
Init Recent Set
Loads the set you used last on launch of Jamm Pro, loads Quantum Trap by default on a clean install.
Autoplay
When loading a set, it will start playback automatically, by default this is off, but if you prefer how Ninja Jamm operated, you may enjoy this setting.
Mini XY global Settings
Three Settings control the way in which all Mini XY controls in the app respond to touch.
Mini XY Range
Sets the active range with 1x1 being the smallest and 3x3 the biggest range.
Mini XY Type
Controls the behaviour when one touches a Mini XY slot: Relative means that the effects are controlled relative to where the initial finger touch down was detected, Absolute means that the control is not relative to the initial touch down decision. This can be set separately for X and Y but is global for all Mini XY controllers.
Mini XY Start
also controls touch behaviour. If set to Instant, the Mini XY has an instant effect on whatever it's controlling If set to WaitMove, it waits cunningly until it detects a finger movement before activating.
Audio Buffer Size
256/512/1024/2048
The newer/more powerful your device, the lower value Buffer Size you can generally afford and the better touch response you get. But if you hear glitches and clicks you may have to increase the Buffer Size. This is an issue for all audio software in one form or another.
Latency Compensation
On/off- toggling this may help reduce latency problems, and forces the app to recalibrate latency.
On Android, there are further options for Automatic or Manual calibration of Latency Compensation. Automatic generally works fine though, and matches up to external testing data.


On iOS/MacOS you can choose to enable/disable Recording and Monitoring (REC / MON) latency compensation separately, this is to allow for the variances in external plugins that integrate with Aum or Audiobus, sometimes the latencies get weird, so it's worth experimenting.
Audio Selector (iOS)

Choose your audio output, summons the airplay menu for ease of access,
Link

Turn on and off Link , the excellent Wifi synchronising system from Ableton. To get devices to play at the same BPM and in sync used to be a huge pain. Link makes it easy. Just get the devices you want to Sync on the same Wifi network and turn Link on.
On iOS this also applies to using InterAppAudio to e.g. record from an app into Jamm...if the source app has a BPM, then if you can turn Link on for that app and for Jamm, they will be in BPM sync for tight grooves.
Further Assistance
Don't forget the HowTo Video series if you wish to see specific functions in action. We also have a Discord Server, or can be found on Social Media platforms, if you need any help or need to report a problem. We’ll try our best to resolve your issues quickly.
Twitter
File Management Guide
This section of the manual is a general guide on moving files between devices, aimed mainly at allowing you to share your sets or back them up. We have organised this per platform interaction e.g. iOS to Windows, iOS to MacOS. Remember, redundancy is best with backups, so always have a secondary option active.
iOS/iPadOS
To and From MacOS or other iOS based devices
All Jamm Pro Sets live in a sub folder on your iPhone or iPad. “On My iPhone”/ “On My iPad” > Jamm Pro > Packs, a quick and easy way to send these to MacOS is to long press the folder and Share via Airdrop to the external Apple device over your wifi network.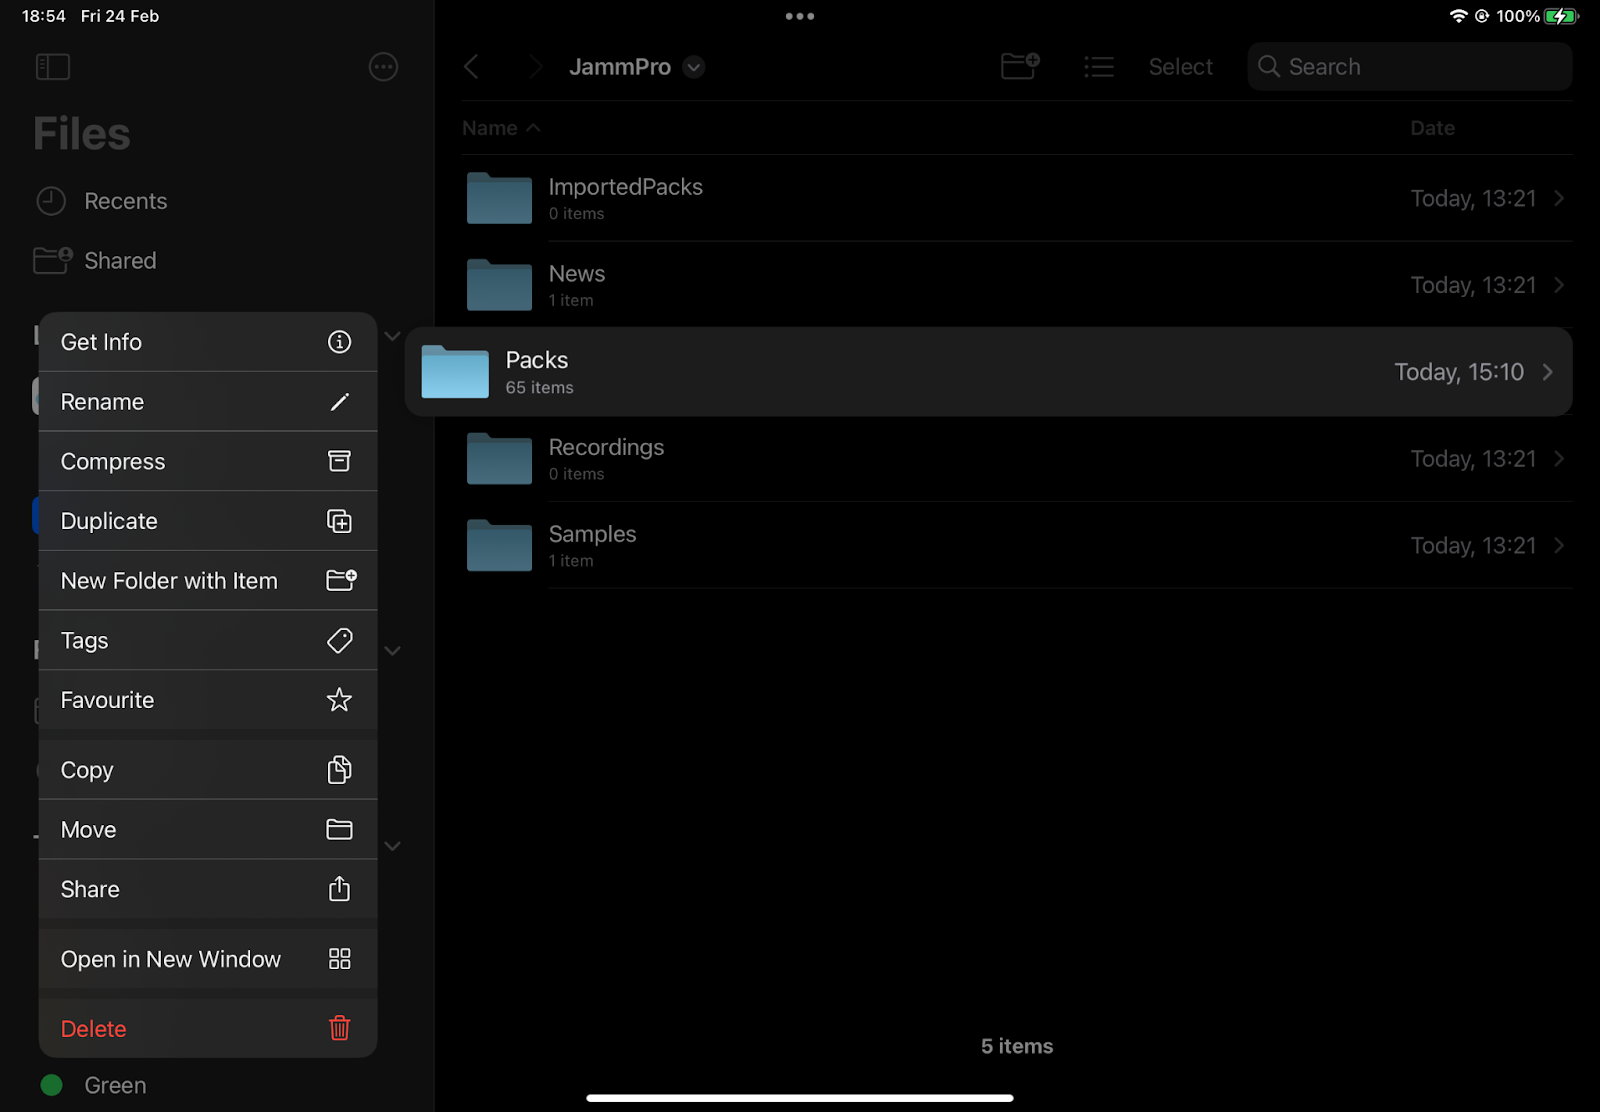

It’ll usually deposit these files and folders in your Downloads.
This also goes for the other way round, Airdrop is a stable and reliable solution for file transfer. A prompt will appear allowing you to open files in an app, usually Files would be best, so you can choose a storage destination for samples and such.

If you lack an internet connection, you can set one up from a host device such as an iPhone (Personal Hotspot) or Mac (Internet Sharing).
Make sure that any files you’re sending for use in Jamm Pro stick to alphanumeric characters, underscores are okay, but anything else tends to cause weirdness.
If you would rather send your files to a Mac over USB, connect up your iPhone or iPad and unlock access with your pin code. It’ll appear in your Locations in the Finder, under whatever name you have assigned your device.

Once you select the device, you’ll be presented with a wide variety of file management options, mostly related to backing up and syncing media. Go to the Files Tab.


Here you can copy and paste or drag and drop content, such as samples or Pack folders from your apple devices.

If you don’t see every folder on your iPhone or iPad, this is normal, only public App specific folders are made visible. As long as you stay organised it shouldn’t cause much of an issue.
To and From Windows
Sending files from an iOS device to Windows requires iTunes.
Connect your iOS device to windows and allow access.

Open Itunes

Select the device icon.
Go to ‘File Sharing’

Select Jamm Pro, from here you can select and ‘Save’ the packs folder as a backup, it’ll ask you to choose a save location on your computer’s drive. Give it a sec to complete the operation.
If you want to add Jamm packs, you can’t deposit them directly into the Packs or ImportedPacks location, so add file or drag and drop into that top level location and then go across to your iOS device and either move the file using the Files App or import a zip from within Jamm Pro Store ‘Import a Set’.
To and from iCloud
If you are signed into the same apple ID on both devices you can sync content over iCloud. This appears as a destination in both the MacOS finder and iOS files manager. The Free tier of iCloud provides 5GB of storage. Copy and Paste to the folder on your Mac or iOS device and wait for it to sync. iCloud tends to provide the most seamless cloud storage solution on iOS devices.
If you want to sync files from a windows computer to iCloud, grab the iCloud client for Windows from the Windows Store.
To and from Dropbox

Dropbox provides 2GB of storage for free. Dropbox file integration with iOS works best relying on the 1st party client rather than the Files app. Find your Zip and choose ‘Save to Device’ to open the ‘share’ menu. The default file manager can sometimes get stuck copying and pasting dropbox files, so this is a foolproof method of downloading your files.

Save to Files and choose ‘Jamm Pro/Imported Packs to have Jamm Pro Extract the set when you next boot.
If Jamm Pro is already open, choose another location and then from the store menu manually import the set.
If sharing a set with a friend, they can download zips from dropbox directly in their browser (e.g Safari.) This’ll save the zip file in your Downloads folder.
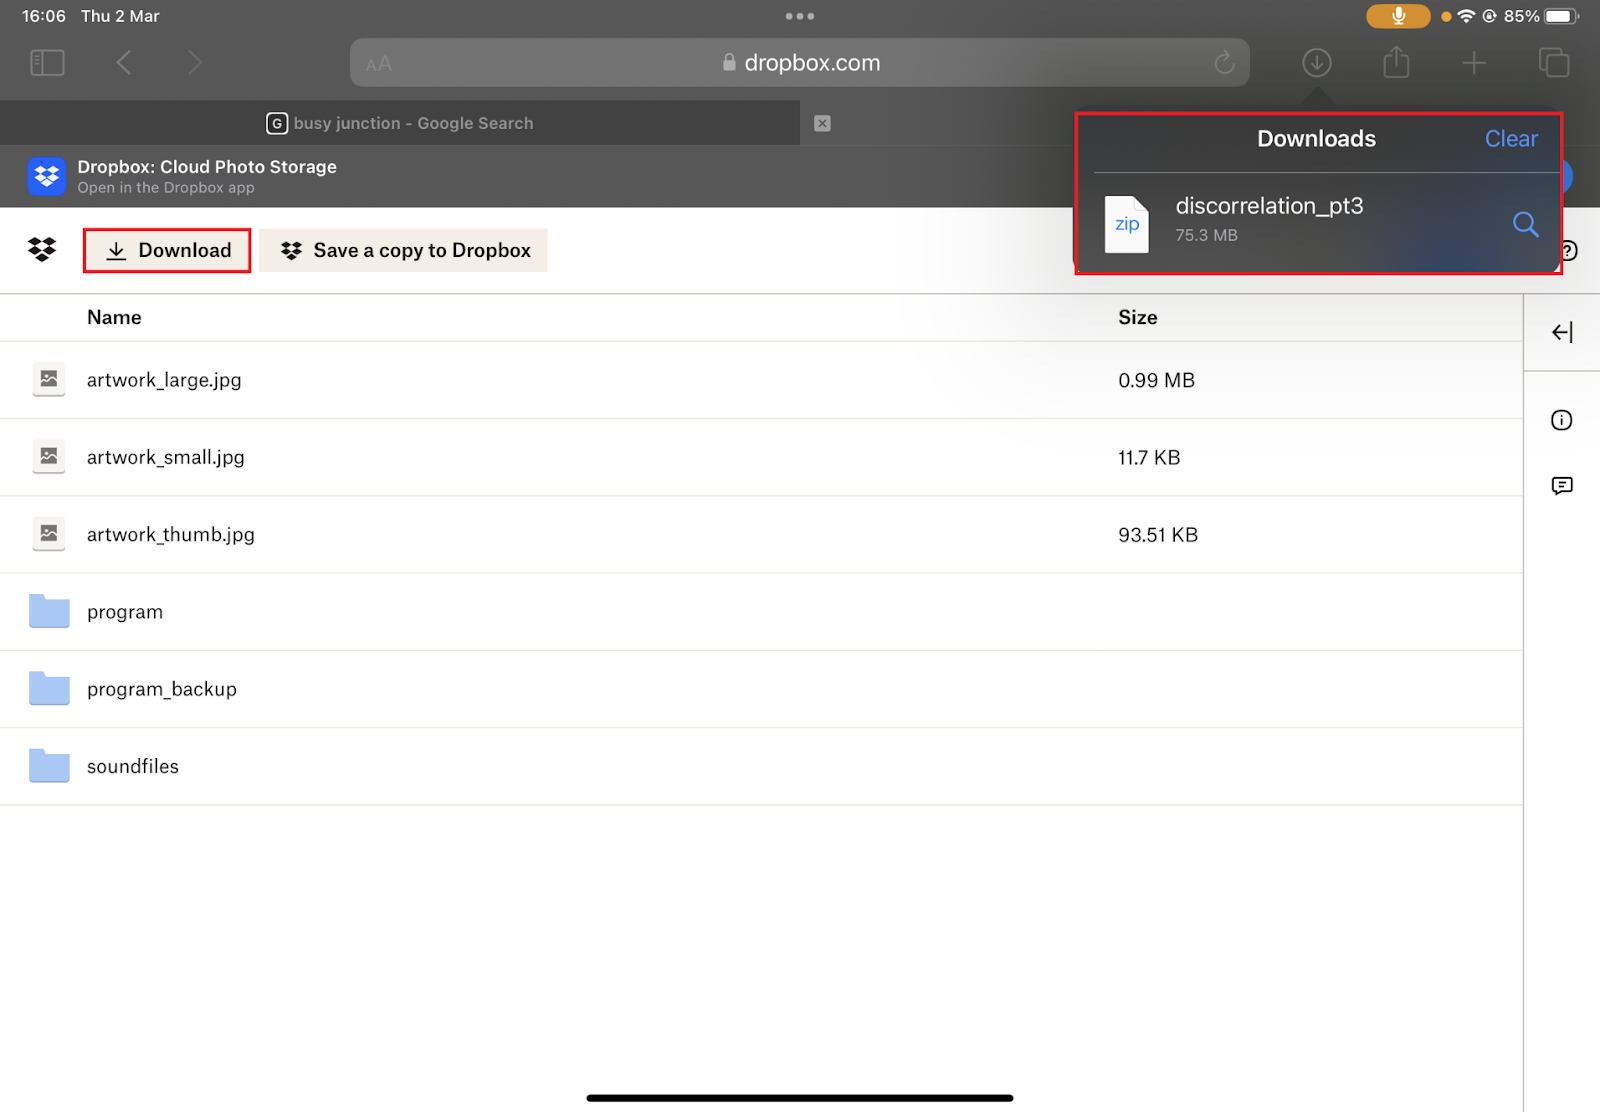
Don’t extract the set, you can do this from within Jamm Pro.
Open Jamm Pro and hit the hamburger menu. Import a Set, then go to your downloads folder and choose the Zip, wait for Jamm pro to finish extracting and loading the set, it’ll refresh the store when it has completed this.

When it’s time to upload a set to dropbox, from within the set,
‘Export and Close’.

Choose ‘Full Set’ as this packages everything important up. You will be returned to the store and the iOS share menu will open, pick dropbox and choose the folder to save the set to, be patient, a progress bar will appear on the bottom half of the screen, you’ll then be able to dropbox app and view the upload, or copy a link to share with others.
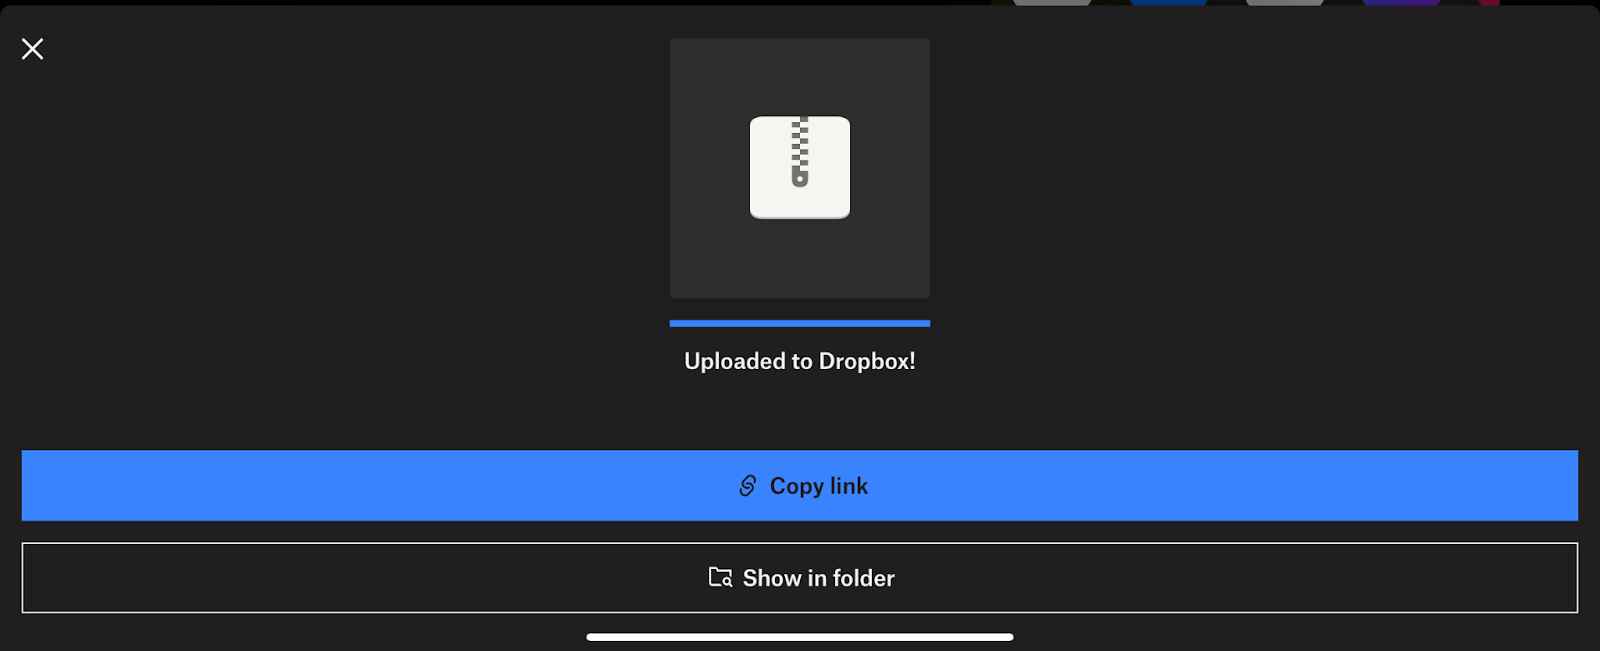
To and from Google Drive
Google Drive provides 15GB of storage for free. On iOS google drive’s integration with the files app has a cap of 500 files visible, the best way to manage your files here is to use folders, which are organised in alphabetical order. Make one called Jamm Pro Sets where your exported zips can live, and another called Jamm Pro Samples. If you want these to appear at the top of your drive list, name it 1-Jamm Pro Sets.
If you’re importing a set from Google Drive use the ‘import a set’ function in the Jamm Pro Store, then go to the location in Google Drive and find the zip you stored there. Unfortunately the ‘Star’ system doesn’t integrate with the iOS files app.

As with all cloud storage solutions, there’s a latency, so please be patient and let your device download the pack or sample. It may take a sec.
To and from Microsoft Onedrive
OneDrive provides 5GB of storage for free. When the OneDrive app is installed on your iOS device, it will show up on the left side of your file manager as a destination. Usually the top level folder will contain ‘Files’ ‘Libraries’ and ‘Shared’. You’ll probably want to use Files. If you’re importing a set from OneDrive use the ‘import a set’ function in the Jamm Pro Store, then go to the location in OneDrive and find the zip you stored there.
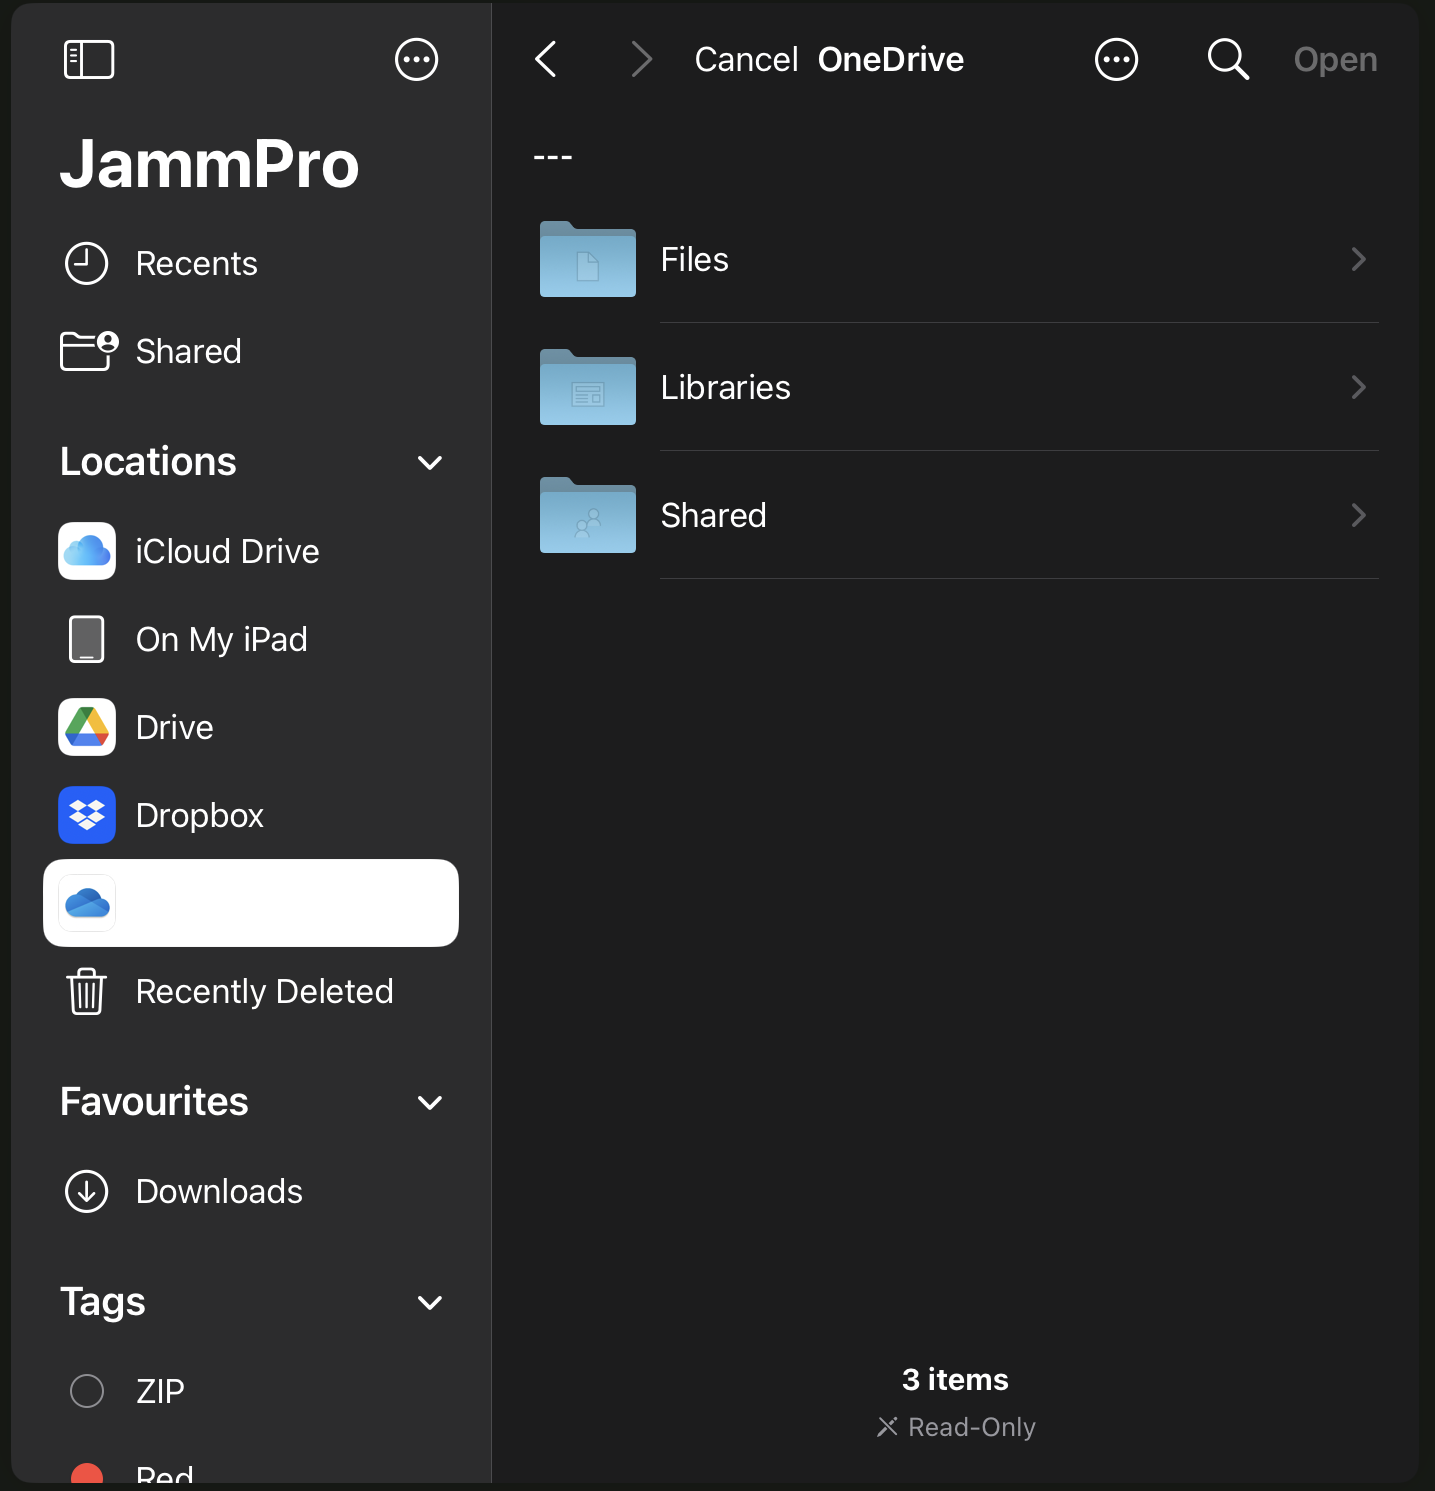
Android
Android has a largely variable integration with different storage clients, though most devices support external storage and some even come with support for MicroSD cards, this is not guaranteed. For USB storage and External HDDs to work on an android device it must support USB-OTG, sometimes this is mentioned in the manual for your phone or tablet, GSMArena often mentions the specification under the “COMMS - USB” category.
Thankfully connecting an android device to a PC/Mac computer is pain free.
To MacOS
To connect your android device to your Mac you will need the USB cable and the Android File Transfer program.
Once that is installed, connect up your android device. Grant Access by tapping Allow. If you miss the prompt, or deny it, you have the chance to change this later from the Notification tray.
Once Access has been granted, your device will be visible in the File Transfer application. From here you can transfer samples, or zipped Jamm Pro Sets (They have to be Zipped to use the Set import function in the JP Store, if you’re sharing sets between devices/friends make sure to read up on Export and Close.
Make sure that any files you’re sending for use in Jamm Pro stick to alphanumeric characters, underscores are okay, but anything else tends to cause weirdness.


To Windows
Connect your android device to your Windows PC via USB and grant access. USB functions are accessible from the notification shade when connected.
Once connected, your android device will show up as a mass storage device in the Windows Explorer application. If your device has an SD card installed, this will show up as a separate partition.

You can copy and paste files back and forth as required. Samples can be sent across as they are, in folders you’ve organised. Sets must be in their packaged ZIP format to be loaded into Jamm Pro on Android, this is a limitation of storage permissions on Android. See Export and Close for packaging up a Jamm Pro Set for sharing with others.

Nearby Share

You can share files between your Microsoft Windows and Google Android devices wirelessly with ‘Nearby Share’ this feature is in beta on Windows and requires the installation of an app ‘Nearby Share Beta from Google’. System requirements here are Windows 10 or later, bluetooth and wifi support. On the Android device, google says it’s integrated into every android version from 6 onwards (Marshmallow). On stock android, it’s usually at the top of the share menu.

Once you’ve installed the app and signed into your google account, you will be able to name your windows device, and select sharing conditions, right now ‘receive from your devices’ seems to work best.
Once you’ve set your devices up to share this way, every file you send will ask for confirmation/approval to receive the file. This makes it safer for sharing with “everyone” in an area, and a viable option to trade samples and videos and such with your friends. 
To and from Dropbox
When the dropbox app is installed on your android device, it may show up in the files manager as a destination. Dropbox provides 2GB of storage space for free. If you can’t see it in the file manager, use the app to save zips to your local storage then find the file and hit the 3 dots > share > send copy of file >Save to Device. By default this’ll choose your downloads folder.
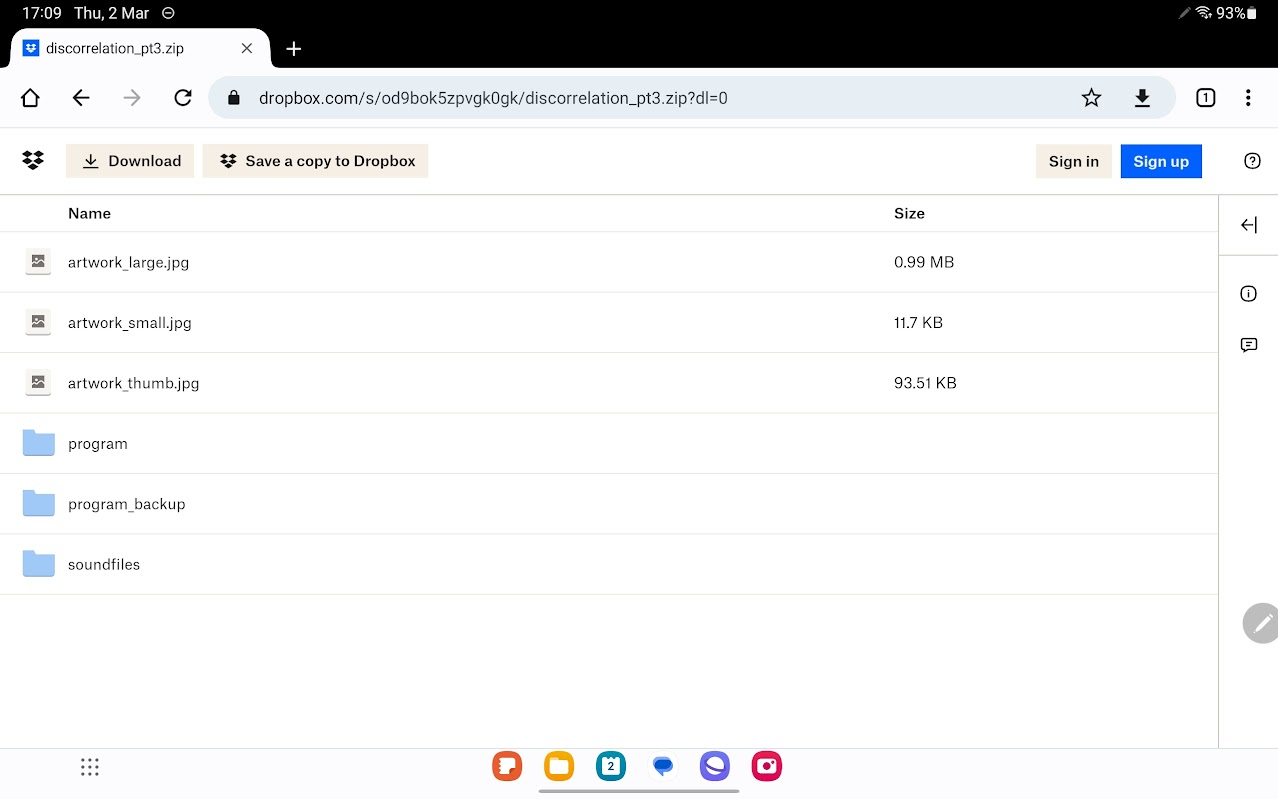
If you’re using a dropbox link, hit the download button, your zip will now be in your local storage > Downloads folder.

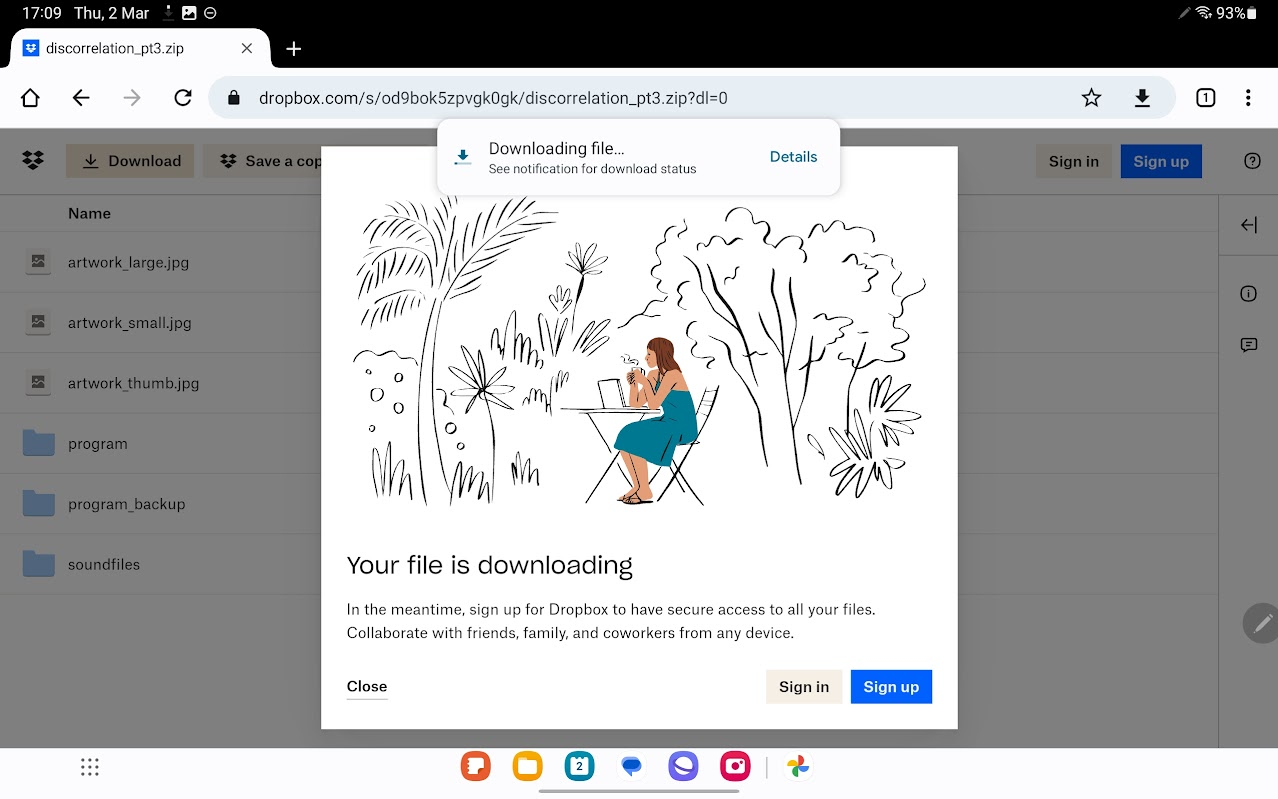
From the Jamm Pro Store, tap the hamburger menu, then ‘Import a Set’.

If you’re importing a set downloaded to local storage from Dropbox, if your options in the ‘Downloads’ tab are greyed out, use the ‘device name’ location, then go to the downloads folder. Some android devices are weird.
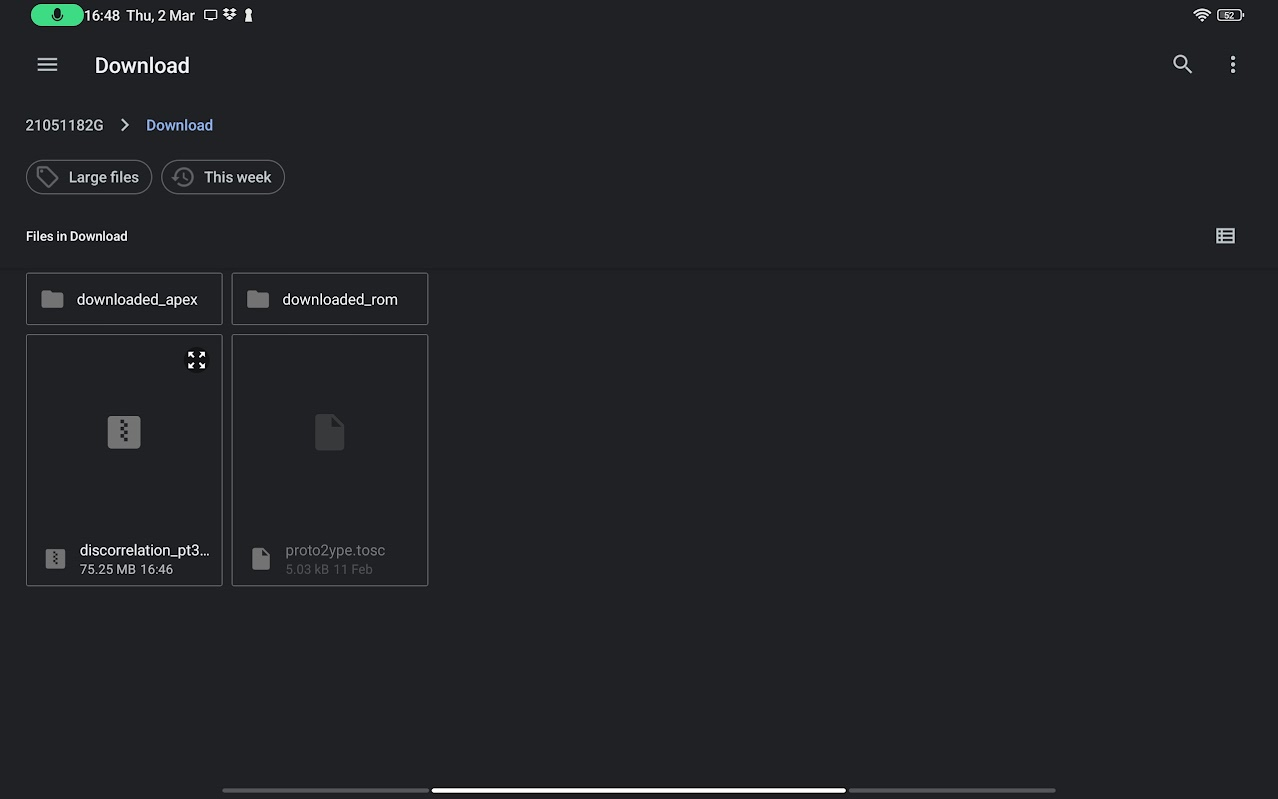
In your file manager select a location where your Zip is located, if that’s a dropbox location, use the entry on the bottom section of the “open from” dialogue.
Wait for Jamm Pro to finish extracting your file, the store will refresh and your set will be ready to use.
To and from Google Drive
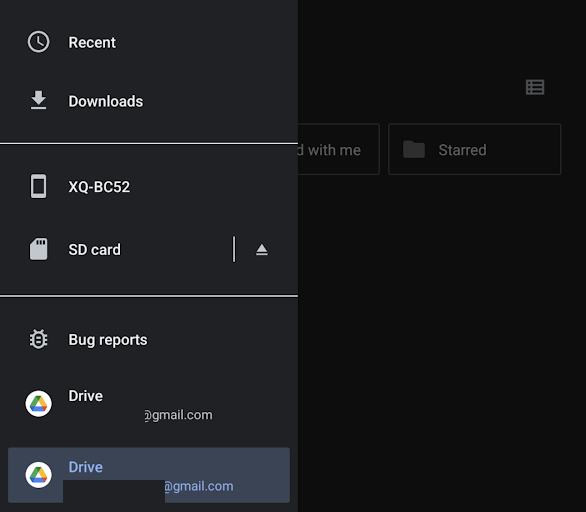
Google Drive is usually installed on android devices by default. Google will provide 15GB of storage to users for free, but this is shared with your email inbox and photos backup, so it's easy to run out of space.
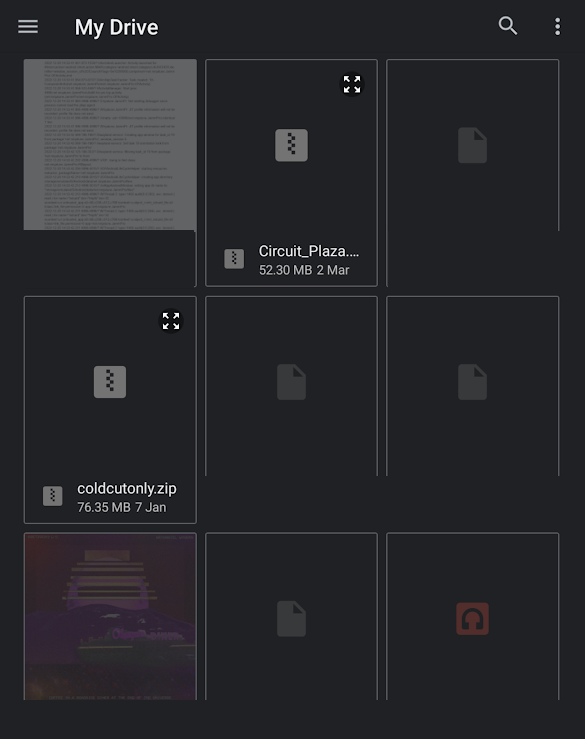
The best way to manage your sets is to use the integration with the default file manager. When using ‘Import a Set’ (from the Jamm Pro Store Menu) Zip files will be selectable for download and extraction within Jamm Pro. Wait a moment during this process, it’s heavily dependent on your internet speed.
When Exporting a set to Google Drive, an upload progress bar appears in your notification shade, the default behaviour with this is to wait till you are on a WIFI connection.
To and from Microsoft Onedrive
When the Onedrive app is installed on your android device, it usually shows up in the files manager as a destination. Microsoft provides 5GB of storage space for free.
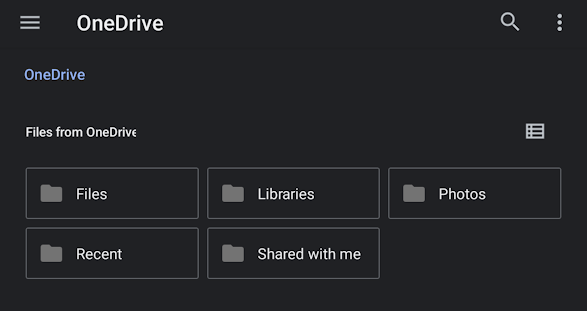
This means you can import sets directly from a OneDrive account, Like with other methods, an eligible Zip folder will appear selectable in your file manager. Right now direct export to OneDrive is not supported on Android (honestly not sure why it doesn’t integrate like other apps) In that scenario, export the set to local storage and then using your files app, share, choosing OneDrive as a destination.


Problem Solving FAQ
Is Bluetooth Audio supported?
Yes, with a few caveats.
On Android
Connect your bluetooth device, and if needed use the android media output manager (in the notification shade) to select your output, though usually it’ll autoconnect and assign the output. “Sampling In” won’t use an inbuilt bluetooth headset mic, defaulting to the device’s own microphones. Monitoring Latency is poor, due to inherent limitations with Bluetooth, This also applies to stab triggering and other fx activations to some extent.
On MacOS (ARM Apple Macs only)
Audio is handled by Mac’s audio system, so use that to assign your audio outputs, latency will take a hit, and microphone support will not be enabled over bluetooth.
On iOS
There are two ways to achieve a bluetooth connection in Jamm Pro.
Option 1: Directly.
Step 1: Load up Jamm Pro, and choose a set.
Step 2: Turn your Bluetooth on.
Step 3: Once your bluetooth output is connected, you need to go to the apple audio menu in the control centre, you may have to flick back and forth between the default “ipad/iphone” speakers and your bluetooth device. You may find that your set playback sounds funny, like it’s been pitched up, this is an error caused by sample rate issues on the bluetooth stack, please restart Jamm Pro and follow Steps 1-3 again.
Latency is negatively impacted in a similar way to how it is on android, this is a limitation of bluetooth technology. Also the microphone input is disabled during bluetooth audio playback, this is a limitation with iOS that we haven’t found a good workaround for. This is a good discussion of the issue.
Option 2: Via Audiobus
Follow the instructions for routing audio via audiobus, and change the output destination to your bluetooth audio output.
Again, latency will be negatively impacted.
Lobby the Bluetooth group for better audio performance!
A quick search on the Bluetooth SIG was not encouraging :(
I purchased 1.2 or earlier and now it’s asking for money for functionality?
With the 1.5 update, we’ve switched to an IAP for functionality unlocks, if you purchased Jamm Pro in its original form, please update the app to 1.5+, load the app into the store, hit the 3 lines on the top left and “restore my purchases” to redeem the ‘Jamm Creator’ pack at no additional cost to yourself.
Glitchy audio/ Clicks when changing Patches and Pages
Try increasing buffer size to 512 or 1024 in Settings. This can also help with performance on older devices. Playback stops when buffer size is changed so needs to be restarted. On Android, some devices like being restarted after an app is installed/updated to “optimise” the application,
Audiobus/AUM doesn’t work?
The Audiobus app allows other iOS apps to be loaded as Inputs and then be routed as Outputs into Jamm Pro , so they can be recorded. There are issues with iOS and IAA which affect not just Jamm but many apps.. For both Audiobus and AUM we have found that it works best if one loads Jamm from the home screen, NOT from within AB/AUM. THEN when it’s loaded, select Jamm as the output or insert effect. It also may be better to load the source /input app (ie what you are recording from) from the homescreen THEN select it in Audiobus.
No sound when doing a screen recording + using Audiobus + soundcard plugged in?
Yes, this puzzled us too! This particular situation also affects ALL other apps inc Apple Music.
When Loading samples, Ipad folders or Dropbox or other Cloud services are not be accessible
In our experience, the Apple Files app -which has to be used for all file operations- can become stuck and not work properly across the board, both for local and cloud service folders.
Sometimes, the Jamm Pro folder cannot be seen but other On My Ipad folders can.
Another symptom of this is frozen or non response folders/files where tapping on them does nothing, and another frequent one is where an entire cloud service or local app's top level directory can't be accessed or will show garbled icons with overlapping images and/or text. Sometimes when this occurs one gets an error message displayed across the folder's content view that says something along the lines of "this folder cannot be accessed".
We don't know exactly what triggers it because we’ve experienced it with various apps; the most common issue run into is actually when moving pictures to/from Files app, especially if there are a lot of files at once.
Try opening and closing the Files app. In severely stuck cases, a reboot of the Ipad should sort it.
Hopefully iOS improvements will solve this, it’s beyond our control. We’ve reported it to Apple.
Stabs won’t play/something else is not active
Are you paused? Stabs won’t play unless the app is playing. And other operations also...Jamm only works when it plays :)
I want to be able to update all the Patches at once with a tweak
Yes, and you can. The Patch system is so powerful because it saves (nearly) everything. Say you have worked forward Storing a series of Patches, using each as the basis for the next. But say you find a setting that you want to improve in all the Patches you’ve stored, like Sub Bass Level . You would have to recall each one, make the change, and resave Each. Looong. EXCEPT we have made a special ‘Macros’ Helper function that is like a Batch assistant to update multiple Patches at once. Currently hidden till it’s perfected.
I can’t install my purchased sets? Help!
Please attempt the following.
1. Restart Jamm Pro
2. ☰ > Restore Purchases.
If this doesn’t fix your issue.
1. Open your files app on iPad
2. ‘On My iPad’
3. JammPro Folder
4. Back up the contents of the folders within, just in case.
5. Uninstall JammPro
6. If Ninja Jamm is installed, uninstall that too.
7. Make sure the AppleID in use is the same one you purchased Jamm Pro and the packs with.
8. In the AppStore, Verify your payment methods are active.
9. Reinstall Jamm Pro.
If you’re still having issues, the best we can advise is to contact Apple themselves, to make sure your AppleID is working correctly.
The Set opened at the wrong tempo?
Make sure that when you make changes within a set, you are saving a copy of the set, and not overwriting the original.
Also:
Check the status of Link, if you’ve had another device connected, Link will preserve the tempo information of the whole session. Try turning this off and then reloading the app or pack.
Why doesn't Jamm do….
We plan to take the app a lot further...we are a small team...your support is appreciated…
Here are some features some of which are in development...
we know we want:
Better quality Timestretching /Pitch Shifting
Multiple XY multi effects and programmable XY params assignment
Ability to properly evolve a Slice Shuffle so evolve ‘inherits’ from the previous state
Mini XY /tip control for CCut Slot buttons
You are welcome to discuss and suggest features on the official Jamm forum at Discord here and the Audiobus Jamm forum here
I’m getting a crash I can’t explain, help?
Please check your internet connectivity when loading up Jamm Pro, if you’ve been using ableton link, there’s a possibility that your link session has been corrupted. Turn your wifi connection on your device off, and then load Jamm, go into a set, turn Ableton Link off and then back on to reset the link session, then restore internet connectivity.
If you’re using multiple link devices, we recommend choosing a stable hotspot connection to host them, preferably one that doesn’t have much other work to do, keeps it from overloading. If you use an android device as a link hotspot, turn data off for maximum stability, leaving it to act as simply an ad-hoc WIFI network.